Table of Contents
Advertisement
Quick Links
Advertisement
Table of Contents

Subscribe to Our Youtube Channel
Related Manuals for Atag Combi Steam SQ4111B


Summary of Contents for Atag Combi Steam SQ4111B
- Page 1 SQ4111B SQ4192B manual art.nr. 88026937...
-
Page 2: Table Of Contents
Contents Control Panel ............. 4 Oven Features . -
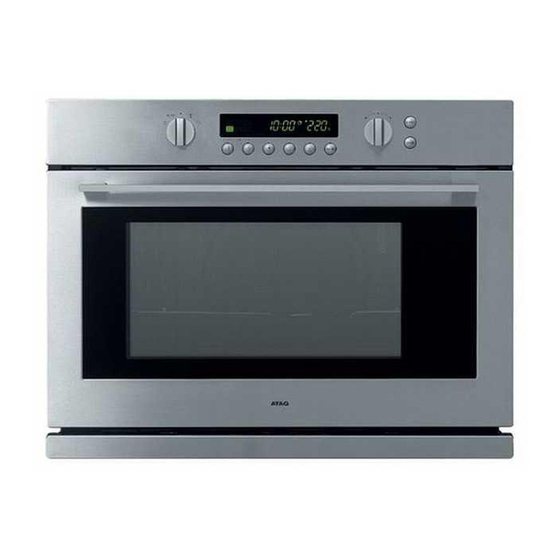
Page 3: Control Panel
Control Panel Oven Features Control Panel Top Heating Elements Oven Light Level 6 Steam Outlet Level 5 Level 4 Water Tank Level 3 10 11 12 13 14 15 Level 2 Evaporator dish Level 1 1. OFF 12. START TIME Door 2. -
Page 4: Accessories
Using This Manual Accessories Thank you for purchasing this ATAG Combi Steam Oven. The following accessories are provided with your Combi Steam Oven: Your Owner’s Manual contains important safety instructions and essential infor- mation on using and caring for your new Combi Steam Oven. -
Page 5: Safety Precautions
Using This Manual (Continued) Using This Manual (Continued) Safety precautions Important information about the use of the appliance This appliance is intended only for domestic use. This Do not use the cooking compartment door as a shelf. appliance must only be used for food preparation. Do not store any food in the appliance. -
Page 6: Causes Of Damage
Using This Manual (Continued) Filling The Water Tank When you open the cooking compartment door, you will see the water tank on the right-hand Causes of damage side. Only fi ll the tank with fresh tap water or with still bottled water. If your water is very hard, Very dirty seal If the seal on the outside of the cooking compartment is we recommend that you use softened water (see also “Water hardness). -
Page 7: Setting The Clock
Setting The Clock Modes And Settings When the appliance is fi rst plugged in, the display lights up. The following table represents the various oven modes and settings of your oven. Use the cooking guide tables for those modes as guidelines for cooking. Setting the Clock (example 15:15) Steam Mode Food is cooked by steam provided by the steam generator and injected... -
Page 8: Default Settings
Modes And Settings (Continued) Default Settings During blinking of the default cook time or default temperature (after you have Defrost choosen a setting with the FUNCTION KNOB), you can change the time or Frozen food is defrosted by steam. The steam is provided by the steam temperature by turning the SELECTION KNOB. -
Page 9: Using The Steam Mode
Using The Steam Mode Using The Steam Mode (Continued) If there is too little water while cooking, you will see the Steam Mode Setting symbol in the display along with a beep being played. Add water into the tank and press START to continue with the steaming. - Page 10 Using The Steam Mode (Continued) Using The Steam Mode (Continued) Steam Mode Setting Steam mode Food Item Accessory (shelf level) Time (min.) (°C ) Food is cooked by steam provided by the steam generators and injected into the cavity by two jet nozzles. Boiled Eggs Steam dish with gastronorm rack (3) 100 °C...
-
Page 11: Using The Combi Steam Mode
Using The Combi Steam Mode Using The Combi Steam Mode (Continued) Combi Steam Mode Setting Combi Steam Mode Setting Food is cooked by convection mode and the help of steam. The steam is provided by the steam generators and injected into the cavity by interval. Place the multi pan on level Fill the water tank up to the maximum Turn the FUNCTION KNOB to Combi... -
Page 12: Using The Reheat Mode
Using The Reheat Mode Using The Convection Mode Reheat Mode Setting Convection Setting Fill the water tank up to the maximum Turn the FUNCTION KNOB to Con- During blinking, turn the SELECTION Turn the FUNCTION KNOB to line and place it back. Then place your vection mode position (default: KNOB and set the desired tempera-... -
Page 13: Using The Grill Mode
Using The Convection Mode (Continued) Using The Grill Mode Convection Setting Grill Setting Food is heated by two heating elements on top of the cavity and one bottom heating element, while the fan on the side distributes the hot air evenly. Place the multi pan or wire rack on level Turn the FUNCTION KNOB to Grill During blinking, turn the SELECTION... -
Page 14: Cooking Time Reservation Function
Using The Grill Mode (Continued) Cooking Time Reservation Function Example by using the convection mode: Current time: 12:05 Grill Setting Cook time: 2:00 Food is heated by the top heating elements (horizontal position). Start time: you wish to start cooking at 16:00 For grilling, the grill insert with multi pan is usually placed on level Turn the FUNCTION KNOB to... -
Page 15: Using The Auto Cook Mode
Using The Auto Cook Mode Using The Auto Cook Mode (Continued) The following table presents 40 Auto Programmes for various cooking. The 40 Auto Cook features include/provide pre-programmed cooking times. You It contains its quantities, standing times after cooking and appropriate recommendations. do not need to set either the cooking times or the temperature. - Page 16 Using The Auto Cook Mode (Continued) Using The Auto Cook Mode (Continued) Serving Serving Code Food Recommendations Code Food Recommendations Size (kg) Size (kg) Fill water tank with fresh water up to maximum level. Put fl an Prepare 300 g pizza dough and roll out . Put on baking paper Homemade Pizza 0.6-1.0 S-10...
-
Page 17: Using The Defrost Mode
Using The Defrost Mode Using The Auto Cook Mode (Continued) Defrost Setting Serving Code Food Recommendations Size (kg) Fill water tank with fresh water up to maximum level. Put pork roast, brushed with oil and spices, with the fat-side down on the grill insert with multi pan, shelf level 1. -
Page 18: Using The Keep Warm Mode
Using The Defrost Mode (Continued) Using The Keep Warm Mode Defrost Setting Keep Warm Setting Use settings and times in this table as guide lines for defrosting. We recommend to always fi ll the water tank with fresh water to the maximum level. Remove all kind of package material before defrosting! After defrosting, let the food stand at room temperature for 15-30 minutes for an even distribu- tion of the heat. -
Page 19: Using The Memory Mode
Using The Memory Mode Using The Memory Mode (Continued) You can store 3 individual programmes in the memory and call them up at any Starting the memory function time. The memory is useful if you prepare one dish particularly frequently. It is very easy to start the stored programme at any time. -
Page 20: Setting The Water Hardness
Setting The Water Hardness Descaling It is necessary to descale your appliance at regular intervals. This is the only way to prevent When you see the message on the control panel, the machine needs to be damage. descaled. Your appliance has a system that automatically displays when it needs descaling. It is preset to a water hardness 4. -
Page 21: Using The Steam Clean Feature
Descaling (Continued) Using The Steam Clean Feature The Steam Clean feature allows you to sanitize your oven in just 10 minutes. The STEAM CLEAN process takes 7 minutes, and the standby time for the process is 3 minutes. In these 3 minutes the steam will soak all the leftovers and you can wipe them from the ceiling or walls with a soft cloth. -
Page 22: Cleaning
Cleaning (Continued) Cleaning Cleaning the oven surface, control Cleaning the top grill panel and window ► Opening the top grill to the left or ► The surface of the oven can right, as shown in the figure, will be wiped with a wet dish towel, facilitate cleaning. -
Page 23: Switching Off The Beeper / Reading Out The Temperature
Switching Off The Beeper / Reading out the temperature Child Safety Lock The oven beeps at the end of cooking and “End” blinks 4 times on the display. The oven’s Child Safety Lock allows you to lock the control panel to protect the oven against unintended use. -
Page 24: Cleaning And Care
Cleaning And Care Changing The Oven Lamp Removing the Cooking Compartment Replacing the oven lamp and cleaning the glass cap You can remove the oven door for easier cleaning. 1. Take off the cap by turning counterclockwise. Do not reach into the door hinges. There is a risk of injury. 2. -
Page 25: Error Codes
STEAM SENSOR SHORT DESCALE MAX. TIME OVER (or STEAM USE MAX TIME OVER) In case the steam operating time after the descaling message has been passed. If any of these errors occur, please contact ATAG Customer Service. - Page 26 Code No.: DE68-03594A...
Need help?
Do you have a question about the Combi Steam SQ4111B and is the answer not in the manual?
Questions and answers