Table of Contents
Advertisement
Quick Links
Advertisement
Table of Contents

Related Manuals for Crestron RACK2


Summary of Contents for Crestron RACK2
- Page 1 Crestron RACK2 2-Series Card Cage System Operations Guide...
- Page 2 This document was prepared and written by the Technical Documentation department at: Crestron Electronics, Inc. 15 Volvo Drive Rockleigh, NJ 07647 1-888-CRESTRON All brand names, product names and trademarks are the property of their respective owners. ©2003 Crestron Electronics, Inc...
-
Page 3: Table Of Contents
Establishing Communication with the RACK2... 21 Troubleshooting Communications ... 23 Compiling and Uploading a Program to the Control System ... 25 Uploading Web Pages to the RACK2 ... 26 Uploading Touchpanel Projects via the RACK2... 27 Updating the Operating System... 27 Running Programs From Compact Flash ... -
Page 5: 2-Series Card Cage System: Rack2
The RACK2 is an integral part of the Crestron system technology featuring the newest series of Ethernet/LAN compatible control systems. The RACK2 is a modular “card cage” control system that includes the CPU2 (central processing unit) and the NET2 (Cresnet RACK2 offers the ultimate in flexibility and customization. - Page 6 Cresnet expander hub (NET2), it's the highly configurable solution for even the most sophisticated A/V applications like media help desks, command and control centers, distance learning, and head ends. At the heart of the RACK2 is the breakthrough 2-Series Control Engine, based on the hot new 257 MIPS, 32-bit...
-
Page 7: Specifications
RACK2 (which includes the CPU2 and NET2) plus the combined requirements of all expansion cards. Do not exceed 75 watts for total load factor of a single RACK2. Listed weight is for RACK2 with CPU2 and NET2 (no other expansion cards installed). -
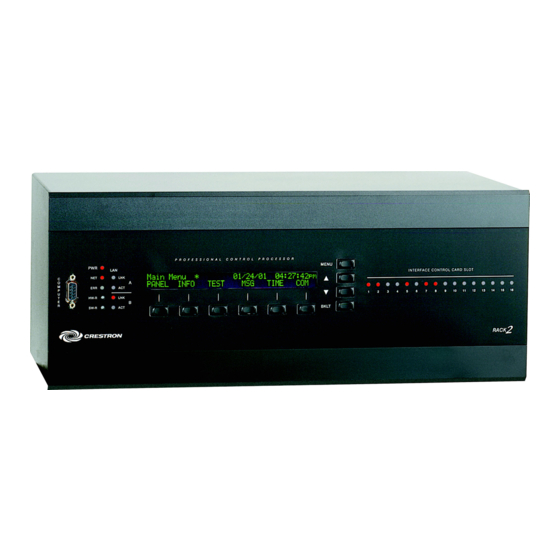
Page 8: Physical Description
2-Series Card Cage System Physical Description The RACK2 is housed in a black enclosure with silk-screened labels on the front panel. On the front panel are: RACK2 Front View 4 • 2-Series Card Cage System: RACK2 • A single RS-232 computer port (in parallel with the port on the rear panel) •... - Page 9 Crestron RACK2 RACK2 Rear View (Shown with optional Z-Bus and Y-Bus cards installed) Operation Guide – DOC. 5958 The rear panel provides 16 open expansion card slots and contains the CPU2 processor and the NET2 Cresnet Hub interface. • One Cresnet connector (on CPU2).
- Page 10 2-Series Card Cage System Crestron RACK2 RACK2 Physical View – Front 6.97 in. (17.70 cm) 17.28 in. (43.89 cm) RACK2 Physical View – Side 8.50 in. (21.59 cm) 6 • 2-Series Card Cage System: RACK2 Operations Guide – DOC. 5958...
-
Page 11: Expansion Slots
Slot 3 Slot 4 Four rubber feet (supplied) can be affixed to the bottom of the RACK2 to provide stability and to prevent slippage when mounted on a flat surface. The unit may also be rack mounted by attaching metal flanges, known as ears (supplied), to each end. - Page 12 2-Series Card Cage System RACK2 Ports There is only one port on the front panel of RACK2, labeled COMPUTER. All of the other ports are on the rear side. COMPUTER These 9-pin DB9 female connectors (one on the front panel and one on the rear panel COMPUTER in the CPU2 section) are used when programming the RACK2 with a PC.
- Page 13 (PWR) located to the right of each row of connectors. NOTE: Do not operate RACK2 when NET2 is not installed. The RACK2 system offers a great deal of data and power connection flexibility. Control Connections You may choose to control the NET2 hub using the CPU2 or you may use an external control system.
- Page 14 (75 watts, max.) connected to the CPU2, remove the jumper from the 3-pin mini connector to disconnect the internal power supply, then connect the (Crestron 24 VDC - regulated power supply) 24 VDC to the EXT terminal and ground to the G terminal.
-
Page 15: Reset Buttons
23). Pressing it alone momentarily while the system is running restarts the program. RACK2 Indicators There are 23 LED indicators on the front panel of the RACK2 and 10 LED indicators on the rear panel. This LED illuminates when the RACK2 receives power from the external power supply (sold separately). - Page 16 RACK2 LCD Screen and Buttons The front panel of the RACK2 incorporates a reverse mode (yellow on black) LCD screen, as shown in the following illustration. The screen contains two lines with up to 40 characters per line; it is used to extend features and gain access to the system including the SIMPL program.
- Page 17 NOTE: Loss of power may cause the error log to clear. The following table lists and defines the four types of error messages that may appear. Operation Guide – DOC. 5958 2-Series Card Cage System menu selection buttons to 2-Series Card Cage System: RACK2 • 13...
- Page 18 NOTE: The up and down menu selection buttons to the right of the LCD screen may be used in lieu of the NEXT and PREV menu function buttons. NOTE: Currently, the Crestron Viewport is available as a pull-down command from SIMPL Windows and Crestron VisionTools standalone application.
- Page 19 Refer to "COM Analyzer" on page 42 for details. NOTE: Only COM-type devices and cards in the SIMPL Windows program that are active (not commented out) are monitored. Operation Guide – DOC. 5958 2-Series Card Cage System 2-Series Card Cage System: RACK2 • 15...
-
Page 20: On-Board Memory
File | Copy to CF function. SIMPL Windows makes the appropriate subdirectories. The same is true when you put web pages on the Compact Flash. The tools create the appropriate directories. 16 • 2-Series Card Cage System: RACK2 TOP LEVEL SECONDARY LEVEL... -
Page 21: Expandable Memory (Compact Flash)
Expandable Memory (Compact Flash) The onboard 36MB memory of the 2-Series integrated dual bus control system is enhanced with a 4GB expansion slot that supports off-the-shelf Type II compact flash memory and the IBM Microdrive panel of the unit. -
Page 22: Memory Card Installation
The following guidelines are provided to ensure your safety: 18 • 2-Series Card Cage System: RACK2 1. Loosen the screw that secures the memory slot cover located on the rear panel. -
Page 23: Network Wiring
(e.g., use of power strips). NOTE: For proper ventilation, allow four rack spaces when mounting. Two “rack ears” are provided with the RACK2 so that the unit can be rack mounted. These ears must be installed prior to mounting. Complete the procedure below to attach ears to RACK2 using a Phillips screwdriver. -
Page 24: Hardware Hookup
The serial cable to the PC may be attached to the DB9 connector of CPU2 on the rear panel or to the DB9 connector on the RACK2 front panel. Use the front panel or rear panel connector for setup and programming. -
Page 25: Establishing Communication With The Rack2
TCP/IP. Serial Connection NOTE: For laptops and other PCs without a built-in RS-232 port, Crestron recommends the use of PCMCIA cards, rather than USB-to-serial adapters. If a USB-to-serial adapter must be used, Crestron has tested the following devices with good results: Other models, even from the same manufacturer, may not yield the same results. -
Page 26: Tcp/Ip Connection
For TCP/IP, use CAT5 straight through cables with 8-pin RJ45 connectors to connect the LAN port on the RACK2 and the LAN port on the PC to the Ethernet hub. Alternatively, you can use a CAT5 crossover cable to connect the two LAN 22 •... -
Page 27: Troubleshooting Communications
RJ45 cables. Pins 4, 5, 7, and 8 are not used. RJ45 Pinouts Once the cable connections are made, open the Crestron Viewport and click Setup | Communication Settings on the menu to display the “Port Settings” window. Then click TCP/IP as the connection type. - Page 28 (e.g., for a modem). Consult the manufacturer’s documentation for further information about the COM ports on your 3. Check the ERR LED indicator on the front panel of the RACK2. If this LED is illuminated, unplug the unit and reapply power after a few seconds.
-
Page 29: Compiling And Uploading A Program To The Control System
SIMPL Program check box will be enabled. If it does contain SIMPL+ modules, then the SIMPL+ program(s) check box will also be enabled. Select one or both check boxes and then click Send Program to begin the transfer. 2-Series Card Cage System: RACK2 • 25 on the on the SIMPL Windows... -
Page 30: Uploading Web Pages To The Rack2
RACK2. Uploading Web Pages to the RACK2 NOTE: The Crestron default web host port is 80. Port 80 requires port 41794 to communicate to the SIMPL program. The RACK2 provides a built-in Web server for e-Control applications. The RACK2 allots 2.5 MB of memory for “user files”... -
Page 31: Uploading Touchpanel Projects Via The Rack2
To upload a project: Updating the Operating System As with all 2-Series control systems, operating system files for the RACK2 have a .cuz extension. You can obtain .cuz updates (when available) from the Software Downloads section of the Crestron website. To download an update, click the .cuz file and choose the Save to Disk option, then specify the directory where the update will be stored. -
Page 32: Running Programs From Compact Flash
The SIMPL Windows online help file provides a full listing of console commands that are valid for 2-Series control systems. You can access the RACK2 console in a variety of ways: via a serial connection (RS-232) with a PC, over Ethernet via the LAN port, or through Telnet, among many other methods. -
Page 33: Programming
The following commands have been modified to enable processing functions for compact flash files/programs: Programming You create a control program for the RACK2 using Crestron programming tools Crestron Application Builder™ (AppBuilder) and SIMPL Windows. You can begin programming using the easiest method (Crestron AppBuilder) and use the advanced techniques available in SIMPL Windows to customize your project. -
Page 34: Programming With The Crestron Appbuilder
SIMPL Windows. If not, refer to the extensive help information provided with the software. RACK2 Device Library Symbols In Configuration Manager, drag the RACK2 from the Control Systems folder of the Device Library to System Views. Refer to the following illustration. System Views of the RACK2 30 •... - Page 35 LCD panel. The C2I Front Panel symbol programs the push buttons and LCD display on the front panel of the RACK2 control system. The symbol detail is similar to that of a Operation Guide – DOC. 5958 2-Series Card Cage System •...
- Page 36 <Bright_4> sets it to the highest setting. Another way to change the brightness is to press the BKLT push button on the front panel itself. The <Bright_FB> outputs report the current brightness setting. 32 • 2-Series Card Cage System: RACK2 Crestron RACK2 Operations Guide – DOC. 5958...
-
Page 37: Converting Programs And Modules Created For Other Systems
To do this you first open the program, and then replace the existing control system with the RACK2. That is, drag the RACK2 from the Control Systems folder onto the existing control system in System Views, and click Yes when prompted to confirm the replacement. -
Page 38: Programming The Lcd Screen
LCD screen. Front Panel Editor The LCD screen on a RACK2 has different pages that are defined by the programmer. Menu function buttons are assigned to different pages or objects. The LCD screen has a 2x40 character display with six-programmable buttons. - Page 39 VCR object. Simply click on the Add button and enter a new name for the new page. For this example, use “Menu2 – VCR Control” as the name. Operation Guide – DOC. 5958 2-Series Card Cage System 2-Series Card Cage System: RACK2 • 35...
- Page 40 VCR Control”, as shown after this paragraph, and click OK. Select the Simulate check box to make the Front Panel Editor simulate an actual RACK2 front panel. Click on the VCR function button to enable the simulated page jump. The screen clears, because “Menu2 –...
- Page 41 Panel | Synchronize Signal Names to automatically name all the input and output signals for the front panel in the SIMPL Windows program. To confirm the assignment and display the signal names, double click on Slot-19: C2I-RACK2- LCDPANEL RACK2 Front Panel, which is available from the Central Control Modules folder in the Program View of the SIMPL Windows Program Manager.
-
Page 42: Object Types
The sample discussed in the previous sections utilizes only one of the object types available from the “Edit Panel Object” window, shown below. These object types are not new to Crestron programmers; the same types are available in VT Pro-e. Object Type Area in the “Edit Panel Object” Window 38 •... -
Page 43: Problem Solving
Crestron RACK2 Problem Solving Problems may occur with the RACK2 itself or there may be serial communication difficulties with other devices connected to the control system. The next two sections address possible problem solving tools or procedures for each. Possible Problems with the Control System Troubleshooting the Control System The following table provides corrective action for possible trouble situations. - Page 44 (Parity), 8 (Data Bits) and 1 (Stop Bits) and click OK. 4. Power down the RACK2. 5. While powering up the RACK2, press and hold ALT and K on the keyboard until the following text (or similar) appears in Viewport: System Monitor [v1.001 (0001)]...
-
Page 45: Serial Communication Difficulties With Other Devices Connected To The Control System
Dispose of used batteries according to the manufacturer's instructions. CPU2 and NET2 Replacement Refer to the latest version of Crestron CPU2 Rack2 Processor Card Installation Guide (Doc. 5961) for CPU2 replacement information. Refer to the latest version of Crestron NET2 Cresnet Hub Card Installation Guide (Doc. - Page 46 Depressing the SELECT menu function button displays the Format Type screen, shown after this paragraph. Select the BIN, ASCII, or HEX menu function button to determine the appropriate format. 42 • 2-Series Card Cage System: RACK2 Crestron RACK2 Operations Guide – DOC. 5958...
- Page 47 NOTE: The buffer recycles data even when in the 'freeze' state. When the screen is unfrozen, the display jumps to the end of the buffer. T/R Screen with Frozen Sample Operation Guide – DOC. 5958 2-Series Card Cage System 2-Series Card Cage System: RACK2 • 43...
-
Page 48: Further Inquiries
Crestron's award winning customer service team by calling: Firmware Upgrades To take advantage of all the RACK2 features, it is important that the unit contains the latest firmware available. Therefore, please check our website (http://www.crestron.com/downloads/software_updates.asp) for the latest version of firmware. -
Page 49: Software License Agreement
This Agreement may only be modified by a writing signed by an authorized officer of Crestron. Updates may be licensed to You by Crestron with additional or different terms. This is the entire agreement between Crestron and You relating to the Software and it supersedes any prior representations, discussions, undertakings, communications or advertising relating to the Software. - Page 50 “applets” incorporated into the Software), the accompanying media and printed materials, and any copies of the Software are owned by Crestron or its suppliers. The Software is protected by copyright laws and international treaty provisions. Therefore, you must treat the Software like any other copyrighted material, subject to the provisions of this Agreement.
-
Page 51: Return And Warranty Policies
CRESTRON shall not be liable to honor the terms of this warranty if the product has been used in any application other than that for which it was intended, or if it has been subjected to misuse, accidental damage, modification, or improper installation procedures. - Page 52 Crestron Electronics, Inc. Operations Guide – DOC. 5958 15 Volvo Drive Rockleigh, NJ 07647 06.03 Tel: 888.CRESTRON Fax: 201.767.7576 Specifications subject to www.crestron.com change without notice.
Need help?
Do you have a question about the RACK2 and is the answer not in the manual?
Questions and answers