mspa Mono Owner's Manual
Hide thumbs
Also See for Mono:
- Owner's manual (23 pages) ,
- Owner's manual (84 pages) ,
- Owner's manual (21 pages)
Table of Contents
Advertisement
w w w . t h e - m s p a . c o m
EN
QUESTIONS? PROBLEMS?MISSING PARTS?
For FAQ, Manuals, Videos or Spare Parts, please visit
www.the-mspa.com/support
PLEASE DO NOT RETURN THE PRODUCT TO THE STORE
Due to MSpa's continuous product improvement process, MSpa reserves the right to change the specifications and appearance of its
products, which may result in updates to the instruction manual without prior notice.
®
Owner's Manual
F-MO061
F-TU061
Mono
Tuscany
Advertisement
Table of Contents

Subscribe to Our Youtube Channel
Related Manuals for mspa Mono


Summary of Contents for mspa Mono
- Page 1 PLEASE DO NOT RETURN THE PRODUCT TO THE STORE Due to MSpa's continuous product improvement process, MSpa reserves the right to change the specifications and appearance of its products, which may result in updates to the instruction manual without prior notice.
-
Page 2: Table Of Contents
To guide you in your initial MSpa experience, we are pleased to present you with this instruction manual. Please read this manual carefully before using the product for the first time. We are delighted to welcome you to the MSpa family, and look forward to sharing with you the full spectrum of our expertise. -
Page 3: Safety Precautions
SAFETY PRECAUTIONS For your own safety and that of your product, please make sure to follow the safety precautions below. Failure to follow the instructions may result in serious injury, property damage or death. Improper installation or operation will void the warranty. PLEASE ENSURE THAT YOU READ, UNDERSTAND AND FOLLOW ALL INSTRUCTIONS KEEP THIS MANUAL FOR FUTURE REFERENCE DANGER... - Page 4 ● Do not use the spa if it is damaged on delivery and/or if it malfunctions in any way. ● Contact the MSpa service center for further instructions. ● Keep all pets away from the spa to avoid any damage.
- Page 5 ● Do not add bath oil or bath salt to the spa water. ● NEVER PUT HEAD UNDER WATER. Avoid swallowing the spa water. ● The spa contains a UVC emitter. To replace or repair the UVC emitter, contact a professional operator. ●...
- Page 6 Warning: The appliance's water protection levels vary across different product zones, as shown in the following diagram. (The installation regulations comply with IEC 60364-7-702.) 2.5 m Zone 2 Zone 1 Zone 2 2.5 m Zone 0 Zone 0 1.5 m 2.0 m 2.0 m 1.5 m...
-
Page 7: Specifications
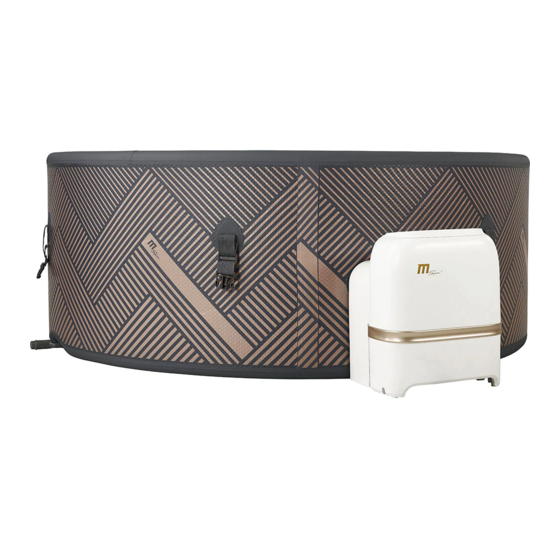
3 Levels (Level 1: 300W, Level 2: 500W, Level 3: 720W) Filter Pump 1800L/hr Integrated Ozone Generator 5.5W, 30-50mg/hr UVC Radiant flux 2000uW Top Lid Rhino-Tech™ reinforced PVC Liner Material Drop-stitch material (MONO) / Plastic wood (TUSCANY) PRODUCT OVERVIEW Packaging content – MONO... - Page 8 The drawings are for reference only. Actual products may vary. Not to scale. Use accessories exclusively provided by MSpa for safety reasons. When ordering parts, be sure to quote the MSpa model number and description. PRODUCT OVERVIEW Packaging content – TUSCANY ®...
-
Page 9: First Use And Setup Preparation
FIRST USE AND SETUP PREPARATION Site preparation and requirements ● The spa can be installed indoors or outdoors in around 10 minutes by one or more persons. For household use only. ● The spa must be set up on a flat, smooth and supporting surface that is able to bear the maximum load of the filled spa with the listed maximum number of occupants. -
Page 10: Spa Set-Up
NOTE: Lay out all the parts on the ground and make sure they are all accounted for. For missing or damaged parts contact the appropriate MSpa after-sales service center. - Page 11 NOTE: If you need to add some air to the spa tub wall or air bladder after they have been set up, please see the “Inflating the spa tub wall” section above or refer to this “Inflating the spa air bladder” section again. The air bladder is preinstalled inside the spa cover in MONO models. If it needs to be reinstalled, place the uninflated air bladder inside the spa cover lip before inflating the bladder.
- Page 12 SPA SETUP: TUSCANY ASSEMBLY - TUSCANY Spa Tub Assembly 1. Take out the foam mat and spread it over the cleared area. 2. Place the ‘open-end panel’ towards the corner where you intend to install your external control box. 3. Connect two panel pieces together by sliding a corner beam between them and then do the same with the remaining panels. 4.
- Page 13 Inflating the Spa Air Bladder 1. Open the inflation valve and insert the inflation hose into the valve. NOTE: Ensure that you use the correct nozzle. 2. Use the foot pump to inflate until it is firm to the touch but not hard. 3.
-
Page 14: Aii-In-One Control Operation
Lock Unlock ALL-IN-ONE CONTROL PANEL LED display Heater Button Filter Button Timer Button Bubble Button - Adjust the bubble level by pressing the button (L1:300W, L2: 500W, L3:720W) UVC Button Ozonator Button Down Button Up Button LED display °C °F Once powered-up, press the RESET on the PRCD. - Page 15 BUBBLE MASSAGE BUBBLE button to turn the function on; hold down the BUBBLE button for 3 seconds to turn the function off. Press the BUBBLE BUBBLE (500W). Press the BUBBLE button to switch The bubble setting can be adjusted to three different levels. The default setting is at level 2 the setting to level 3 (720W).
-
Page 16: Water Maintaince And Chemicals
WATER MAINTENANCE AND CHEMICALS CAUTION: ALWAYS ENSURE THE SPA IS UNPLUGGED BEFORE BEGINNING ANY MAINTENANCE WORK TO AVOID THE RISK OF INJURY OR DEATH. FILTER CARTRIDGE MAINTENANCE 1. Inspect and clean the filter cartridge gently after each use. Follow the steps below: NOTE: Change the filter cartridge every 3-5 days, or if the filter cartridge remains soiled and discolored. -
Page 17: Drainage, Cleaning And Storage
Rinse thoroughly before refilling with clean water. IMPORTANT: Do not use steel wool, hard brushes or abrasive cleaners. Deflation Instructions Spa deflation (MONO) ① 1. Open the valve cap by twisting it counter-clockwise. Ensure the valve is clear from debris, sand, or dirt before releasing. - Page 18 NOTE: Glue is not included. pin hole pin hole How to fix a leaking valve (MONO) A. Try to tighten the valve 1. Inflate your spa to the max air pressure 2. Insert your valve wrench into the valve and turn the wrench clockwise to tighten the valve onto the spa B.
-
Page 19: Disposal And Environmental Protection
SPA LEAKING Drainage valve is not closed completely Close the drainage valve. Contact the MSpa Service Center, if spa is still leaking Water leaks from the spa pool body Repair the leaking hole/split with the repair kit material... - Page 20 Water level is not at the minimum NOT HEATING Add more water to the minimum line water line PROPERLY Contact the MSpa Service Center Heater failure Filter pump DOES NOT WORK Refer to the "FILTER PUMP DOES NOT WORK" section Temperature protection switch trip off Reset the heater Make sure the valve is screwed tightly.
-
Page 21: Mspa Limited Warranty
Where the cost of repairs or replacement is not covered by this warranty, MSpa will advise the owners and the cost shall be charged to the owner.
Need help?
Do you have a question about the Mono and is the answer not in the manual?
Questions and answers