Advertisement
Quick Links
Perfect For
• Non-contact surface temperatures
Easy To Use
• 1-second response
• 8-beam laser target illumination
• Backlit
• Data-hold
• One-button operation
Features
• Shatterproof
• Memory
• Maximum, minimum, difference, average with lock for
continuous scanning
• High and low alerts
• Distance:spot = 12:1
• Battery status indication
• ABS plastic
• Auto-off
• Batteries and instructions included
Get Professional Results
Every Time!
Monitoring temperature is essential to keeping food
safe. The versatile IN1022 is perfect for any application.
Simply point the infrared sensor lens toward the target
and press the trigger to get a quick reading of surface
temperatures.
Maximum, Minimum, Difference
and Average Modes
The IN1022 also offers Maximum, Minimum, Difference
and Average modes. Maximum mode displays the highest
temperature among multiple targets. Minimum mode
displays the lowest temperature among multiple targets.
Difference mode displays the difference between the
maximum and minimum temperature measurements
of multiple targets. While Average mode displays the
average temperature measurements of multiple targets.
Lock Mode
Lock mode continuously measures the temperature
for up to 60 minutes. This is particularly useful for
continuous temperature monitoring.
High and Low Alerts
The IN1022 provides a programmable high and low alert
for measurements that are out of the desired range.
Note: Remove sticker from display before use.
Note: In the following instructions, names of the control
buttons are shown in CAPS. Function information that appears
on the display is shown in BOLD CAPS.
Battery Installation
Replace battery when LCD becomes dim or alarm
level declines. Power off the unit before installing the
batteries. A malfunction may occur if the power is on
when the battery is installed. If a malfunction occurs,
restart the device.
1. Remove battery cover by sliding it in the direction of
the arrow.
2. Install two 1.5V AAA batteries observing polarity
shown in compartment.
3. Replace the battery cover until it clicks shut.
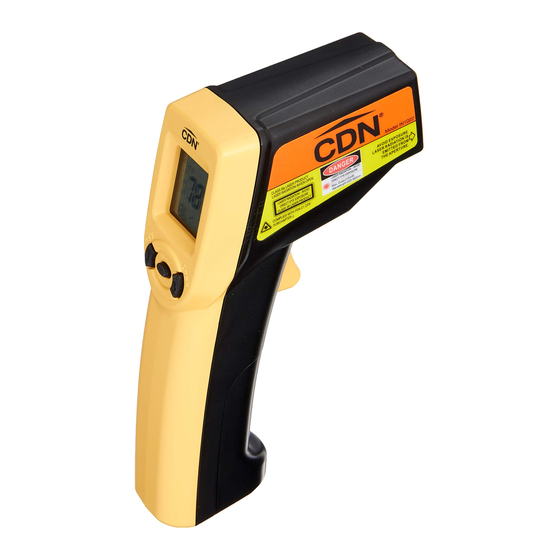
Model: IN1022
Infrared Gun
-76 to +1022°F/-60 to +550°C
Advertisement

Related Manuals for CDN Infrared Gun


Summary of Contents for CDN Infrared Gun
- Page 1 Model: IN1022 Infrared Gun -76 to +1022°F/-60 to +550°C Perfect For Lock Mode Lock mode continuously measures the temperature • Non-contact surface temperatures for up to 60 minutes. This is particularly useful for continuous temperature monitoring. Easy To Use High and Low Alerts The IN1022 provides a programmable high and low alert • 1-second response for measurements that are out of the desired range. • 8-beam laser target illumination • Backlit Note: Remove sticker from display before use. • Data-hold • One-button operation Features • Shatterproof • Memory • Maximum, minimum, difference, average with lock for continuous scanning • High and low alerts • Distance:spot = 12:1 • Battery status indication • ABS plastic • Auto-off Note: In the following instructions, names of the control • Batteries and instructions included buttons are shown in CAPS. Function information that appears...
- Page 2 ) appears in the top The emissivity of the thermometer can be changed portion of the display when on. from 0.1 (10E) to 1 (100E). Only experienced C. Laser Light personnel should attempt to make changes. To turn the laser light on and off: For information relating to the emissivity of specific 1. Press the MODE button or trigger to turn the materials, please contact CDN. thermometer on. 1. Press the MODE button or trigger to turn the 2. Press and hold the trigger and then also press the thermometer on. C°/F° button to turn the laser light on and off. The 2. Press the MODE button until E appears in the LASER icon ( ) appears in the top portion of the lower left corner of the display. The current display when on. emissivity setting appears in the lower right corner of the display CAUTION: Never point the unit and/or laser towards 3. Press the MODE button again to adjust the...
- Page 3 Reinstall the battery (see Battery Installation). 3. Aim the infrared lens at the target and press the d. Press the MODE button or trigger to turn the trigger to display the surface temperature. thermometer on. 4. Measurement continues as long as the trigger e. If the error message remains, please contact is pressed or for 60 minutes in Lock Mode. CDN for further assistance. The MIN reading displays the lowest temperature G. Temperature Alerts among multiple targets. 1. High Alert 5. Difference Mode An alert will sound when the measured temperature 1. Press the MODE button or trigger to turn the exceeds the alert temperature setting. thermometer on. 1. Press the MODE button or trigger to turn the 2. Press the MODE button repeatedly until DIF thermometer on. appears in the lower left portion of the display. 2. Press the MODE button repeatedly until HAL 3. Aim the infrared lens at the target and press the...
-
Page 4: Care Of Your Product
Care of Your Product Specifications • The sensor lens is the most delicate part of the -76 to +1022°F/-60to +550°C Measurement Range 32 to 122°F/0 to 50°C thermometer and should be kept clean at all Operating Range ±2.7°F/±1.5°C Accuracy, times. Take care when cleaning the lens. Use only a (Tobj=59-95°F/15-35°C, soft cloth or cotton swab with water or rubbing alcohol. Tamb=77°F/25°C) Tobj=-76 to +32°F/-60 to 0°C: Allow the lens to dry fully before using Accuracy, ±(3.6°F/2°C + 0.05/degree C) (Tamb=73 ±37.4°F/23 ±3°C) the thermometer. Tobj=32 to 1022°F/0 to 550°C: ±2% of reading or 4°F/2°C whichever is • Do not submerge any part of the thermometer in water. greater Wipe clean with a damp cloth. 0.95 default; adjustable 0.1 to 1, Emissivity Range step .01 • Store the thermometer at room temperature within 0.1°F/0.1°C Resolution 32 to 122°F/0 to 50°C. (14.18 to 392°F/-9.9 to 199.9°C) 1 second Response Time (90%) 12:1 Distance:Spot... - Page 5 Hard Ball 246–264°F 240–258°F 235–253°F 1-Year Limited Warranty: Any instrument that Soft Crack 266–286°F 260–286°F 255–275°F proves to be defective in material or workmanship Hard Crack 296–306°F 290–300°F 285–295°F within one year of original purchase will be repaired or replaced without charge upon receipt of the unit prepaid at: CDN, PO Box 10947, Portland, OR OIL TEMPERATURE GUIDE 97296-0947. This warranty does not cover damage in shipment or failure caused by tampering, obvious 325–375°F/163-190°C is the normal desired carelessness or abuse. temperature for deep fry cooking. Note: When food is added to hot oil, the temperature of the oil immediately drops at least 50°F/28°C. You will need For more detailed...
Need help?
Do you have a question about the Infrared Gun and is the answer not in the manual?
Questions and answers