Table of Contents
Advertisement
Quick Links
Advertisement
Table of Contents

Related Manuals for Trotec IRO 15


Summary of Contents for Trotec IRO 15
- Page 1 IRO 15 ORIGINAL INSTRUCTIONS INFRARED RADIANT OIL HEATER...
-
Page 2: Table Of Contents
Do not use the device in rooms if persons are present Information marked with this symbol helps you to carry who cannot leave the room independently and who are out your tasks quickly and safely. not under constant supervision. infrared radiant oil heater IRO 15... - Page 3 The device must only be operated with EL (ultra-light) fuel oil storage and operating conditions specified in the Technical and diesel, however not with petrol, heavy fuel oil etc. data chapter. infrared radiant oil heater IRO 15...
- Page 4 • have read and understood the instructions, especially the Safety chapter. Safety signs and labels on the device Note Do not remove any safety signs, stickers or labels from the device. Keep all safety signs, stickers and labels in legible condition. infrared radiant oil heater IRO 15...
- Page 5 If so, please contact Warning the customer service to have the overheating protection Improper handling entails a risk of burning and electric replaced. shock. Only use the device as intended! infrared radiant oil heater IRO 15...
-
Page 6: Information About The Device
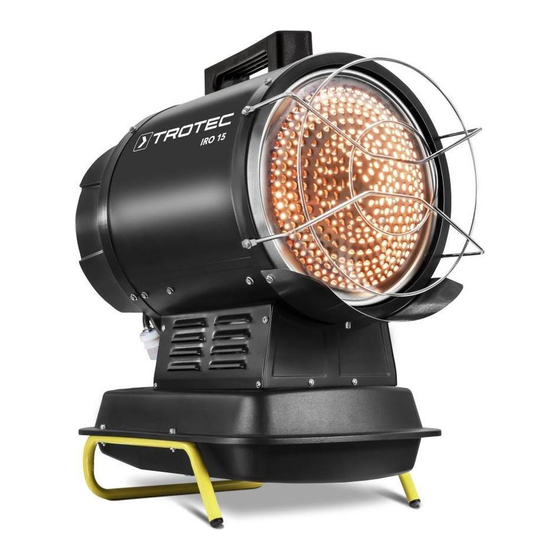
Designation Transport handle Air outlet with cover Protective grid Protective plate Tank Foot Control panel Fuel filter Fuel tank cap Tank filling level indication infrared radiant oil heater IRO 15... -
Page 7: Transport And Storage
At delivery, the screws required for the installation are already screwed into the housing. 1. Loosen the 2 screws at the housing top. 2. Use the 2 screws to mount the transport handle to the top of the housing. infrared radiant oil heater IRO 15... - Page 8 1.5 m (see figure). There must be no walls or large objects near the device. Mounting the foot Fasten the foot to the tank using 4 screws and secure the tank using the 4 matching nuts. infrared radiant oil heater IRO 15...
- Page 9 Stop filling the tank just before the red completeness. If an accessory part is missing, please range. contact the Trotec customer service or the specialist dealer 4. Screw the fuel tank cap (9) back onto the tank. Observe where you purchased the device.
-
Page 10: Operation
ð The target temperature is indicated on the Segment display (11) while the temperature is adjusted. ð When the temperature has been adjusted, the Segment display (11) blinks three times, then the room temperature is shown again. 3. Ensure a successful ignition. infrared radiant oil heater IRO 15... -
Page 11: Errors And Faults
Refill fuel if the tank is empty (see chapter Filling the tank). • The pump pressure might be incorrect. Check the pressure at the pump and adjust it if necessary, see chapter Adjusting the air pressure for the pump. infrared radiant oil heater IRO 15... - Page 12 • Check the tank for contaminations and drain it if required (see chapter Maintenance). Refill with clean fuel. Note Wait for at least 3 minutes after maintenance and repair work. Only then switch the device back on. infrared radiant oil heater IRO 15...
- Page 13 The tilt protection has tripped. Place the device on a level and stable ground and restart it. Ambient temperature below -9 °C Normal operation, no remedy required Continuous operation (55 °C) Normal operation, no remedy required infrared radiant oil heater IRO 15...
-
Page 14: Maintenance
11. Date: ........12. Date: ........Signature: ........ Signature: ......... Signature: ......... Signature: ......... 13. Date: ......... 14. Date: ........15. Date: ........16. Date: ........Signature: ........ Signature: ......... Signature: ......... Signature: ......... infrared radiant oil heater IRO 15... - Page 15 • Clean the filter insert with clean fuel oil. If the filter insert is heavily polluted or damaged, replace it by a new filter insert. • Assemble the components in reverse order after cleaning. infrared radiant oil heater IRO 15...
-
Page 16: Technical Annex
D: front 2.50 m uncontrollably. Weight 18 kg 6. Dispose of the fuel according to national regulations. Fuels The following fuels are approved for the device: • Diesel • Kerosene infrared radiant oil heater IRO 15... - Page 17 Wiring diagram infrared radiant oil heater IRO 15...
- Page 18 Overview and list of spare parts Info The position numbers of the spare parts differ from those describing the positions of the components mentioned in these instructions. infrared radiant oil heater IRO 15...
- Page 19 Support Fuel Pipe Ass'y Heat Insulation Casing Body Shell Solenoid Valve Front Cover Motor Fuel Pump Body Front Ring Air Passage Support Electromagnetic Pump Connector Safety Frame Motor Support Connector For Fuel Lower Protection infrared radiant oil heater IRO 15...
-
Page 20: Disposal
The Section A addresses can be obtained from your municipality or local Herewith, we – Trotec GmbH– declare that the machinery administration. For further return options provided by us please designated below was developed, constructed and produced in refer to our website https://de.trotec.com/shop/. - Page 21 Trotec GmbH Grebbener Str. 7 D-52525 Heinsberg +49 2452 962-400 +49 2452 962-200 info@trotec.com www.trotec.com...
Need help?
Do you have a question about the IRO 15 and is the answer not in the manual?
Questions and answers