Carmanah R247-E User Manual
24 hour flashing beacon
Hide thumbs
Also See for R247-E:
- User manual (75 pages) ,
- Quick start manual (20 pages) ,
- Install manual (20 pages)
Table of Contents
Advertisement
Quick Links
Advertisement
Table of Contents

Subscribe to Our Youtube Channel
Related Manuals for Carmanah R247-E


Summary of Contents for Carmanah R247-E
- Page 1 R247-E 24 HOUR FLASHING BEACON USER MANUAL...
-
Page 2: Warnings And Precautions
This manual will familiarize you with the features, more than one person. operation standards, and installation of Carmanah's R247-E 24 Hour Flashing Beacon. Failure to comply Ensure the equipment is not with the use, storage, maintenance, installation or powered during installation and placement instructions detailed in this manual could wiring of the system. -
Page 3: Table Of Contents
R247-E 24 HOUR FLASHING BEACON USER MANUAL TABLE OF CONTENTS Table of Contents NOTE Changes or modifi cations to Carmanah equipment not expressly Warnings and Precautions ........2 approved by Carmanah could Warranty Disclaimer ..........2 both void the user's authority to Standards .............. -
Page 4: Introduction
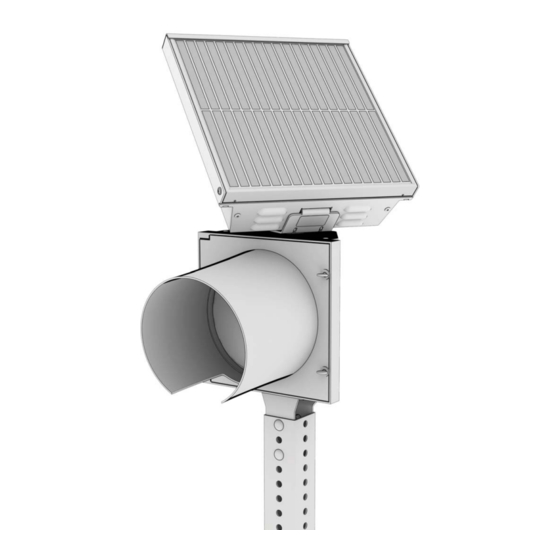
R247-E 24 HOUR FLASHING BEACON USER MANUAL INTRODUCTION Introduction The R247-E is the new standard for 24 hour fl ashing beacons: The solar panel and EMS work together to charge the batteries during the day. The EMS controls the fl ow of power from the batteries to the fl... -
Page 5: Installation
RNING Use extreme caution Summary when handling the batteries as they are capable of generating Basic steps to install a R247-E solar engine: hazardous short-circuit currents. Remove all 1. Connect the post mount to the post. jewelry (bracelets, metal-strap watches, 2. -
Page 6: Step By Step Instructions
R247-E 24 HOUR FLASHING BEACON USER MANUAL INSTALLATION Step by Step Instructions Attach the post mount to the post using appropriate fasteners. Square Post 4.0-4.5" Round Mount 2.5" Square Post Mount 2" Square Wood Post 2.38"-2.88" Round Mount Post Mount Recommended in•lb... - Page 7 R247-E 24 HOUR FLASHING BEACON USER MANUAL INSTALLATION Mount the solar engine and signal head assembly to the post mount pointing the signal head in the direction required. 4.0-4.5" Round 2"-2.5" Square Post Mount Post Mount 2.38"-2.88" Round Post Wood Post...
- Page 8 R247-E 24 HOUR FLASHING BEACON USER MANUAL INSTALLATION Tighten the nipple to secure the system in place. 4.0-4.5" 2"-2.5" Square Round Pole Mount Pole Mount 2.38"-2.88" Wood Round Post Post Mount Mount Side-of-Post Mount © 2014, Carmanah Technologies Corporation. 72466_R247-E_UserManual_RevA...
- Page 9 R247-E 24 HOUR FLASHING BEACON USER MANUAL INSTALLATION Ensure the solar panel is facing south and then tighten the nut. © 2014, Carmanah Technologies Corporation. 72466_R247-E_UserManual_RevA...
- Page 10 R247-E 24 HOUR FLASHING BEACON USER MANUAL INSTALLATION Note the battery terminal and harness polarity. Open the solar engine. Connect one battery harness and install battery as shown. Note the system will begin operating. Connect second battery harness and install battery as shown.
- Page 11 R247-E 24 HOUR FLASHING BEACON USER MANUAL INSTALLATION Secure batteries with battery strap, note proper routing. Battery strap is tightened over the two batteries © 2014, Carmanah Technologies Corporation. 72466_R247-E_UserManual_RevA...
- Page 12 R247-E 24 HOUR FLASHING BEACON USER MANUAL INSTALLATION The system will start once the batteries are connected. See 'EMS Programming and Testing' section to check the system status and confi guration. CAUTION Consult with Carmanah customer service before making adjustments to the system. Improper system adjustment may reduce operational effectiveness, reduce battery life, or void the warranty.
-
Page 13: Ems Programming And Testing
R247-E 24 HOUR FLASHING BEACON USER MANUAL EMS PROGRAMMING AND TESTING EMS Programming and EMS Onboard User Interface Operation Testing The EMS OBUI has three buttons to navigate and The EMS will be pre-confi gured at the factory. Use change settings and activate functions as required. - Page 14 FACt: Factory Set LED brightness depending on solar location. LED brightness range from 10mA to 545mA in increments of 5mA. Contact Carmanah before adjusting this setting. bISt: Built in system test. YES: Activates the built-in system test.
-
Page 15: System Testing
R247-E 24 HOUR FLASHING BEACON USER MANUAL EMS PROGRAMMING AND TESTING System Testing Built-in System Test The OBUI has a built-in system test function (bISt, see previous section). Activating this function through the OBUI performs the system test. After the test completes, it will display any errors or 'PASS' if no error is detected. -
Page 16: Maintenance & Product Care
The frequency of the inspections depends on location and local weather patterns. A yearly visual inspection EMS Recycling of the R247-E solar engine is typically suffi cient. The R247-E is designed to be maintenance free, however maximum system performance will be achieved when Production of the EMS required the extraction and the LED module lens and solar panels are clean. -
Page 17: Troubleshooting
See the 'EMS Programming and Testing' section of this manual. Ensure that the R247-E solar engine is clean, clear of debris, and is not shaded by buildings or vegetation. If the solar panel is covered or shaded, this will prevent proper battery charging and drive the system into ALC. -
Page 18: Specifi Cations
R247-E 24 HOUR FLASHING BEACON USER MANUAL SPECIFICATIONS Specifi cations Mechanical Specifi cations Solar Engine Width 13.6" (345 mm) Depth (not including mount) 3.6" (91 mm) Tilt angle 45 degrees Height (above signal head) 12.0 " (302 mm) Weight (Solar enging only) 19.8 lbs (9kg) Electrical Specifi... - Page 19 R247-E 24 HOUR FLASHING BEACON USER MANUAL © 2014, Carmanah Technologies Corporation. 72466_R247-E_UserManual_RevA...
-
Page 20: Warranty
R247-E 24 HOUR FLASHING BEACON USER MANUAL WARRANTY Warranty This product is covered by the Carmanah warranty. Visit www.carmanah.com for additional information or contact the customer service department. Before contacting Carmanah’s customer service department, please have the serial number of your system available, a brief description of the problem, as well as all details of the installation.
Need help?
Do you have a question about the R247-E and is the answer not in the manual?
Questions and answers