Table of Contents
Advertisement
Quick Links
OWNER'S MANUAL
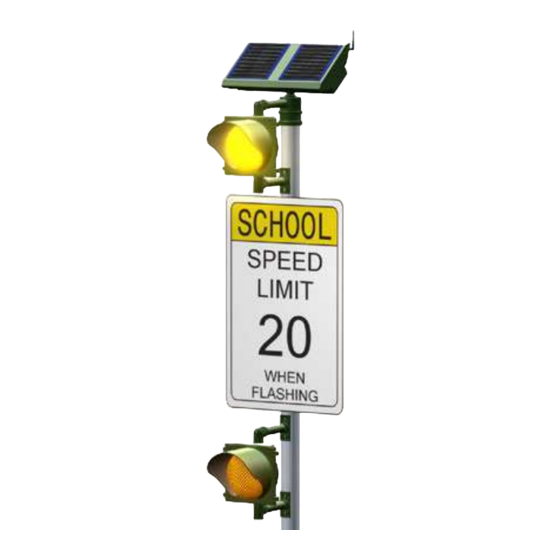
Solar LED School Zone Beacon – Model R829
The world's most advanced solar LED school zone beacon.
No external wiring or bulb replacement.
Maintenance-free for up to 5 years.
© November 7, 2006, Carmanah Technologies Corp.
www.carmanah.com
Technical Support:
customerservice@carmanah.com
Toll Free in North America: 1 (877) 722-8877
International: + (250) 380-0052 | Fax: + (250) 389-0040
R829 – 37234
Advertisement
Chapters
Table of Contents
Troubleshooting

Subscribe to Our Youtube Channel
Related Manuals for Carmanah R829


Summary of Contents for Carmanah R829
- Page 1 OWNER’S MANUAL Solar LED School Zone Beacon – Model R829 The world’s most advanced solar LED school zone beacon. No external wiring or bulb replacement. Maintenance-free for up to 5 years. © November 7, 2006, Carmanah Technologies Corp. www.carmanah.com Technical Support: customerservice@carmanah.com...
-
Page 3: Table Of Contents
4.11 Installing the Lower Signal Head (if equipped)............9 4.12 Connect the Batteries ..................10 4.13 Install Bird Deterrents on the Module Housing..........10 4.14 Attach the Solar Panels to the R829 Electronics..........11 4.15 Final Adjustments.....................11 Maintenance and Product Care ................12 Troubleshooting ....................12 Service and Additional Products..............13... -
Page 4: Introduction
It operates using solar-charged batteries that are maintenance free for up to five years when properly installed. The R829 can be ordered with one or a pair of flashing lights for each unit. When there are two flashers, these can be mounted as a vertical dual flasher, a horizontal dual flasher, or a bi- directional flasher depending on location requirements. -
Page 5: Component Identification
2. Solar Panel. 3. Radio Antenna. 4. Signal Head (one or two). 5. Signal Head Mounting Bracket. 6. Sign (not included). 7. Pole (not included). Carmanah Technologies Corp. Copyright © 2006 Document number: MAN_ROAD_R829 Owner's Manual 37234_vC Last revised: November 7, 2006... -
Page 6: Tools And Materials Required
Compass (to measure angles) 4.0 Product Assembly and Installation Installation time is approximately one hour in the shop and two hours in the field per R829 system. No trenching, external cabling, traffic disruption or site remediation required. Once installed, the R829 is designed to operate for up to 5 years with virtually no maintenance other than routine cleaning. -
Page 7: Installing The R829 Switch Enclosure
Preparing the Solar Panel Module Turn the solar module upside down to prepare it for installation. Prop up the end of the R829 that has the radio antenna (see Figure 5) to ensure that this delicate component is not damaged during assembly. -
Page 8: Locate The Signal Head(S) And Sign
Note: If a 4” OD pole is being used, longer bolts will be required than those provided. Carmanah Technologies Corp. Copyright © 2006 Document number: MAN_ROAD_R829 Owner's Manual 37234_vC... -
Page 9: Erect The Pole
The wire for the lower signal head should already be hanging out of the hole in the pole. Feed the wire through one of the brackets and fasten the bracket to the pole with bolts or stainless steel straps. Carmanah Technologies Corp. Copyright © 2006 Document number: MAN_ROAD_R829 Owner's Manual 37234_vC Last revised: November 7, 2006... -
Page 10: Connect The Batteries
4.13 Install Bird Deterrents on the Module Housing The bird deterrents discourage birds from using the top edge of the R829 as a perch, thus ensuring that the solar panels remain as clean as possible. Place the top cap with solar panels onto a stable work area. Attach the three bird deterrents with sheet metal screws, using the predrilled holes on the top cap as a means of identifying their location. -
Page 11: Attach The Solar Panels To The R829 Electronics
4.15 Final Adjustments The Carmanah R829 is solar powered; therefore it is critical to properly position the unit in relation to the optimum angle of the sun in order to achieve maximum solar power generation. To do this, angle the solar panel towards the equator (use of a compass is recommended) and tip it upwards at an angle equal to the latitude of installation plus 5 degrees. -
Page 12: Maintenance And Product Care
Do not discard batteries in the garbage. Please recycle! 6.0 Troubleshooting The most obvious fault that may occur with the R829 is that the light will not flash. If this is the case, there are two things that can be checked correct this problem: 1. -
Page 13: Service And Additional Products
Customer Service and Warranty Before contacting Carmanah’s customer service department, please have the serial number of the Model R829 available, a brief description of the problem, as well as all details of the installation. Carmanah products are covered by a standard 3-year pro-rated warranty. A warranty card is supplied with each unit. -
Page 14: Product Specifications
Head and Support Structure Powder coated aluminum Signal Housing Injection Molded UV stabilized polycarbonate Switch Housing Powder Coated Steel Patents Trademark and Patents Patents Pending Carmanah Technologies Corp. Copyright © 2006 Document number: MAN_ROAD_R829 Owner's Manual 37234_vC Last revised: November 7, 2006... -
Page 15: Appendix A - R829 Quick Start Guide
R829 Owner’s Manual | 9.0 Appendix A – R829 Quick Start Guide This Quick Start Guide is intended to provide basic information on installing the software on your computer and uploading your first calendar. For more detailed information on configuring your School Zone Beacon, please refer to Appendix B or the Help Folder on your CD. - Page 16 Note: When naming and saving your newly created calendar, it is important to note that the file name you choose cannot have any blank spaces in it. Carmanah Technologies Corp. Copyright © 2006 Document number: MAN_ROAD_R829 Owner's Manual 37234_vC Last revised: November 7, 2006...
- Page 17 Note: If you have any problems or questions during the set-up of your new School Zone Beacon, visit the FAQ and Troubleshooting section of the Help File located on the CD. Carmanah Technologies Corp. Copyright © 2006 Document number: MAN_ROAD_R829 Owner's Manual 37234_vC...
-
Page 18: Appendix B - R829 Calendar Configuration Instructions
4.1 Send Calendar .....................31 4.2 Read Calendar.....................32 5.0 Configure Operations....................32 5.1 Interface Box......................32 6.0 FAQs and Troubleshooting ..................32 6.1 Frequently Asked Questions ................32 6.2 Troubleshooting ....................33 Carmanah Technologies Corp. Copyright © 2006 Document number: MAN_ROAD_R829 Owner's Manual 37234_vC Last revised: November 7, 2006... -
Page 19: Getting Started
Windows XP. Ignore the messages and continue with the driver installations – they are fully compatible and will perform correctly. Place the CD that Carmanah has supplied you into the CD ROM drive of your computer. The installation program will automatically launch. Follow the prompts to install the program correctly. -
Page 20: Creating A Calendar
Note: When naming and saving your newly created calendar, it is important to note that the file name you choose cannot have any blank spaces in it. Carmanah Technologies Corp. Copyright © 2006 Document number: MAN_ROAD_R829 Owner's Manual 37234_vC Last revised: November 7, 2006... -
Page 21: Creating A New Calendar
Saturday and Sunday are coloured GRAY(OFF) and Monday through Friday are colored RED(Schedule A). This means that the lights will not flash on weekends and Monday through Carmanah Technologies Corp. Copyright © 2006 Document number: MAN_ROAD_R829 Owner's Manual 37234_vC Last revised: November 7, 2006... -
Page 22: Setting The Start Day
Navigate to the Calendar->Set Start Day menu and left click. Carmanah Technologies Corp. Copyright © 2006 Document number: MAN_ROAD_R829 Owner's Manual 37234_vC Last revised: November 7, 2006... - Page 23 This will cause a calendar to pop up where you can select the start day from. Navigate your way to May 2006 and highlight May 9th by clicking on it. Carmanah Technologies Corp. Copyright © 2006 Document number: MAN_ROAD_R829 Owner's Manual 37234_vC...
-
Page 24: Setting The End Day
Navigate to the Calendar->Set End Day menu and left click. This will cause a calendar to pop up where you can select the end day from. Carmanah Technologies Corp. Copyright © 2006 Document number: MAN_ROAD_R829 Owner's Manual 37234_vC... -
Page 25: Turning The Lights Off On A Specific Day
Then select OFF and left click on it. Now move the mouse over May 10th and left click. May 10th will change from RED to GRAY. Carmanah Technologies Corp. Copyright © 2006 Document number: MAN_ROAD_R829 Owner's Manual 37234_vC... -
Page 26: Turning The Lights On For A Specific Day At Specific Times
Click on the up and down arrows to set Event 1 to start at 8:30am and end at 8:45am Do the same for Event 2 but set it to start at 12:00pm and end at 12:15pm Carmanah Technologies Corp. Copyright © 2006 Document number: MAN_ROAD_R829 Owner's Manual 37234_vC... - Page 27 After you've done this, move on to the next step -> Sending a Calendar to the School Zone Beacon. Carmanah Technologies Corp. Copyright © 2006 Document number: MAN_ROAD_R829 Owner's Manual 37234_vC Last revised: November 7, 2006...
-
Page 28: Adjusting The Brightness
Now the Brightness Configuration box will open. Select the Brightness Level by clicking the mouse onto the Brightness Level indicator and sliding it to the desired brightness level. Press OK when done. Carmanah Technologies Corp. Copyright © 2006 Document number: MAN_ROAD_R829 Owner's Manual 37234_vC Last revised: November 7, 2006... -
Page 29: Sending A Calendar To The School Zone Beacon
Please be patient while the calendar is being sent. The amount of progress that has been made in sending the calendar is reflected by the progress bar. Carmanah Technologies Corp. Copyright © 2006 Document number: MAN_ROAD_R829 Owner's Manual 37234_vC Last revised: November 7, 2006... - Page 30 Your calendar is now programmed into the School Zone Beacon and the lights will flash at the times that you specified on your calendar. 8. Flip the switch in the pole-mounted box back to the “Auto” position. Carmanah Technologies Corp. Copyright © 2006 Document number: MAN_ROAD_R829 Owner's Manual 37234_vC Last revised: November 7, 2006...
-
Page 31: File Operations
The Communicate->Send Calendar action sends a complete image of the calendar to the School Zone Beacon. Please refer to the Getting Started section entitled Sending a Calendar to the School Zone Beacon for more detailed information. Carmanah Technologies Corp. Copyright © 2006 Document number: MAN_ROAD_R829 Owner's Manual 37234_vC Last revised: November 7, 2006... -
Page 32: Read Calendar
This information is available on the Carmanah website at http://www.carmanah.com/ or at http://www.roadlights.com/ Do I need an Interface Box to program my calendars into the R829 School Zone Beacon? Yes you do - contact Carmanah or one of our distributors for further information. -
Page 33: Troubleshooting
Mode should be secondary. The default channel of the School Zone Beacon is Channel 0, if you haven't changed the configuration of the R829 School Zone Beacon select Channel 0 ( factory default is 0 ). The Interface Box and School Zone Beacon must be on the same channel in order for them to communicate properly.
Need help?
Do you have a question about the R829 and is the answer not in the manual?
Questions and answers