
Subscribe to Our Youtube Channel
Related Manuals for Plockmatic Morgana VFL Feeder


Summary of Contents for Plockmatic Morgana VFL Feeder
- Page 1 Morgana VFL Feeder Operating Instruction Read this manual carefully before you use this product and keep it handy for future reference. For safety, please follow the instructions in this manual. Doc no: T10211B Date: 2020-06-10...
- Page 2 WARNING This is a Class A product. In a domestic environment this product may cause radio interference in which case the user may be required to take adequate measures. The product (System) which is connected to this machine will be class A. NOTE The domestic environment is an environment where the use of broadcast radio and television receivers may be expected within a distance of 10 m of the apparatus concerned.
- Page 3 Introduction This manual contains instructions on the operation and maintenance of this machine. To get the maximum versatility from this machine all operators should carefully read and follow the instructions in this manual. Keep this manual in a handy place near the machine. Please read the Safety Information before using this machine.
- Page 4 Safety Information When using this machine, the following safety precautions should always be followed. Safety During Operation WARNING • To avoid hazardous situations such as electric shock or danger while exposed to moving, rotating or cutting devices, do not remove any covers, guards or screws other than those specified in this manual.
- Page 5 CAUTION: • The machine and its peripherals must be installed and maintained by a customer service representative who has completed the training course on those models. • Always follow all warnings marked on, or supplied with, the equipment. • When you disconnect the power plug from the wall outlet, always pull the plug (not the cable).
- Page 6 Page intentionally blank.
-
Page 7: Table Of Contents
TABLE OF CONTENTS What You Can Do with This Machine ................... 8 Guide to Components ....................9 VFL Feeder ......................... 9 Feed Area ........................10 User Interface ......................11 Tools and Accessories ....................12 Basics ..........................13 Paper ........................... 13 Paper Guidelines ....................... -
Page 8: What You Can Do With This Machine
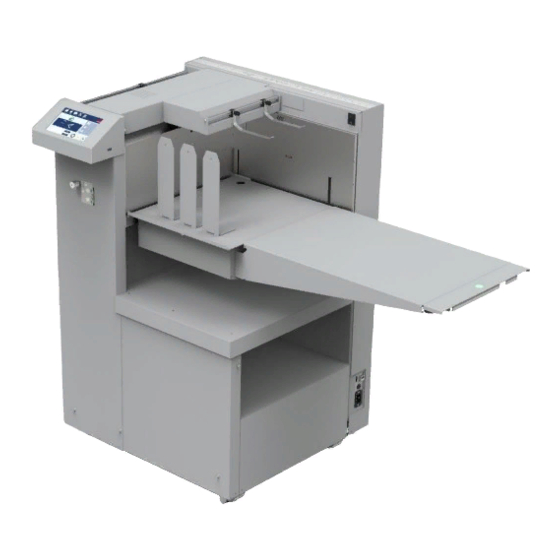
_________________________________________________________________________ What You Can Do with This Machine The Morgana VFL Feeder is a state-of-the-art paper feeding system. • The vacuum top feed mechanism uses air knives together with advanced sensing to separate, feed and accurately register sheets ranging from 93 x 210 mm (3.67” x 8.27”) all the way up to 385 x 1300 mm (15.16”... -
Page 9: Guide To Components
_________________________________________________________________________ Guide to Components VFL Feeder 1. Registration area 7. Paper table extension 2. Vacuum belts 8. Power inlet and fuse 3. Paper guide tongues 9. Storage shelf 4. Paper wall 10. Magnetic paper guides 5. Power switch 11. Feeder skew adjustment 6. -
Page 10: Feed Area
_________________________________________________________________________ Feed Area 1. User interface (UI) 11. Separated paper (SP) sensor Q12 2. USB port for software updates 12. Feeder skew adjustment wheel 3. Front separation fan 13. Feeder skew adjustment locking knob 4. Paper separation pads 14. Registration (alignment) belts 5. -
Page 11: User Interface
_________________________________________________________________________ User Interface The Morgana VFL Feeder has a Graphical User Interface (GUI) which allows for setting up jobs and viewing / modifying machine settings and properties. Detailed descriptions of each menu and sub-menu are found in Section 2 of this Operator Manual. -
Page 12: Tools And Accessories
_________________________________________________________________________ Tools and Accessories The following tools and accessories are included with the VFL Feeder. Component no Description 601-167 Digital thickness gauge 142-115551 Multi-purpose wrench 201-111686 Screwdriver torx T20 201-111685 Hex wrench kit 960-108861 USB memory stick for performing machine software updates 601-185 Sensor cleaning brush 601-118... -
Page 13: Basics
_________________________________________________________________________ 1 Basics Paper Paper Guidelines Paper comes in many different makes, types and finishes. There are many ways to print on the paper and then protect that printed image. The grain direction, fibre structure, substrate thickness, porosity, coating type, bond strength of the coating, water content, relative humidity and many other things can affect how the paper will behave when it is separated and fed. -
Page 14: Setting Up A Job
_________________________________________________________________________ 2 Setting Up a Job Getting Started Turning the Machine On and Off 1. Ensure the main power cord is plugged in the machine [A] and the wall socket. 2. Toggle the main power switch [B] to turn the machine on. 3. -
Page 15: Paper Stack Preparation
_________________________________________________________________________ Paper Stack Preparation Before loading paper in this machine, it is recommended to fan the sheets as shown. 1. Hold the paper stack on a flat surface. 2. Bend the paper stack. 3. Use your fingers and thumbs to pinch the paper stack. - Page 16 _________________________________________________________________________ 5. Flex the paper back and forth a couple of times to break surface tension and pre-separate the sheets. 6. Realign the sheets into a stack before putting them in the machine. NOTE: If the sheets you are using are too stiff or too large format to carry out the above procedure, fan the front edge of the sheets when loading them in the machine.
-
Page 17: Loading Paper
_________________________________________________________________________ Loading Paper 1. Take a stack of printed paper and place it on the feeder table in the desired orientation. NOTE: If using sheets longer than 450 mm (17.7”), but shorter than 700 mm (27.6”) extend the built- in pull-out table. If using sheets longer than 700 mm (27.6”) see the “Feeder Table Extension” section within this manual. -
Page 18: Feeder Table Extension
_________________________________________________________________________ Feeder Table Extension Install table extension if using sheets longer than 700 mm (27.6”): 1. Ensure the built-in pull-out table [A] is fully stowed. 2. Hook the table extension [B] into the lift [C] as shown. NOTE: The feeder table extension has a built-in pull out part that can be used to feed sheets up to 1300 mm (51”). -
Page 19: The Home Screen
_________________________________________________________________________ The Home Screen Overview Element Description Home button Returns to this screen Media button Set paper size and thickness for this job Jobs button Save / load job Tools button Access additional machine settings Counter button Set batch counter behavior Line speed Set the desired paper output speed Gap between sheets... -
Page 20: Paper Size
_________________________________________________________________________ Paper Size To set paper size and type: 1. Choose Media from the top menu in the Home screen NOTE: Changing paper size thickness will reset any fine adjustments that may have been entered other screens. 2. Select one of the pre- defined paper sizes. - Page 21 _________________________________________________________________________ 3. Set paper thickness and paper weight NOTE: Measure paper thickness using the included vernier caliper. 4. Click paper properties button to enter paper surface finish and curl if necessary. 5. Confirm the settings by clicking the green tick mark.
-
Page 22: Saving And Loading Jobs
_________________________________________________________________________ Saving and Loading Jobs To store a customized job or to load a previously saved job: 1. Choose Jobs from the top menu Home screen NOTE: The current job name is displayed in the box on the right. Asterisk (*) following the job name indicates that there are unsaved changes to this job. -
Page 23: Counters
_________________________________________________________________________ Counters Once the machine cycle is started by default this machine will continue processing sheets until there is no more paper on the table. Alternatively, the machine can be configured to run in batch mode: • Stop mode – the machine will stop after the specified number of sheets has been processed. -
Page 24: The Tools Screen
_________________________________________________________________________ The Tools Screen Overview The Tools screen allows the operator to adjust advanced machine settings. To access the Tools screen: 1. Choose Tools from the top menu on the Home screen 2. Select the desired function. Element Description Feeder settings Allows the adjustment of feeder fan, lift and sensor settings in case the automatic settings do not provide satisfactory feeding performance. -
Page 25: Feeder Settings
_________________________________________________________________________ Feeder Settings Element Description AUTO settings Toggles automatic feeder mode. In AUTO mode feeder settings are calculated automatically depending on paper size and weight. In most cases AUTO settings will provide optimum feeding performance. Switching AUTO settings off allows the operator to make adjustments to fans. -
Page 26: Checking For Software Updates
_________________________________________________________________________ Checking for Software Updates 1. To check currently installed machine software version, go to Tools -> Software version 2. To check if there are software updates available for this machine go to Plockmatic Group website Partner Centre (https://plockmaticgroup.com/customer-login/). Find the latest software download for this machine and compare version numbers. -
Page 27: Troubleshooting
_________________________________________________________________________ 3 Troubleshooting Misfeeds / Jams General If a misfeed or a jam condition should occur, it is indicated on the machine display. A message with the jam description, error code and approximate jam location is displayed. Misfeed / Jam in the Feeder 1. -
Page 28: Fault Codes
_________________________________________________________________________ Fault Codes General When there is a misfeed or a fault condition in this machine, a message and a fault code will be displayed on the screen. Some fault codes may be rectified by the operator, while others may only be rectified by a certified service technician. NOTE: Clicking on the fault code will open a short description of the issue. -
Page 29: List Of Fault Codes
_________________________________________________________________________ List of Fault Codes FE-101 – Misfeed This code is displayed if the ultrasonic double sheet detector (US DSD) Q10 was not activated in time after the start of the feed cycle. This means that the sheet has failed to exit the feeder table area. - Page 30 _________________________________________________________________________ FE-103 – Sheet too long When a sheet exits the feeder the ultrasonic double sheet detector (US DSD) Q10 measures its length to ensure the sheet matches machine settings. Error code FE-103 is displayed if the sensor Q10 is covered longer than expected. This can be either because the sheet is too long or because there is insufficient grip on the registration belts and the sheet cannot be fed forward.
- Page 31 _________________________________________________________________________ FE-108 – Paper table overloaded In order to stop paper table movement in case it is overloaded paper stack height sensor Q4 measures the amount of paper on the table when feed cycle starts. If the media used is longer than 700 mm (27.6”) the permitted paper stack height is limited to 100 mm (3.9”).
-
Page 32: Accuracy Checks
_________________________________________________________________________ Accuracy Checks Separation Pad Check Rubber separation pads are used in the feeder to prevent several sheets from exiting the feeder table area at the same time. Separation pad position is set at the factory. If frequent misfeeds or double sheets occur the separation pad position may need to be adjusted by the following procedure: 1. -
Page 33: How To Get Support
_________________________________________________________________________ How to Get Support CAUTION: Never attempt any maintenance that is not specifically described in this documentation. Please contact your Dealer for authorized servicing. If you encounter problems running this machine and you cannot solve them by following the advice given in the Troubleshooting section of this manual, please contact your authorized Dealer for further support. -
Page 34: Remarks
_________________________________________________________________________ 4 Remarks Do’s and Don’ts • Always follow all warnings marked on, or supplied with, the equipment. • Always exercise care in moving or relocating the equipment. CAUTION: Unplug the power cord from the wall outlet and the machine before you move or relocate the equipment. -
Page 35: Where To Put Your Machine
_________________________________________________________________________ Where to Put Your Machine Machine Environment • Always locate the equipment on a solid support surface with adequate strength for the weight of the machine. • Always keep magnets and all devices with strong magnetic fields away from the machine. -
Page 36: Access To Machine
_________________________________________________________________________ Access to Machine Place the machine near a power source, providing clearance as shown. Service access 730 mm 28.7 in Operator access 1000 mm 39.4 in 685 mm / 27 in Service access 730 mm 28.7 in Operator access 1000 mm 39.4 in 1535 mm / 60.5 in... -
Page 37: Maintaining Your Machine
_________________________________________________________________________ Maintaining Your Machine CAUTION: Never attempt any maintenance that is not specifically described in this documentation. Please contact your Dealer for authorized servicing. Recommended Weekly Operator Maintenance To maintain the accuracy and reliability of this machine it is recommended to carry out the following maintenance on a weekly basis: 1. -
Page 38: Limitations Of The Vfl Feeder
_________________________________________________________________________ Limitations of the VFL Feeder • The intended average monthly sheet volume for the VFL Feeder is 450k. • Maximum hourly productivity of this machine is 10 000 sheets. • Paper quality affects the output quality of this machine. If the sheets entering this machine are not uniform and square, the output will vary accordingly. -
Page 39: Specifications
_________________________________________________________________________ 5 Specifications Machine Specification General Power source Voltage: 100-240 V ac (tolerance -10/+6%) Current: 8-4 A Frequency: 50/60 Hz Power consumption Standby: 55W Maximum: 750 W Operating temperature 10-30 °C (50-86 °F) Humidity 30-80 % RH Sound emissions 80 dB Physical Characteristics Product Length... -
Page 40: Eu Declaration Of Conformity
_________________________________________________________________________ EU DECLARATION OF CONFORMITY ......N0007378 (A.2) Manufacturer ..Plockmatic International AB, Telefonvägen 30, S-126 26 Hägersten, Sweden This Declaration of Conformity is issued under the sole responsibility of the manufacturer Object of the Declaration Model/Type F142-001 F142-011 F142-021...
Need help?
Do you have a question about the Morgana VFL Feeder and is the answer not in the manual?
Questions and answers