Table of Contents
Advertisement
Available languages
Available languages
Quick Links
Advertisement
Table of Contents

Related Manuals for Eneo VMC-6.4LED-P1A


Summary of Contents for Eneo VMC-6.4LED-P1A
- Page 1 Quick Installation Guide 6.4" TFT LCD Color Monitor VMC-6.4LED-P1A...
-
Page 2: Produktbeschreibung Und Anschlüsse
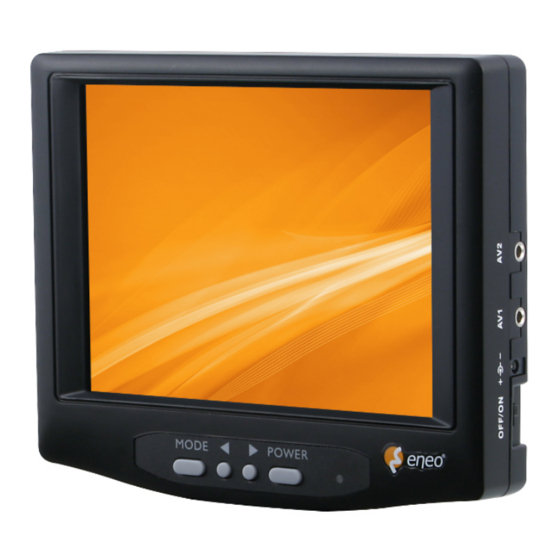
Sicherheitshinweise Bitte beachten Sie auch die beiliegenden Sicherheitshinweise und lesen Sie diese Anleitung vor Inbetriebnahme sorgfältig durch. Wichtige Hinweise sind mit einem Achtungsymbol gekennzeichnet. Lieferumfang 1x LCD-Monitor 1x Netzteil 100~240VAC 1x Anschluss Set 1x Standfuß 1x Betriebsanleitung Produktbeschreibung und Anschlüsse MODE POWER Modus... -
Page 3: Erste Schritte
Netzschalter DC IN Erste Schritte 1. Verbinden Sie Audio/Video Kabel mit dem Anschluss AV1 oder AV2. 2. Schließen Sie die 12VDC Spannunsversorgung an die DC Buchse an. 3. Stellen Sie den Netzschalter auf "ON" und drücken Sie den Power Schalter für “ON”. 4. - Page 4 LCD Monitor Netzteil Kamera DC IN (+12V) LCD Monitor Netzteil DC IN (+12V)
-
Page 5: Notes On Safety
Notes on safety Please also pay attention to the enclosed safety instructions, and carefully read through this instruction guide before initial operation. Important points of advice are marked with a caution symbol. Parts supplied 1x LCD-Monitor 1x Power supply 100~240VAC 1x Connection kit 1x Table stand 1x Operation manual... -
Page 6: Getting Started
Power Switch DC IN Getting started 1. Connect Audio/Video cable into either AV1 or AV2 properly. 2. Plug in DC 12V power supply into DC jack. 3. Turn Power Switch “ON” and press Power “ON”. 4. Select AV1 or AV2 by pressing ◂ (AV2) or ▸ (AV1). 5. - Page 7 LCD Monitor Adaptor Camera DC IN (+12V) LCD Monitor Adaptor DC IN (+12V)
-
Page 8: Consignes De Sécurité
Consignes de sécurité Respectez les consignes de sécurité ci-après et lisez attentivement cette notice avant toute utilisation. Les remarques importantes sont identifiées par le symbole « Attention ». Contenu de la livraison 1x écran LCD 1x alimentation 100~240VAC 1x kit de connexion 1x support de table 1x mode d´emploil Description du produit... -
Page 9: Exemples De Connexion
Power Switch DC IN (interrupteur) (entrée CC) Démarrage 1. Raccorder correctement le câble audio/vidéo soit sur AV1, soit sur AV2. 2. Raccorder le câble d´alimentation DC 12V dans la prise jack DC. 3. Appuyer sur le bouton “ON” pour allumer. 4. - Page 10 Moniteur LCD Adaptateur Caméra DC IN (+12V) Moniteur LCD Adaptateur DC IN (+12V)
-
Page 11: Wskazówki Dotyczące Bezpieczeństwa
Wskazówki dotyczące bezpieczeństwa Prosimy przestrzegać także załączonych wskazówek dotyczących bezpie- czeństwa oraz dokładnie zapoznać się z niniejszą instrukcją obsługi przed pierwszym uruchomieniem urządzenia. Ważne wskazówki są oznaczone symbolem 'UWAGA'. Elementy wchodzące w skład zestawu 1x Monitor LCD 1x Zasilacz 100~240VAC 1x Zestaw połączeniowy 1x Podstawka 1x Instrukcja obłsugi... -
Page 12: Pierwsze Kroki
Włącznik zasilania DC IN Pierwsze kroki 1. Podłącz przewód audio/wideo do wejścia AV1 lub AV2 2. Podłącz wtyk zasilacza 12CDC do gniazda zasilania. 3. Przesuń przełącznik zasilania w pozycję “ON” a następnie wciśnij Po- wer “ON”. 4. Wybierz wejście sygnałowe AV1 lub AV2 naciskając ◂ (AV2) or ▸ (AV1). 5. - Page 13 Monitor LCD Zasilacz Kamera DC IN Rejestrator (+12V) Monitor LCD Zasilacz Rejestrator DC IN Rejestrator (+12V)
-
Page 14: Объем Поставки
Замечания по безопасности Обратите, пожалуйста, внимание на прилагаемые указания по безо- пасности и внимательно прочитайте это руководство перед началом работы. Важные рекомендации отмечены символом предостережения. Объем поставки 1x ЖК-монитор 1x Блок питания 100~240 В 1x Комплект для подключения 1x Подставка 1x Руководство... -
Page 15: Начало Работы
Выключатель DC IN питания (вход пост. ток) Начало работы 1. Подключите кабель (аудио/видео) к AV1 или AV2 в правильном порядке. 2. Подключите блок питания 12 В (пост. ток) к разъему DC. 3. Переключите выключатель питания в положение «ON» (Вкл.) и на- жмите... - Page 16 ЖК-монитор Адаптер Камера DC IN Видеоплеер (VCD) (+12 В) ЖК-монитор Адаптер Видеорегистратор DC IN (+12 В) Видеоплеер (VCD)
- Page 20 Videor E. Hartig GmbH Exclusive distribution through spe- cialised trade channels only. Videor E. Hartig GmbH Carl-Zeiss-Straße 8 · 63322 Röder- mark/Germany Tel. +49 (0) 6074 / 888-0 · Fax +49 Technical changes reserved (0) 6074 / 888-100 www.videor.com...
Need help?
Do you have a question about the VMC-6.4LED-P1A and is the answer not in the manual?
Questions and answers