Table of Contents
Advertisement
Quick Links
Item #1000 020 147
Model #THD130419.1a.OF
USE AND CARE GUIDE
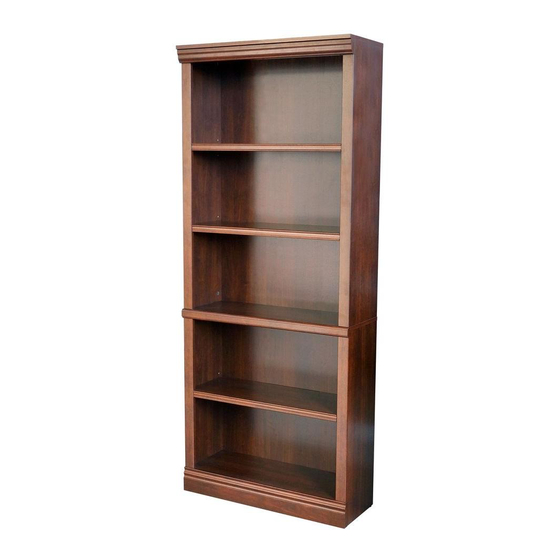
5-SHELF DECORATIVE BOOKCASE
Questions, problems, missing parts? Before returning to the store,
call Hampton Bay Customer Service
8 a.m. - 6 p.m., EST, Monday - Friday
1-855-HD-HAMPTON
HAMPTONBAY.COM
THANK YOU
We appreciate the trust and confidence you have placed in Hampton Bay through the purchase of this decorative bookcase. We strive to
continually create quality products designed to enhance your home. Visit us online to see our full line of products available for your home
improvement needs. Thank you for choosing Hampton Bay!
Advertisement
Table of Contents

Related Manuals for HAMPTON BAY THD130419.1a.OF


Summary of Contents for HAMPTON BAY THD130419.1a.OF
- Page 1 THANK YOU We appreciate the trust and confidence you have placed in Hampton Bay through the purchase of this decorative bookcase. We strive to continually create quality products designed to enhance your home. Visit us online to see our full line of products available for your home...
-
Page 2: Table Of Contents
Table of Contents Table of Contents ........2 Planning Assembly . -
Page 3: Pre-Assembly
Pre-Assembly PLANNING ASSEMBLY Compare all parts with the Hardware Included and Package Contents lists in this manual. If any part appears missing or damaged, do not assemble this product. Contact the Customer Service Team at 1-855-HD-HAMPTON or visit www.HamptonBay.com. TOOLS REQUIRED Flathead Phillips screwdriver... -
Page 4: Package Contents
Pre-Assembly (continued) PACKAGE CONTENTS Part Description Quantity Hutch top Bottom Upper left side panel Upper right side panel Left side panel Right side panel Bottom front rail Adjustable shelf Top trim Long rail Short rail Upper back panel Lower back panel... -
Page 5: Assembly
Assembly Preparing the top and the long and Preparing the hutch top and top short rails □ Screw four cam bolts (BB) into the appropriate holes on the □ Screw four cam bolts (BB) into each side of the top (B). hutch top (A). - Page 6 Assembly (continued) Preparing the bottom, side panels, Attaching the long rails and top trim and bottom front rail □ Insert the cam bolts (BB) attached to the long rails (K) into □ Insert sixteen wood dowels (CC) into the appropriate holes the holes along the side of the upper left and right side along the sides of the bottom panel (C), left side panel (F), panels (D and E).
- Page 7 Assembly (continued) Attaching the side panels and bottom Attaching the short rails front rail □ Insert the cam bolts (BB) attached to the short rails (L) into □ Position the bottom of the left and right side panels (F and the holes along the side of the left and right side panels (F G) against the sides of the bottom (C).
- Page 8 Assembly (continued) Attaching the upper left and right side Attaching the lower back panel panels □ Place the upper left and right side panels (D and E) on top NOTE: Before attaching the back panel, ensure that the unit is at 90°. of the bottom assembly.
- Page 9 Assembly (continued) Attaching the hutch top Attaching the upper back panel □ Place the hutch top (A) on top of the assembly, ensuring all NOTE: Before attaching the back panel, ensure that cam bolts (BB) and wood dowels (CC) fit together. the unit is at 90°.
- Page 10 Assembly (continued) Installing the shelves Securing the bookcase to the wall □ Insert shelf supports (FF) into the desired holes along the □ Attach the wall bracket (JJ) to the top center of the inside of the bookcase assembly and place the shelves (I) bookcase using a 4x16 mm screw (EE).
-
Page 11: Weight Limits
Assembly (continued) WEIGHT LIMITS □ This unit has been designed to support the maximum loads shown. Exceeding these load limits could cause sagging, instability, product collapse, and/or serious injury. WARNING: Please ensure that all the objects are removed before moving the assembled unit. The unit must be lifted by more than one person, not dragged or pushed. - Page 12 Questions, problems, missing parts? Before returning to the store, call Hampton Bay Customer Service 8 a.m.-6 p.m., EST, Monday-Friday 1-855-HD-HAMPTON HAMPTONBAY.COM Retain this manual for future use.
Need help?
Do you have a question about the THD130419.1a.OF and is the answer not in the manual?
Questions and answers