Canon imageCLASS 2300 Basic Manual
Canon imageclass 2300: user guide
Hide thumbs
Also See for imageCLASS 2300:
- Reference manual (197 pages) ,
- Sending manual (139 pages) ,
- Printer manual (134 pages)
Table of Contents
Advertisement
Quick Links
Advertisement
Table of Contents

Related Manuals for Canon imageCLASS 2300


Summary of Contents for Canon imageCLASS 2300
- Page 2 Ot¯ imageCLASS 2300 Basic Guide...
-
Page 3: Manuals For The Machine
Manuals for the Machine The manuals for this machine are divided as follows. Please refer to them for detailed information. Some of the manuals listed below are only supplied with the Network Model of this machine. Guides with this symbol are printed manuals. Installing and Setting Up the Machine Network and Printer Settings Basic Operations... -
Page 4: How This Manual Is Organized
Chapter 11 Appendix Includes the specifications and index. Considerable effort has been made to ensure that this manual is free of inaccuracies and omissions. However, as we are constantly improving our products, if you need an exact specification, please contact Canon. -
Page 5: Table Of Contents
PDF Manuals and Software (CD-ROMs) ......1-4 Features of the imageCLASS 2300........1-5 Model Configurations . - Page 6 Control Panel Parts and Functions ....... . .1-9 Chapter 2 Documents Placing Originals (For Copying, Faxing, Scanning) .
- Page 7 Chapter 6 Printer/Fax Driver Software Introduction ........... . 6-2 System Requirements .
- Page 8 Chapter 10 Troubleshooting List of Error Messages ......... . .10-2 Self-Diagnostic Display .
-
Page 9: Preface
Thank you for purchasing the Canon imageCLASS 2300. Please read this manual to familiarize yourself with the basic operation of all functions of your machine. After reading this manual, keep it handy for easy reference. How to Use This Manual... -
Page 10: Operations And Terms Used In This Manual
Operations and Terms Used in This Manual This machine makes effective use of memory in order to perform print operations efficiently. For example, as soon as the machine has scanned the original that you want to copy, it can immediately scan the next person's original. You can also print from this machine, using a function other than the Copy function. - Page 11 Copying Scanning of an original, printing through finishing.
-
Page 12: Legal Notices
Legal Notices Laser Safety This product complies with 21 CFR Chapter 1 Subchapter J as a Class 1 laser product under the U.S. Department of Health and Human Services (DHHS) Radiation Performance Standard according to the Radiation Control for Health and Safety Act of 1968. -
Page 13: Cdrh Regulations
United States. CANON INC. 3-30-2 SHIMOMARUKO, OHTA-KU, TOKYO, JAPAN CANON U.S.A., INC. ONE CANON PLAZA, LAKE SUCCESS, N.Y. 11042, U.S.A. CANON CANADA INC. 3128 ORLANDO DRIVE, UNIT#1, BUILDING F, MISSISSAUGA, ONTARIO, L4V1R5, CANADA... -
Page 14: International Energy Star Program
The standards and logos are uniform among participating nations. Trademarks Canon, the Canon logo, and imageCLASS are trademarks of Canon Inc. Other product and company names herein may be the trademarks of their respective owners. -
Page 15: Disclaimers
Disclaimers The information in this document is subject to change without notice. CANON INC. MAKES NO WARRANTY OF ANY KIND WITH REGARD TO THIS MATERIAL, EITHER EXPRESS OR IMPLIED, EXCEPT AS PROVIDED HEREIN, INCLUDING WITHOUT LIMITATION, THEREOF, WARRANTIES AS TO MARKETABILITY, MERCHANTABILITY, FITNESS FOR A PARTICULAR PURPOSE OF USE OR AGAINST INFRINGEMENT OF ANY PATENT. -
Page 16: Important Safety Instructions
Important Safety Instructions Please read these "Important Safety Instructions" thoroughly before operating the machine. As these instructions are intended to prevent injury to the user or other persons or destruction of property, always pay attention to these instructions. Also, since it may result in unexpected accidents or injuries, do not perform any operation unless otherwise specified in the manual. -
Page 17: Power Supply
Do not install the machine in the following locations: - A damp or dusty location - A location near water faucets or water - A location exposed to direct sunlight - A location subject to high temperatures - A location near open flames Power Supply WARNING Do not damage or modify the power cord. -
Page 18: Handling
Handling WARNING Do not attempt to disassemble or modify the machine. There are high-temperature and high-voltage components inside the machine which may result in a fire or electrical shock. If the machine makes strange noises, or gives off smoke, heat, or strange smells, immediately turn OFF the main power switch, and disconnect the power cord from the power outlet. -
Page 19: Maintenance And Inspections
Turn OFF the main power switch for safety when the machine will not be used for a long period of time, such as overnight. Also, disconnect the power cord for safety when the machine will not be used for an extended period of time, such as during consecutive holidays. -
Page 20: Consumables
CAUTION The fixing unit and its surroundings inside the machine may become hot during use. When removing jammed paper or when inspecting the inside of the machine, do not touch the fixing unit and its surroundings, as doing so may result in burns or electrical shock. -
Page 21: Other Warnings
Set-Up Help & Product Registration (USA) Before you unpack your new machine, CALL 1-800-828-4040 for help with set-up and operation. You can also register your machine with us. Call the Canon USA Consumer Products Information Center between 8 a.m. and 8 p.m. EST, Monday through Friday, except holidays. -
Page 22: Power Cord
Transparencies Canon Type E Power Cord NOTE All items are subject to availability. Accessories are also available for other Canon consumer products. - Page 23 xxii...
-
Page 24: Introduction
Features of the imageCLASS 2300 ........ -
Page 25: Where To Find Help
It is located on the feeder cover on top of the machine. I Set-Up Sheet for Networking and Printing Refer to this documentation to connect and set up the imageCLASS 2300 Network Model for networking and printing functions. NOTE Set-Up Sheet for Networking and Printing is only provided with the Network Model of this machine. -
Page 26: Book Manuals
Book Manuals The following book manuals are provided with the machine: I Basic Guide (This Document) Explains the basic operations of the machine's major functions. Keep this manual handy for easy reference. I Reference Guide Explains the machine operations common to all functions (i.e., entering characters). Also covers the machine settings, maintenance, and troubleshooting. -
Page 27: Pdf Manuals And Software (Cd-Roms)
PDF Manuals and Software (CD-ROMs) The imageCLASS 2300 Network Model comes with two CD-ROMs: Driver Software CD-ROM and Network User Software CD-ROM. I Driver Software CD-ROM The Driver Software CD-ROM contains the following manuals and software: PCL Printer Guide PCL Driver Guide... -
Page 28: Features Of The Imageclass 2300
2300 and the imageCLASS 2300 Network Model. I imageCLASS 2300 The standard imageCLASS 2300 lets you copy and fax documents placed on the machine. It can perform multiple jobs without waiting for the current job to be finished. For example, you can copy a document while the machine is sending a fax document scanned into the memory. -
Page 29: Setting Up Machine Functions
Setting Up Machine Functions It is necessary to set up certain functions before using it on a network, as a printer, and with the Fax and I-Fax function. To set up the functions, refer to the following instructions: I Setting Up and Connecting to the Network See the Network Guide. -
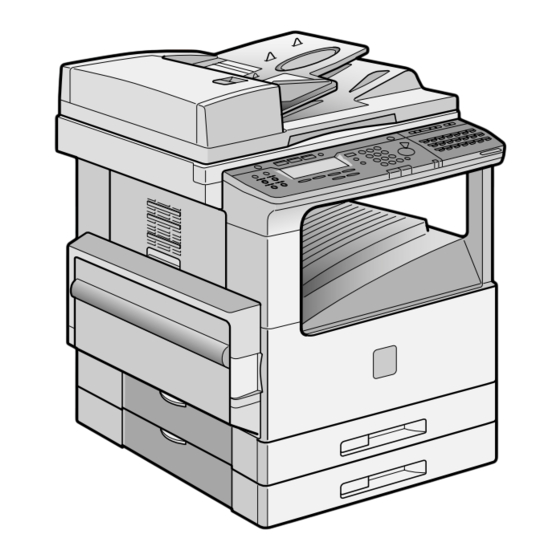
Page 30: Parts And Their Functions
Parts and Their Functions This section provides you with the names and functions of all the parts on the outside and inside of the main unit, and the control panel. External View F ro n t V i ew a a a a Control Panel Includes the keys, LCD display, and indicators required for operating the machine. -
Page 31: Internal View
i i i i Printer Ports Connect the printer cable (USB or parallel) to the matching port. Available in the Network Model only. Internal View a a a a Underside of the Feeder This holds originals in place on the platen glass. b b b b Platen Glass Place originals here when scanning books, thick originals, thin originals, etc. -
Page 32: Control Panel Parts And Functions
Control Panel Parts and Functions One-Touch Speed Dialing Panels Closed Display Contrast COPY PRINT Special Features Collate Reduce Enlarge Two Page Separation Frame Erase BACK a a a a Display Contrast dial Rotate to adjust the contrast of the LCD display. b b b b LCD display Displays messages and prompts during operation. - Page 33 p p p p Direct TX key Press to use the Direct Sending method, which enables you to send a document ahead of other documents stored in memory. q q q q One-touch speed dialing panels The first panel displays keys 01 to 21. Open the first panel to access keys 22 to 42.
-
Page 34: One-Touch Speed Dialing Panels Opened
One-Touch Speed Dialing Panels Opened Delayed Transmission Memory Reference Stack Bypass Settings a a a a Delayed Transmission key Press to set a time for delayed sending. b b b b Advanced Communication key Press to set a document for advanced communications such as polling sending/ receiving, confidential mailbox, relay broadcast, and subaddress/password transmission. - Page 35 1-12 Parts and Their Functions...
-
Page 36: Documents
Documents This chapter describes how to place original documents, and the types of documents you can load on the machine. Placing Originals (For Copying, Faxing, Scanning) ......2-2 Orientation . -
Page 37: Placing Originals (For Copying, Faxing, Scanning)
Placing Originals (For Copying, Faxing, Scanning) You can place originals on the platen glass or in the feeder, depending on the size and type of paper that you are using, and the settings that you have specified. I Platen Glass Place originals on the platen glass when scanning bound originals (such as books and magazines), originals on heavy or lightweight paper, and transparencies. -
Page 38: Platen Glass
Orientation You can place an original either vertically or horizontally. Always align the top edge of your original with the back edge of the platen glass (by the arrow in the top left corner), or with the back edge of the feeder. Vertical Placement Vertical Placement NOTE... -
Page 39: Platen Glass
Platen Glass You should use the platen glass when scanning bound originals (such as books and magazines), originals on heavy or lightweight paper, and transparencies. Lift up the feeder. IMPORTANT This machine is equipped with an open/close sensor on the underside of the feeder (see circled area in the above illustration). - Page 40 If you are enlarging an STMT or LTR original to 11" x 17" or LGL paper, place the original horizontally on the platen glass, and align it with the STMT marks. Gently lower the feeder. CAUTION Close the feeder gently, to avoid catching your hand, as this may result in personal injury.
-
Page 41: Feeder
Feeder Place a stack of originals in the feeder, and press [Start]. The machine automatically scans them. You can place the following originals in the original supply tray: Item Weight 10 to 32 lb bond (37 to 128 g/m Place very thin originals 10 to 14 lb bond (37 to 51 g/m originals 28 to 32 lb bond (105 to 128 g/m Size 11"... - Page 42 Place your originals as far into the feeder as they will go. A beep sounds when the originals are set correctly. Adjust the slide guides to fit the size of your originals. IMPORTANT Do not add or remove originals while they are being scanned. Do not place objects in the original output area.
- Page 43 NOTE The scanned originals are output face down to the original output tray. You can place different size originals (i.e., LTR and 11" x 17" , STMT LTR ) together in one group in the feeder when you set the Different Size Originals mode.
-
Page 44: Print Media
Print Media CHAPTER This chapter describes the types of paper you can use with the machine and how to load them. Paper Type ............3-2 Loading Paper . -
Page 45: Paper Type
Paper Type Paper types which can be used with this machine are shown in the following table. Paper Type Plain * Heavy * Recycled * Transparency Labels * Envelope *1 16 to 24 lb bond (60 to 90 g/m *2 24 to 32 lb bond (90 to 128 g/m *3 Only one sheet at the same time. -
Page 46: Loading Paper
Paper Size 11" x 17" (279 mm x 432 mm) 11" x 17" 8 1/2" x 14" (216 mm x 356 mm) 11" x 8 1/2" (279 mm x 216 mm) 8 1/2" x 11" (216 mm x 279 mm) 8 1/2"... -
Page 47: Loading Paper
Loading Paper This section describes how to load paper into the paper drawers. CAUTION When loading paper, take care not to cut your hands on the edges of the paper. NOTE The following paper sizes can be loaded into the paper drawers: 11" x 17" , LGL , LTR , LTR , and STMT . - Page 48 - Paper which has been printed on using a thermal transfer printer (do not copy on the reverse side either) - Back side of printed paper NOTE For high-quality print output, use paper recommended by Canon. Push down the metal plate until it locks in place. Loading Paper...
- Page 49 Load the paper into the paper drawer. Even out the edges of the paper stack. Load the paper stack against the right wall of the paper drawer. When loading paper in the paper drawer for the first time, set the size plate to match the paper size being loaded.
- Page 50 Gently push the paper drawer back into the machine until it clicks into place in the closed position. CAUTION When returning the paper drawer to its closed position, be careful not to get your fingers caught, as this may result in personal injury. IMPORTANT Never place paper or any other items in the open part of the paper drawer next to the paper stack.
-
Page 51: Adjusting The Paper Drawer Guides
Adjusting the Paper Drawer Guides If you want to load a new paper size in a paper drawer, follow the procedure described below to adjust the paper drawer guides. NOTE The following paper sizes can be loaded into the paper drawers: 11" x 17" , LGL , LTR , LTR , and STMT . - Page 52 Detach the paper end guide by pushing it to the left and pulling up, and attach it again aligning it with the mark for the desired paper size. NOTE Attach the end guide while pressing down the point indicated with "A". If you are setting for 11"...
- Page 53 Lower the lock lever to the left to lock the side guide. IMPORTANT Be sure to set the lock lever correctly. If the lock lever is set to the wrong position, paper jams or dirty prints may occur, or the inside of the machine may get dirty. Set the paper size detector lever, located on the left side of the paper drawer, to match the size of the paper being loaded.
- Page 54 Attach the appropriate paper size label onto the paper size plate. Remove the protecting plastic sheet and attach the label for the paper size you are loading. Change the paper size plate, so that it matches the new paper size being loaded. Gently push the paper drawer back into the machine until it clicks into place in the closed position.
- Page 55 CAUTION When returning the paper drawer to its closed position, be careful not to get your fingers caught, as this may result in personal injury. 3-12 Loading Paper...
-
Page 56: Copying - Basic Operations
Copying - Basic Operations CHAPTER This chapter describes the overview and flow of copying operations. Overview of Copying Operations ......... . . 4-2 Copy Operations . -
Page 57: Overview Of Copying Operations
Overview of Copying Operations Copying operations of this machine are done from the control panel with the Copy Basic Features screen, Special Features screen, and Additional Functions menu. Press the appropriate keys on the control panel in accordance with the selections on the LCD display. - Page 58 [Two-Page Separation]: This mode enables you to copy facing pages of an opened book onto separate copy sheets. (See Chapter 3, "Special Copying Features," in the Copying Guide.) [Margin]: Select to create margins along the sides of a copy sheet. (See Chapter 3, "Special Copying Features,"...
-
Page 59: Copy Operations
Copy Operations This section describes the flow of basic copy operations. Understanding the flow of copy operations is useful to learn the machine's basic features, and how to find more information in the NOTE For the following items: - Main power and the Energy Saver mode, see Chapter 1, "Before You Start Using This Machine,"... - Page 60 NOTE For instructions on using Department ID Management, see Chapter 5, "System Manager Settings," in the Reference Guide. Place your original. You can place your original both vertically and horizontally in the feeder or on the platen glass. For instructions on placing your original, see "Placing Originals," on p. 2-2. NOTE LTR originals can be placed either vertically or horizontally.
- Page 61 Set the desired copy mode on the Copy Basic Features screen. NOTE On the Copy Basic Features screen, you can select the copy ratio, paper size, and copy exposure and image quality settings. Set the desired copy modes on the Special Features screen. ❑...
-
Page 62: Press [Start]
Start Press [Start]. If the following screen is displayed, follow the instructions that appear on the LCD display © press complete, press Copying starts. IMPORTANT While copying, you cannot change copy mode settings, such as the copy quantity, paper size, and copy ratio. NOTE If there is a current job, the machine scans the original, and waits to print it. - Page 63 G If you want to cancel a copy job in the standby mode: ❑ Press [Stop]. Stop The display for selecting a copy job to cancel appears. ❑ Press [F2] (M) or [F3] (L) to select the copy job you want to cancel © press [F4] (CANCEL).
-
Page 64: More Information
More Information For detailed information on all copying functions, see the Copying Guide. Copy Operations... - Page 65 4-10 Copy Operations...
-
Page 66: Faxing - Basic Operations
Faxing - Basic Operations This chapter describes the overview of the fax functions, how to set up the machine, and the flow of fax operations. Overview of Fax Operations ..........5-2 Setting Up the Machine for Fax Operation . -
Page 67: Overview Of Fax Operations
Overview of Fax Operations This section provides an overview of the fax functions of this machine. I Various Fax Features When sending, you can set the document resolution, image quality and contrast suitable to the original. (See Chapter 3, "Basic Sending," in the Facsimile Guide.) You can select from Book, Memory, or Direct Sending. - Page 68 I Monitoring Transactions and Checking Settings You can check a list of documents being sent or waiting to be sent by simply pressing [Monitor]. (See Chapter 3, "Basic Sending," in the Facsimile Guide.) You can print various kinds of reports. (See Chapter 11, "Printing Reports and Lists," in the Facsimile Guide.) I Fax Transmissions over Internet (Network Model Only) If you have the Network Model, you can send and receive documents to/from an e-mail...
-
Page 69: Setting Up The Machine For Fax Operations
Setting Up the Machine for Fax Operations After installation, you need to set up the machine to use the fax function. If the connection or registered information is not correct, the machine will not function properly. Connecting the Telephone Line Before turning the power ON, connect the telephone line to the machine. -
Page 70: Setting The Current Date And Time
Setting the Current Date and Time You must set the current date and time. The date and time is printed on the top of every document you send. It is also used as required for functions that have timer settings. Additional Functions Press [Additional Functions]. - Page 71 Press [F2] ( ) or [F3] ( ) to select the month, day, year, and time © enter the current date and time using the numeric keys. Enter the date, and time in 24-hour notation, with four digits and no space. Enter two digits for the year.
-
Page 72: Registering The Required Sender Information
Registering the Required Sender Information According to recent amendments to the FCC (Federal Communications Commission) rules governing the use of facsimile equipment in the United States, the following sender information must be printed on every facsimile transmission. Your fax number Your personal name or company's name Date and time of transmission The sender information you register is printed as shown below. -
Page 73: Registering The Machine's Fax Number
I Date and Time Date and time of the transmission. I Fax Number Your fax number. I Unit's Name or Sender's Name Select a unit's name or a sender's name by pressing [TTI Selector] before scanning a document for sending. I Page Number/Total Number of Pages The page number of the document out of the total number of pages. - Page 74 Press [F3] (M) or [F4] (L) to highlight <01 USER SETTINGS> © press [OK]. The USER SETTINGS menu appears. Press [F3] (M) or [F4] (L) to highlight <01 TEL LINE SETTINGS> © press [OK]. The TEL LINE SETTINGS menu appears. Press [F3] (M) or [F4] (L) to highlight <01 USER TEL NO.>...
-
Page 75: Registering The Unit's Name
To delete the entire entry, press [Clear]. Reset Press [Reset] to return to the Basic Features screen. Registering the Unit's Name Follow the procedure below to register the unit's name. The unit's name can be the name of the company or department, or a personal name. The unit's name you register is printed as the TX Terminal ID on the document the other party receives. - Page 76 Press [F3] (M) or [F4] (L) to highlight <02 UNIT NAME> © press [OK]. The display for entering the unit's name appears. Enter the unit's name using the numeric keys © press [OK]. OPER SYMBOLS The unit's name is registered, and the USER SETTINGS menu returns. NOTE The unit's name can be up to 24 characters long.
-
Page 77: Registering The Sender Information (Tx Terminal Id)
Registering the Sender Information (TX Terminal ID) The TX Terminal ID tells the recipient the sender's name and fax number. Follow the procedure below to select the position where the TX Terminal ID appears on the recording paper, and to select a Telephone Number Mark. IMPORTANT •... - Page 78 Press [F3] (M) or [F4] (L) to highlight <04 TX TERMINAL ID> © press [OK]. The TX TERMINAL ID menu appears. Press [F3] (M) or [F4] (L) to highlight the transmission type © press [OK]. The transmission type settings menu appears. NOTE The I-Fax function is only available in the Network Model of this machine.
- Page 79 G If you selected <01 TTI POSITION>: ❑ Press [OK] © press [F3] (M) or [F4] (L) to highlight <01 OUTSIDE IMAGE> or <02 INSIDE IMAGE> © press [OK]. <01 OUTSIDE IMAGE>: This prints the TX Terminal ID outside the image area on the output fax.
-
Page 80: Fax Sending Operations
Fax Sending Operations This section describes the flow of basic fax sending operations. NOTE For the following items: - Main power and the Energy Saver mode, see Chapter 1, "Before You Start Using this Machine," in the Reference Guide. - Routine maintenance, see Chapter 9, "Maintenance," in this manual, or Chapter 6, "Routine Maintenance,"... - Page 81 Place your documents on the machine. You can place your original either vertically or horizontally in the feeder or on the platen glass. For instructions on placing your original, see "Placing Originals," on p. 2-2. Select the desired fax settings on the Fax Basic Features screen.
-
Page 82: Specify The Destination
Specify the destination. For instructions on how to specify a destination, see Chapter 2, "Speed Dialing," and Chapter 3, "Basic Sending," in the Facsimile Guide. If you want to set other sending conditions, set them before you specify the destination. (See Chapter 4, "Additional Sending Features," in the Facsimile Guide.) Start Press [Start]. -
Page 83: More Information
When scanning is complete, remove your document. If you have set Department ID Management, press [ID]. For instructions on using Department ID Management, see Chapter 5, "System Manager Settings," in the Reference Guide. More Information For detailed information on all fax functions, see the Facsimile Guide. 5-18 Fax Sending Operations... -
Page 84: Printer/Fax Driver Software
Printer/Fax Driver Software CHAPTER This chapter briefly describes the PCL printer driver and fax driver software. Introduction ............6-2 System Requirements . -
Page 85: Introduction
Introduction The Canon PCL5e and PCL6 printer drivers and fax driver give users of Microsoft Windows 95, Windows 98, Windows Millennium Edition, Windows NT Version 4.0, Windows 2000, or Windows XP (hereafter called Windows 95/98/Me/NT 4.0/2000/ XP) operating systems the ability to make full use of the printer. The printer drivers enable you to print documents from any Windows application to your printer using Hewlett-Packard's PCL5e or PCL6 data format. -
Page 86: System Requirements
System Requirements The printer and fax drivers for Windows 95/98/Me/NT 4.0/2000/XP can be used in the following system environments. I Software Microsoft Windows 95, Microsoft Windows 98, Microsoft Windows Me, Microsoft Windows NT 4.0, Microsoft Windows 2000, or Microsoft Windows XP. I Computer Any computer on which Microsoft Windows 95, Microsoft Windows 98, Microsoft Windows Me, Microsoft Windows NT 4.0, Microsoft Windows 2000, or Microsoft Windows XP runs... -
Page 87: Installing The Software
Installing the Software The Set-Up Sheet for Networking and Printing explains the standard installation procedures for the printer and fax drivers. For detailed information on different installation procedures, see the PCL Driver Guide and/or Fax Driver Guide. More Infomation For detailed information on all features of the printer driver and fax driver software, see the PCL Driver Guide and Fax Driver Guide with Cover Sheet Editor, respectively. - Page 88 I-Fax - Basic Operations This chapter describes the overview of the I-Fax functions, setting up the machine, and sending and receiving I-Fax. Overview of the I-Fax Functions ..........7-2 Setting Up the Machine for Using I-Fax .
-
Page 89: Overview Of The I-Fax Functions
Overview of the I-Fax Functions I-Fax (Internet Facsimile) enables you to transmit and receive a scanned original document converted to TIFF (Tag Image File Format) image data or PDF (Portable Document Format) as an attachment of an e-mail, to/from any facsimile with I-Fax capability or any personal computer with e-mail through the Internet. -
Page 90: Setting Up The Machine For Using I-Fax
Setting Up the Machine for Using I-Fax Before using I-Fax, it is necessary to specify the following settings from the machine's control panel. 1. Network Settings 2. Mail Transmission/Reception Settings 3. Registering mail addresses in one-touch speed dialing and coded speed dialing. I Network Settings Specify the machine's parameters in the network. -
Page 91: Sending I-Fax By One-Touch Speed Dialing, Coded Speed Dialing, Or Access Code
Sendig and Receiving I-Fax This section describes how to transmit and receive mail with the I-Fax functions of the machine. Sending I-Fax by One-Touch Speed Dialing, Coded Speed Dialing, or Access Code This section describes the basic procedure to transmit mail by one-touch speed dialing, coded speed dialing, or access code. - Page 92 Press [Line/Mail] to display <I-FAX>. The machine is ready to transmit. Place a document. NOTE For details on how to place a document, see Chapter 3, "Basic Sending," in the Facsimile Guide. Specify the transmitting conditions © press [OK]. NOTE To specify a sender name, open all three one-touch speed dialing panels, then press [TTI Selector] and select a sender name.
-
Page 93: Manual I-Fax Sending
Start Press [Start]. The machine scans the document. NOTE To cancel transmitting, press standby for transmitting. You cannot cancel while transmitting, even if you press (Stop). If the machine fails to transmit due to transmitting error, etc., it will retransmit for the number of times specified in RETRY of the MAIL USER SETTING menu. - Page 94 Place a document. NOTE For details on how to place a document, see Chapter 3, "Basic Sending," in the Facsimile Guide. Specify the transmitting conditions © press [OK]. NOTE To specify a sender name, open all three one-touch speed dialing panels, then press [TTI Selector] and select a sender name.
-
Page 95: Receiving I-Fax
Receiving I-Fax If you set EMAIL RX PROTOCOL to SMTP on the MAIL USER SETTING menu, or set EMAIL RX PROTOCOL to POP3 and specify an interval in the CHECK INTERVAL menu, the machine will automatically receive mail. (See Chapter 3, "Setting Up a Mail Account,"... -
Page 96: More Information
NOTE If you do not specify a sender name, the machine will receive mail transmitted to the mail address of the sender registered in '01'. Press [Start]. The machine receives mail. NOTE To cancel receiving mail, press displayed, press If data size of the transmitted mail is larger than that specified at MAX. RX DATA SIZE of the MAIL USER SETTING menu, the machine will not receive that mail, and skips to the next mail. - Page 97 7-10 Sendig and Receiving I-Fax...
-
Page 98: Printing - Basic Operations
Printing - Basic Operations This chapter describes the features and basic operations of the printer. Features of the Printer ........... 8-2 Connecting to a Computer . -
Page 99: Features Of The Printer
Features of the Printer Your printer offers fast printing speed, superior print quality, sophisticated paper handling, and ecology and energy sensitive features. The printer also supports network printing. The printer function is only available in the Network Model of this machine. - Page 100 Ltd. Also supplied with the printer are the TrueType screen fonts for 96 font solution and Canon Font Manager for easy management of installed fonts in Microsoft 98/Me/2000/XP and Windows NT version 4.0. A list of typeface samples is provided in Chapter 5, "Apendix,"...
-
Page 101: Connecting To A Computer
Connecting to a Computer Connect the machine to a computer or network using an interface cable supporting bidirectional communication or a 100Base-TX or 10Base-T Ethernet cable. IMPORTANT To avoid risk of a shock hazard, turn OFF the main power switch located on the right side of the machine and unplug the power cord from the power outlet, before connecting an interface cable or network cable. -
Page 102: Connecting Through A Parallel Interface
Connecting through a Parallel Interface This machine can connect to a computer through a parallel interface. After connection, install the supplied printer driver and utility software to match the OS of your computer. For installing the printer driver and utility software, see Chapter1, "Before You Start Using This Machine,"... -
Page 103: Printing A Document
Printing a Document To print a document, follow the procedure below. In the application, with the document open, select [Print] to print your document. In the [Print] dialog box, select your printer from [Name], and then click the [Properties] button. The [Properties] dialog box opens. -
Page 104: Canceling A Print Job
Canceling a Print Job After you cancel a print job from your software application, the printer may still have data remaining in the printer memory. Follow the procedure below to cancel a print job from the printer control panel. NOTE You can also cancel print jobs from the Remote UI. - Page 105 Canceling a Print Job...
-
Page 106: Maintenance
Maintenance This chapter describes how to replace the toner cartridge and perform routine cleaning. Replacing the Toner Cartridge ..........9-2 Routine Cleaning . -
Page 107: Replacing The Toner Cartridge
Replacing the Toner Cartridge When the machine runs out of toner, the alarm lamp blinks and the message <REPLACE CARTRIDGE> appears on the display. When this happens, remove the toner cartridge from the machine and slowly shake it sideways to redistribute toner. Reinstall the toner cartridge in the machine and print out a test page. - Page 108 Open the stack bypass. Pull out the left cover of the stack bypass. CAUTION Grasp the handle and pull out the left cover horizontally to the left. (Be careful not to pull it upward as it may easily come off.) Replacing the Toner Cartridge...
- Page 109 While gripping the handles (marked with blue) of the toner cartridge, pull it out horizontally. Cut the protective bag of the new toner cartridge with scissors, and remove it from the bag. IMPORTANT Use only the toner cartridge recommended for use with this machine. Replacing the Toner Cartridge...
- Page 110 When handling the toner cartridge, hold it by the handles with the triangle facing up as shown in the illustration below. Do not hold the toner cartridge vertically or upside down. Do not discard the protective bag for the toner cartridge. You will need it later to store the cartridge temporarily when the machine needs servicing.
- Page 111 Place the toner cartridge on a flat stable surface, and hold the cartridge with one hand while removing the seal by pulling it out with the other hand. IMPORTANT Do not stop pulling the seal until it is removed completely from the toner cartridge because the toner may scatter and printing quality may deteriorate.
- Page 112 CAUTION When removing the protective cover, be careful not to touch the toothed wheels on the covered side of the toner cartridge, as this may result in personal injury. Toothed wheel IMPORTANT Do not reattach the protective cover on the toner cartridge, as this may damage the drum inside the cartridge.
- Page 113 While holding the toner cartridge with both hands, align both sides of the cartridge with the guiding grooves on the machine and insert the cartridge horizontally as far as it will IMPORTANT Be careful not to touch the blue-green drum inside the toner cartridge, as this may damage the drum.
- Page 114 Close the stack bypass. CAUTION When closing the stack bypass, be careful not to get your fingers caught, as this may result in personal injury. IMPORTANT Be sure to clean the roller every time you replace the toner cartridge. (See "Roller Cleaning,"...
-
Page 115: Routine Cleaning
Routine Cleaning If the original is not copied clearly, clean the following parts of the machine. For high quality output, we recommend cleaning these parts once a month. Platen Glass Underside of the Feeder Feeder Scanning Area Roller WARNING When cleaning the machine, first turn OFF the main power switch and disconnect the power cord. -
Page 116: Feeder Cleaning
Clean the platen glass and the platen glass cover with a cloth dampened with water, and wipe them with a soft and dry cloth. Feeder Cleaning When scanning the original using the feeder, some streaked lines which do not exist on the original may appear on the output. If your originals have black streaks or appear dirty after copying them using the feeder, this may be caused by pencil writing rubbing off the originals and onto the roller. - Page 117 Open the feeder cover. Clean the rollers (total of two places), separator, and transparent plastic plate inside the feeder cover, with a cloth slightly dampened with water. CAUTION Do not dampen the cloth too much, as this may damage the original or break the machine.
- Page 118 Close the feeder cover. CAUTION When closing the feeder cover, be careful not to get your fingers caught, as this may result in personal injury. Open the feeder. Routine Cleaning 9-13...
- Page 119 Clean the feeder scanning area (platen glass) and the document feeding roller, with a cloth dampened with water. Document Feeding Roller CAUTION Do not dampen the cloth too much, as this may damage the original or break the machine. Close the feeder. CAUTION When closing the feeder, be careful not to get your fingers caught, as this may result in personal injury.
-
Page 120: Roller Cleaning
Roller Cleaning If a black streak appears on the output, the fixing roller in the main unit may be dirty. In such a case, clean the roller. Also, it is necessary to clean the roller every time you replace the toner cartridge. First, print the cleaning paper using the machine, then perform the roller cleaning using the cleaning paper. - Page 121 Press [F3] (M) or [F4] (L) to highlight <02 PRNT CLEANING PAPR> © press [OK]. The cleaning paper is printed. Open the stack bypass. Load the cleaning paper with the side on which the letter "V" is printed facing up. 9-16 Routine Cleaning...
-
Page 122: More Information
Repeat steps 1 to 3 © press [F3] (M) or [F4] (L) to highlight <01 START CLEANING> © press [OK]. The machine starts cleaning the roller. NOTE If a cleaning paper jam occurs, the alarm indicator blinks red. Press remove the jammed cleaning paper. Discard the cleaning paper after use. - Page 123 9-18 Routine Cleaning...
-
Page 124: Troubleshooting
Troubleshooting This chapter highlights any problems that may occur during the operation of the machine, and solutions that may be helpful in fixing them. List of Error Messages ..........10-2 Self-Diagnostic Display . -
Page 125: List Of Error Messages
List of Error Messages Self-Diagnostic Display The machine is equipped with the self-diagnostic function. Self-diagnostic (error) messages appear on the display when: Printing cannot be performed because of an operational error. You need to make a judgement or take some action during scanning or printing. The following is a list of self-diagnostic messages, along with possible causes and remedies. - Page 126 CHECK PRINTER Cause The machine is detecting an error in the printer area. Remedy Please contact your service representative. CHECK PRINTER COVER Cause One or more covers are open. Remedy Close all the covers. DATA ERROR Cause The machine may have trouble. Remedy Contact your service representative.
- Page 127 LOAD THE APPROPRIATE SIZE PAPER Cause Although <AUTO PAPER> is selected when copying, appropriate size paper is not set in the paper drawer or on the stack bypass. Remedy Select the paper size, or set the copy ratio. If you press [Start] while this message is displayed, the paper with the smallest margin is selected automatically and printing starts.
- Page 128 OPEN THE FRONT COVER Cause A paper jam has occurred. Remedy Open the front cover, and follow the procedure described on the label inside the cover to remove the jammed paper. OUTPUT TRAY FULL Cause The output tray is full of paper. Remedy Remove the prints from the output tray.
- Page 129 RECEIVED IN MEMORY Cause A document was received in memory because the toner or paper has run out. Remedy Replace the toner cartridge or replenish the paper, then print out the document stored in memory. REPLACE CARTRIDGE Cause The toner cartridge has run out of toner. Remedy Replace the toner cartridge.
- Page 130 TRANSMITTING... Cause 1 During the current transmission, your machine may have tried to send a document identified from the list of documents in memory. Remedy Resend the document when transmission of the first document is complete. Cause 2 You tried to send a document using direct sending while sending another document from memory.
-
Page 131: When Problems Occur During Fax Operations
When Problems Occur during Fax Operations If an error occurs during fax operations, check the following points. Sending Documents You cannot send a document after dialing. Cause 1 Is your machine set to the correct telephone line type (pulse or tone)? Remedy Check the telephone line type and set the machine to the correct type. - Page 132 Cause 2 Is a document occupying your memory space? Remedy Either print out any documents received in memory or wait until any documents stored in memory for sending have been sent, then resend your document. Documents are streaked with lines when they print on the other party's fax machine. Cause Is your machine's platen glass clean? Remedy...
- Page 133 You cannot perform polling. Cause Is the polling box set? Remedy For polling to send, the polling box must first be set. Set the polling box and resend the document. You cannot perform confidential sending. Cause 1 Has the other party set up a confidential mailbox in memory? Remedy Contact the other party and resend on confirmation that their confidential mailbox is set.
-
Page 134: Receiving Documents
Cause 4 Did you make a mistake in the subaddress or password registered for one-touch or coded speed dialing? Remedy Check your one-touch or coded speed dialing settings. Cause 5 Is the memory of the other fax machine full? Remedy Contact the other party and check. - Page 135 The documents you received are of poor quality. Cause 1 Is your toner cartridge running low on toner? Remedy Remove your toner cartridge and gently tilt it from side to side five or six times to redistribute the remaining toner. If this does not solve the problem, replace with a new toner cartridge.
-
Page 136: Other Problems
Other Problems Sending and receiving of documents is too slow. Cause 1 Is the resolution set to 'FINE', 'SUPER FINE', or 'ULTRA FINE'? Remedy Setting the resolution to 'STANDARD' reduces the sending time. However, any fine text in the document will also be harder to read. Cause 2 Is the picture quality set to 'PHOTO' or 'TEXT/PHOTO'? Remedy... -
Page 137: When You Have Trouble Printing
When You Have Trouble Printing If your printer is unable to print or you have problems with the printer or print quality, use this map to find the appropriate page for help. 10-14 When You Have Trouble Printing PCL Driver Guide PCL Driver Guide Reference Guide Reference Guide... - Page 138 PCL Printer Guide Reference Guide Reference Guide Reference Guide Reference Guide PCL Printer Guide When You Have Trouble Printing 10-15...
-
Page 139: Service Call Message
Service Call Message If a malfunction occurs to the machine, service call messages appear on the display. WARNING Do not connect or disconnect the power cord with wet hands, as this may result in electrical shock. CAUTION Always grasp the power plug when disconnecting the power cord. Pulling on the power cord may expose or snap the core wire, or otherwise damage the power cord. -
Page 140: If You Cannot Solve The Problem
If you contact your service representative, make sure you have the following information ready: Product name: imageCLASS 2300 Serial number (located on the label at the back of the machine) Details of the problem... - Page 141 10-18 If You Cannot Solve the Problem...
- Page 142 Appendix Machine Specifications ..........11-2 Main Unit .
-
Page 143: Machine Specifications
Number of Tones Acceptable Paper Stock Acceptable Originals Maximum Original Size Paper Sizes Margin Areas 11-2 Machine Specifications Specifications Canon imageCLASS 2300 Desktop Stationary Indirect electrostatic copying One component dry jumping exposure Heat Roller Fusing Reading 600 dpi x 600 dpi Writing approx. - Page 144 Item Warm-Up Time When main power is turned ON: approx. 30 seconds Activation time from Energy Saver mode: Power Consumption at Energy Saver mode: <LOW>: approx. 30 seconds Power Consumption at Energy Saver mode: <HIGH>: approx. 10 seconds *Activation time may vary depending on the conditions under which the machine is used.
-
Page 145: Feeder
Item Exposure Control Multiple Copies Power Source Max Power Consumption Dimensions (H x W x D) Installation Space (W x D) Weight Feeder Item Type Originals Original Paper Weights 10 to 32 lb bond (37 to 128 g/m Original Tray Capacity Original Replacement Speed Power Source... -
Page 146: Fax Specifications
Applicable Telephone Line Autodial Function * Approximately 3 seconds per page for transmission time based on Canon FAX standard Chart No. 1 (ECM-MMR, Standard Mode) at 33.6 Kbps modem speed. The Public Switched Telephone Network (PSTN) currently supports 28.8 Kbps modem speed or lower, depending on the telephone line conditions. -
Page 147: Printer Specifications
Printer Specifications This section lists the specifications for the printer. Controller Specifications Memory (RAM) Host interface RAM socket ROM socket Software Specifications Printer Languages PCL Resident Fonts Effective Printable Area 11-6 Printer Specifications Power PC405 (200 MHz) One parallel connector (Centronics compliant/ bidirectional) One USB connector (V 1.1) Two expansion board slots ®... -
Page 148: Interface Specifications
Interface Specifications This section lists the specifications for the parallel interface and printer cable that should be used with the printer. Parallel Interface (Centronics Compliant) I Location of signal lines and pins Pin number STROBE DATA0 DATA1 DATA2 DATA3 DATA4 DATA5 DATA6 DATA7... -
Page 149: Index
Index Symbols + key, 1-11 Numerics 10Base-T/100Base-TX Port, 1-7 Additional Functions key, 1-10, 4-3 Additional Functions menu, 4-3 Advanced Communication key, 1-11 Alarm lamp, 1-10 Automatic Image Refinement, 8-2 BACK key, 1-10 Canceling a print job, 8-7 Centronics, 11-7 Clear key, 1-9, 1-11 Coded Dial key, 1-9 Collate key, 1-10 Connecting telephone line, 5-4... - Page 150 Hook key, 1-9 Horizontal placement, 2-3 ID key, 1-10 If you cannot solve a problem, 10-17 I-Fax, 7-2, 7-4 E-Mail mode, 7-2 Simple mode, 7-2 In Use Memory lamp, 1-10 Installing driver software, 6-4 Interface cable, 8-4 Internal view, 1-8 Interrupt key, 1-10 LCD display, 1-9 Left cover, 1-8...
- Page 151 Plug & Play, 8-2 POP3, 7-2 Preset time, 7-4 PRINT key, 1-9 Printer Ports, 1-8 Printing a document, 8-6 Receive mail automatically, 7-8 Receive mail manually, 7-8 Receiving I-Fax, 7-8 Registering mail addresses, 7-3 Remote UI Support, 8-3 Report key, 1-11 Reset key, 1-9 Resolution, 8-2 Retransmit, 7-6, 7-7...
- Page 152 Underside of the feeder, 1-8 Unit's name, registering, 5-10 Upper left cover, 1-8 USB interface, 8-5 USB port, 8-2, 8-5 Ventilation slot, 1-7 Vertical placement, 2-3 When problems occur during fax operations, 10-8 Other problems, 10-13 Receiving documents, 10-11 Sending ducuments, 10-8 Index 11-11...
-
Page 153: Limited Warranty (U.s. Only)
CONTACT CANON USA IMMEDIATELY IF YOU HAVE NOT RECEIVED A COPY OF THE CARTRIDGE P LIMITED WARRANTY. Canon USA warrants the Product to be free from defects in workmanship and materials under normal use and service for a period of one year after delivery to the original purchaser ("Purchaser") by Canon USA or its authorized dealer. - Page 154 (the "Product") to be free from defects in workmanship and materials under normal use and service for a period of fifteen (15) days from the date of original purchase. A defective Cartridge returned to a Canon U.S.A. or a Canon Canada Authorized Service Facility or Dealer from whom you purchased the Cartridge ("Service Provider") within the fifteen (15)
- Page 155 GARANTIE RESTREINTE DES CARTRIDGE P DE CANON Canon U.S.A., Inc. et Canon Canada Inc. (collectivement " Canon ") certifient à l'acheteur initial (" l'Acheteur ") que la Car tridge P de Canon, livrée avec la présente garantie restreinte (la " Cartouche "), utilisée avec un produit compatible* de marque Canon (le " Produit ") est sans vices de mat- ière et de fabrication, dans des conditions d'utilisation et de ser vice normales pendant une période de quinze (15) jours à...
Need help?
Do you have a question about the imageCLASS 2300 and is the answer not in the manual?
Questions and answers