HIKVISION DS-1600KI Quick Start Manual
Hide thumbs
Also See for DS-1600KI:
- User manual (88 pages) ,
- Quick start manual (75 pages) ,
- User manual (64 pages)
Table of Contents
Advertisement
Quick Links
Advertisement
Table of Contents

Subscribe to Our Youtube Channel
Related Manuals for HIKVISION DS-1600KI


Summary of Contents for HIKVISION DS-1600KI
- Page 1 DS-1600KI Keyboard Quick Start Guide...
- Page 2 WITHOUT LIMITATION, MERCHANTABILITY, SATISFACTORY QUALITY, OR FITNESS FOR A PARTICULAR PURPOSE. THE USE OF THE PRODUCT BY YOU IS AT YOUR OWN RISK. IN NO EVENT WILL HIKVISION BE LIABLE TO YOU FOR ANY SPECIAL, CONSEQUENTIAL, INCIDENTAL, OR INDIRECT DAMAGES,...
- Page 3 DS-1600KI Keyboard Quick Start Guide PRODUCTION OF CHEMICAL OR BIOLOGICAL WEAPONS, ANY ACTIVITIES IN THE CONTEXT RELATED TO ANY NUCLEAR EXPLOSIVE OR UNSAFE NUCLEAR FUEL-CYCLE, OR IN SUPPORT OF HUMAN RIGHTS ABUSES. IN THE EVENT OF ANY CONFLICTS BETWEEN THIS MANUAL AND THE APPLICABLE LAW, THE LATER...
- Page 4 DS-1600KI Access Documentation Visit official website ( www.hikvision.com ) for user manual, application, SDK document, etc. Scan the following QR code to get more information about the operations of DS-1600KI network keyboard. Symbol Conventions The symbols that may be found in this document are defined as follows.
- Page 5 DS-1600KI Keyboard Quick Start Guide Symbol Description Indicates a hazardous situation which, if not avoided, will or could Danger result in death or serious injury. Indicates a potentially hazardous situation which, if not avoided, could Caution result in equipment damage, data loss, performance degradation, or unexpected results.
-
Page 6: Table Of Contents
DS-1600KI Keyboard Quick Start Guide Contents Chapter 1 Product Description ....................1 1.1 Product Overview ........................1 1.2 Appearance ..........................2 Chapter 2 Activate Keyboard ...................... 5 Chapter 3 Configure Network ..................... 6 3.1 Set Wired Network ........................ 6 3.2 Set Wireless Network ......................6 Chapter 4 Manage Keyboard ...................... - Page 7 DS-1600KI Keyboard Quick Start Guide 5.1.2 Display a Camera on Video Wall ................. 26 5.1.3 Local Live View ......................27 5.1.4 Video Wall Playback ....................28 5.2 Control HikCentral ........................ 29 5.2.1 Login ..........................29 5.2.2 Display a Camera on Video Wall ................. 30 5.2.3 Local Live View ......................
-
Page 8: Chapter 1 Product Description
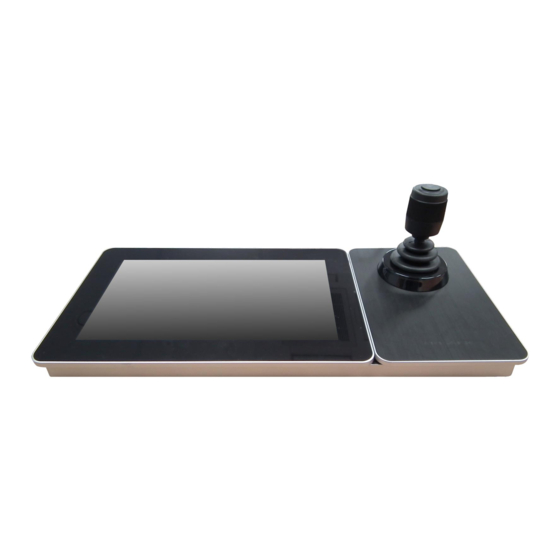
In addition to displaying images, the 10.1" capacitive touchscreen supports DVI and HDMI video outputs. The software system runs on Android 6.0. It is compatible with all series of Hikvision IP cameras, NVRs/DVRs, and control center platform such as HikCentral. It supports recording, picture capturing and two-way audio, as well as the video wall control and scene switch of platform and decoding devices. -
Page 9: Appearance
DS-1600KI Keyboard Quick Start Guide 1.2 Appearance The DS-1600KI keyboard consists of a touchscreen and a joystick panel. The joystick panel is detachable and can be separated from the keyboard. Refer to the following figure for keyboard appearance. Figure 1-1 DS-1600KI Keyboard Appearance Front Panel Refer to the following table for description of keyboard appearance. - Page 10 Rotate clockwise Zoom in (ZOOM+) Interfaces Eight interfaces and one button are provided on the rear panel of DS-1600KI keyboard. Figure 1-2 Rear Panel of DS-1600KI Refer to the following table for description of the interfaces. Table 1-3 Description of Interfaces...
- Page 11 DS-1600KI Keyboard Quick Start Guide Number Name Description LAN Network Interface 1 10M/100M/1000M adaptive Ethernet interface. Power Input 12 VDC power input. Power Switch Press to wake up the touchscreen, or turn the keyboard into sleeping mode. Hold (for 3 s) to power on/ o ff, or reboot the device.
-
Page 12: Chapter 2 Activate Keyboard
DS-1600KI Keyboard Quick Start Guide Chapter 2 Activate Keyboard The network keyboard is inactive by default. You should activate it before performing other operations. Then you can log in and log out of the keyboard. Here we introduce the local operation. -
Page 13: Chapter 3 Configure Network
DS-1600KI Keyboard Quick Start Guide Chapter 3 Configure Network 3.1 Set Wired Network Setting the wired network parameters to connect to the network. Before You Start Make sure the network cable is appropriately connected. Steps 1. Click on the home page and choose Ethernet. -
Page 14: Chapter 4 Manage Keyboard
DS-1600KI Keyboard Quick Start Guide Chapter 4 Manage Keyboard 4.1 Manage Device 4.1.1 Add and Edit Device Add Device Manually You can add devices manually by inputting device parameters. Up to 8,000 devices can be added by the admin. Steps 1. - Page 15 DS-1600KI Keyboard Quick Start Guide Figure 4-2 Add Device Manually 6. Click Save to finish adding. Add Device by Searching Online Devices You can also add devices by online searching Steps 1. Click Keyboard. 2. Click 3. Click Device. 4. Click to enter Auto Search interface.
- Page 16 DS-1600KI Keyboard Quick Start Guide Figure 4-3 Auto Search Result 5. Select the device(s) as you desired. 6. Enter User Name, and Password. 7. Click Save. Note If you want to add multiple devices, all device user names and passwords must be the same.
- Page 17 DS-1600KI Keyboard Quick Start Guide 5. Click 6. Enter the admin password. 7. Select the import file from the USB flash drive. 8. Click Confirm. Find Added Devices In the device/camera management interface, you can quickly search the added device/camera by IP address, keywords, or name.
-
Page 18: Manage Connected Cameras
DS-1600KI Keyboard Quick Start Guide 3. Click Device. 4. Click on the name of the added device to view device details. 5. Modify the device parameters on the pop-up window. Note Only Name, User Name, and Password are editable. Figure 4-5 Edit the Device 6. - Page 19 DS-1600KI Keyboard Quick Start Guide 4. Click the camera as you desired and then you can view its details. Name The camera name. Channel ID The camera serial number according to the added sequence. Protocol The transfer protocol. Stream The stream type.
-
Page 20: Manage Auto-Switch Group
DS-1600KI Keyboard Quick Start Guide 4.1.3 Manage Auto-switch Group Create Auto-switch Group It would be easier to manage your devices by adding relevant cameras into a group. For example, you can add all the underground garage cameras into one auto-switch group, so you can view the group to view the cameras in it. - Page 21 DS-1600KI Keyboard Quick Start Guide Figure 4-8 Add Camera(s) to the New Group 7. Select the camera(s). 8. Click Save to finish creating auto-switch group. Edit Auto-switch Group You can view and modify auto-switch group details in Auto-switch Group interface.
-
Page 22: Live View On Screen
DS-1600KI Keyboard Quick Start Guide Figure 4-9 Edit the Group 5. Edit group parameters of Name, No., and Time. 6. Click Edit to edit channel(s) in the group. 7. Click Save to confirm the modification. 4.2 Live View on Screen 4.2.1 View Video with Keyboard... -
Page 23: Ptz Control
DS-1600KI Keyboard Quick Start Guide • Click to preview the previous or next camera or group. • Enter 0 in the numeric panel and click to stop the live view. 7. Optional: You can click to perform operations including full screen, capture picture, record video, two-way audio, and view parameters of the camera on live view. -
Page 24: Play Video On Video Wall
DS-1600KI Keyboard Quick Start Guide Note Up to 300 presets can be configured. What to do next You can click a preset from the list to call the preset. Call a Patrol A patrol is a scanning track specified by a group of user-defined presets, with the scanning speed between two presets and the dwell time at the preset separately programmable. -
Page 25: Save Current Video Wall Settings As A Scene
DS-1600KI Keyboard Quick Start Guide Steps 1. Click Keyboard. 2. Click 3. Click Video Wall. 4. Select a playing window. 5. Click to expand the channel panel. 6. Select the camera No. you want to play on the selected display window. -
Page 26: Video Playback
DS-1600KI Keyboard Quick Start Guide 3. Click Video Wall. 4. Select a window on the video wall interface. 5. Click 6. Select the date as you desired. Figure 4-11 Video Wall Playback 7. Optional: You can switch channel by two ways. -
Page 27: Control Dvr
DS-1600KI Keyboard Quick Start Guide Figure 4-12 Video Playback 5. You can switch channel by two ways. In keyboard panel Enter the serial number in the numeric panel, and click In the list a. Click List b. Select a camera in the list. - Page 28 DS-1600KI Keyboard Quick Start Guide Figure 4-13 DVR/NVR Remote Panel 6. Optional: You can switch on Enable PTZ to achieve functions such as PTZ control, iris control, focus, wiper, light, etc. Note Ensure the device that connects to DVR/NVR device supports PTZ control operation.
- Page 29 DS-1600KI Keyboard Quick Start Guide Table 4-1 Panel Description Name Function Description Returns to the previous menu. Presses for arming/disarming the device in live view mode. REC/SHOT Enters the Manual Record settings menu. Presses this button followed by a numeric button to call a PTZ preset in PTZ control settings.
-
Page 30: Manage User
DS-1600KI Keyboard Quick Start Guide Name Function Description Shows/hides the control interface in playback mode. MULT/FOCUS- Switches between single screen and multi- s creen mode. Adjusts the focus in conjunction with the A/FOCUS+ button in PTZ control mode. IRIS- Adjusts the iris of the PTZ camera in PTZ control mode. -
Page 31: Edit User Accounts By Administrator
DS-1600KI Keyboard Quick Start Guide Figure 4-15 User Management 4.5.2 Edit User Accounts by Administrator The administrator has the highest operation permissions that can change the settings of all other operators, including assigning device permission to the operator, and changing the password of other operator accounts. -
Page 32: Chapter 5 Control Platform
DS-1600KI Keyboard Quick Start Guide Chapter 5 Control Platform You can connect the keyboard to platforms to play live video on video wall or watch live video on the local keyboard interface. 5.1 Control iSecure You can connect the keyboard to iSecure platform to play live video on video wall, watch live video or watch video playback on the local keyboard interface. -
Page 33: Display A Camera On Video Wall
DS-1600KI Keyboard Quick Start Guide Figure 5-2 Login 5. Optional: Check Remember Password to log in with no need to enter password next time. 6. Tap Login. 5.1.2 Display a Camera on Video Wall Steps 1. Tap on the iSecure main page, and select Video Wall. -
Page 34: Local Live View
DS-1600KI Keyboard Quick Start Guide - Tap Shortcut, and enter the serial number in the numeric panel, and tap - Tap List, and select a camera to display. You can also perform the following operations: • Enter 0+ to stop playing the live video of corresponding camera on the window. -
Page 35: Video Wall Playback
DS-1600KI Keyboard Quick Start Guide - Tap List, and select a channel to preview. 5. Optional: Switch the channel. - Enter 0+ to stop previewing. - Tap to preview the live video of the previous input camera channel on the selected output monitor. -
Page 36: Control Hikcentral
DS-1600KI Keyboard Quick Start Guide Figure 5-5 Video Wall Playback 3. Select the date. 4. Select the channel. You can choose one of the following ways. - Tap Shortcut, and enter the serial number in the numeric panel, and tap - Tap List, and select the desired channel. -
Page 37: Display A Camera On Video Wall
DS-1600KI Keyboard Quick Start Guide Figure 5-6 IP Configuration 4. Enter the server's user name and password. Figure 5-7 Login 5. Optional: Check Remember Password to log in with no need to enter password next time. 6. Tap Login. 5.2.2 Display a Camera on Video Wall Steps 1. -
Page 38: Local Live View
DS-1600KI Keyboard Quick Start Guide Figure 5-8 Video Wall 3. Optional: Tap to select desired scene from Scene list. 4. Optional: Tap and select Split to split the output window. 5. Tap to play the live video of corresponding camera on the window. You can choose one of... - Page 39 DS-1600KI Keyboard Quick Start Guide Figure 5-9 Live View 2. Optional: Tap to select the window division mode. Note You can also preview the window first and then split the window. In this situation, the previewed window in on the upper-left by default.
-
Page 40: Video Wall Playback
DS-1600KI Keyboard Quick Start Guide Note You can also press the button on the joystick to capture pictures. Record Select a window and tap Record to save records to a USB flash drive or FTP server. View Tap View to view parameters of the camera on live view. -
Page 41: Control Kps
DS-1600KI Keyboard Quick Start Guide Pause/Start Fast forward speed; you can also move the joystick right to fast forward the video. Slow forward speed; you can also move the joystick left to slow forward the video. Stop 5.3 Control KPS You can connect the keyboard to KPS platform to play live videos on the video wall. - Page 42 DS-1600KI Keyboard Quick Start Guide 2) Click , enter the serial number in the numeric panel, and click to play the live video of corresponding camera on the window. Note You can also select from List. 7. Optional: Click to preview the live video of the previous or next input camera channel on the selected output monitor.
- Page 43 UD17856B...
Need help?
Do you have a question about the DS-1600KI and is the answer not in the manual?
Questions and answers