HIKVISION DS-1100KI User Manual
Network keyboard
Hide thumbs
Also See for DS-1100KI:
- User manual (150 pages) ,
- Quick start manual (44 pages) ,
- Quick operation manual (15 pages)
Table of Contents
Advertisement
Quick Links
Advertisement
Table of Contents

Related Manuals for HIKVISION DS-1100KI


Summary of Contents for HIKVISION DS-1100KI
- Page 1 DS-1100KI Network Keyboard User Manual V 1.0...
- Page 2 User Manual of DS-1100KI Network Keyboard Preventive and Cautionary Tips Before connecting and operating your keyboard, please be advised of the following tips: Ensure unit is placed in a well-ventilated, dust-free environment. • Keep all liquids away from the keyboard.
-
Page 3: Table Of Contents
User Manual of DS-1100KI Network Keyboard Table of Contents Chapter1 Introduction ........................3 1.1 Overview ..........................3 1.2 Features ..........................3 1.3 Appearance .......................... 4 Chapter2 Keyboard Configuration ...................... 5 2.1 Keyboard Management ......................6 2.1.1 Network Settings ....................... 6 2.1.2 Hardware Settings ..................... -
Page 4: Chapter1 Introduction
1.1 Overview DS-1100KI Network Keyboard can be used to control the speed dome and the display of decoded video on TV wall, as well as support 1 channel of video view at up to 1080P resolution. It is easy to operate and configure settings. -
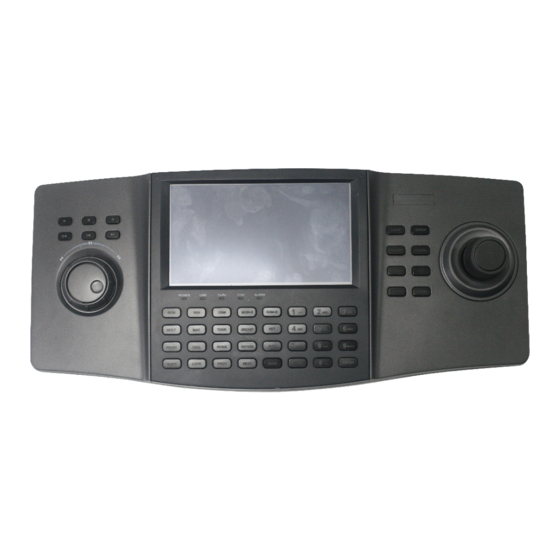
Page 5: Appearance
User Manual of DS-1100KI Network Keyboard 1.3 Appearance Front View: Interface Description:... -
Page 6: Chapter2 Keyboard Configuration
User Manual of DS-1100KI Network Keyboard Chapter2 Keyboard Configuration Note: Please use the user name admin to log in the system for the first time. After keyboard startup, enter the user login interface. Select the user name to admin and input the password of 12345. -
Page 7: Keyboard Management
User Manual of DS-1100KI Network Keyboard 2.1 Keyboard Management Click Keyboard on the admin main interface to enter the keyboard management menu. 2.1.1 Network Settings Configure the network settings of the keyboard, including the Port, IP address, Subnet Mask and Default Gateway, and finally click Apply to save the settings. -
Page 8: Time Settings
User Manual of DS-1100KI Network Keyboard 2.1.3 Time Settings Date: Click to select the date from the calendar. Time: Click to decrease or increase the time value. Click Apply to save the settings. 2.1.4 Language Language: Click to select the option from the drop-down menu. -
Page 9: Upgrade
User Manual of DS-1100KI Network Keyboard Use the touch pen to click the three spots marked as “+” by following the hints and then the system will pop up the attention “Screen verify successfully”, click OK to finish the operation. -
Page 10: Device Management
User Manual of DS-1100KI Network Keyboard If the upgrading is failed, the corresponding error message box will pop up. Note: When the upgrading is successful, the keyboard will restart automatically to complete the upgrade. 2.2 Device Management Click Device on the admin main interface to enter the device management menu. - Page 11 User Manual of DS-1100KI Network Keyboard User can also select multiple devices to be added each time. If the adding is failed, in the status bar it will display . If the adding is successful, it will display in Note: The devices for bulk adding must have the same user name and password.
-
Page 12: Modify/Delete Device
User Manual of DS-1100KI Network Keyboard 2.2.2 Modify/Delete Device Modify Device: Click to enter the Modify Device” interface. User is allowed to modify the device name, port, user name and password. Finally, click Modify to modify the device information. Note: The user name and password here refer to that are used for to log in the device from keyboard. -
Page 13: Add User
User Manual of DS-1100KI Network Keyboard 2.3.1 Add User Add User: Click Add User to enter the Add User interface. Input the user name, password and verify the password. Finally, click Add to finish the adding of user. 2.3.2 Related Device... -
Page 14: Modify User Password And Delete User
User Manual of DS-1100KI Network Keyboard 2.3.3 Modify User Password and Delete User Modify User Password: In the “User Management” interface, user can click to modify the user password. Delete User: Click to delete the selected user. 2.3.4 Configure File Click Config on the admin main interface to enter the file Export/Import Configuration menu. -
Page 15: Logout
User Manual of DS-1100KI Network Keyboard 2.5 Logout Click Logout on the admin main interface, the message box “Logout Now?” will pop up. Click Yes to confirm the logout, or No to cancel the operation. After logout, the system will return to the User Login interface. -
Page 16: Chapter3 Keyboard Operation
User Manual of DS-1100KI Network Keyboard Chapter3 Keyboard Operation 3.1 Basic Operation In the User Login interface, select the user name (operator) and password, and then click Login to enter the operator main interface. Enter the operator main interface. 3.1.1 Device List Click the Device List on the main interface to enter the Device List menu. -
Page 17: Input Settings
User Manual of DS-1100KI Network Keyboard 3.1.2 Input Settings Click Input Set on the main interface to enter the Input Settings menu. The list has displayed all device channels which can be controlled by the current login user. Note: The channel name shown in the Monitor Name is obtained from the corresponding channel of device. -
Page 18: Output Settings
User Manual of DS-1100KI Network Keyboard 3.1.3 Output Settings Click Output Set on the main interface to enter the Output Settings menu. Modify Monitor: In the “Output Settings-Output List” menu, click to modify the channel name of the device. Note: The monitor No. should be set uniquely from 0 to 9999. -
Page 19: Macro Settings
User Manual of DS-1100KI Network Keyboard 3.1.4 Macro Settings The macro command can be used for operating a series of continuous actions in sequence. Operation: Press the “Num+MAC” keys to call the programmed macro command. Click Macro Set on the main interface to enter the Macro Settings menu. -
Page 20: Aux Settings
User Manual of DS-1100KI Network Keyboard 3.1.5 Aux Settings Click Aux Set on the main interface to enter the Aux Settings menu. The Aux Key 1 and Aux Key 2 correspond to the AUX1 and AUX2 keys on the keyboard respectively. The Aux key operation can be set to Voice Talk or Picture Catch. -
Page 21: Reboot
User Manual of DS-1100KI Network Keyboard 3.1.8 Reboot Click Reboot on the main interface, the message box “Are you sure you want to reboot now?” will pop up. Click Yes to confirm the reboot, or No to cancel the operation. -
Page 22: Local Preview
User Manual of DS-1100KI Network Keyboard In the any interface or operation status, user can press the SHIFT + LOCK keys to lock the keyboard operation. In the lock status, user can press the SHIFT + LOCK keys to unlock the keyboard operation. - Page 23 User Manual of DS-1100KI Network Keyboard 3.2.2.2 Camera to Monitor The selected input signal can be outputted and displayed by the decoding channel on the monitor. Currently, the supported decoding resolution includes: QCIF, CIF, 2CIF, DCIF, 4CIF, 720p, 1080p, VGA, UXGA, etc. The output interface can be selected to BNC/VGA/HDMI/DVI.
- Page 24 User Manual of DS-1100KI Network Keyboard 3.2.2.4 Camera Group to Window The video signal from the camera group can be outputted to and displayed on the selected window of monitor in cycle. Note: The default dwell time for the cycle view is 30 sec.
- Page 25 User Manual of DS-1100KI Network Keyboard Operation: Press the SET key to enter the tour settings interface. Press the Num + TOUR keys to set the selected tour. Press the Num + ENTER keys to set the dwell time of the camera and the camera number respectively.
-
Page 26: Playback By Time
User Manual of DS-1100KI Network Keyboard Note: The group tour settings will not be saved after keyboard reboot. And if user presses the Num + GROUP keys in the process of setting the group tours, all previous settings will be cleared. -
Page 27: Ptz Control
User Manual of DS-1100KI Network Keyboard Press the key again to restore the normal playback. If the current playback operation has been stopped, it is invalid to press the button. If is needs to the re-configure the playback time when the selected MON (+WIN) is in playback mode, user... - Page 28 User Manual of DS-1100KI Network Keyboard Set Preset by Input Channel Operation: Input the Num + CAM keys to select the inputput channel. Operate the joystick to move PTZ to the desired position. Press the Num + PRESET keys to set the current position as the preset with entered number.
- Page 29 User Manual of DS-1100KI Network Keyboard 3.2.3.4 Set Patrol Select the output monitor or window and the keyboard is capable of automatically connecting with its corresponding camera. Press the SET key on the keyboard and then press PATROL key to enter the patrol settings interface.
- Page 30 User Manual of DS-1100KI Network Keyboard Call Patrol by Output Channel Operation: Input the Num + MON keys to select the output channel. Input the Num + WIN keys to select the display window. Press the Num + PATROL keys to call the programmed pattern.
- Page 31 User Manual of DS-1100KI Network Keyboard Set Pattern by Input Channel Operation: Input the Num + CAM keys to select the input channel. Press the SET key to enter the settings interface. Press the Num + PATTERN keys to set the pattern number.
-
Page 32: Aux Functions
User Manual of DS-1100KI Network Keyboard 3.2.4 Aux Functions The keyboard is designed with AUX1 and AUX2 keys on its panel. User is allowed to configure Aux function for AUX1/AUX2 key on the operator user interface. By default settings, the AUX1 is selected to Voice Talk and the AUX2 to Picture Capture function. -
Page 33: Other Functions
User Manual of DS-1100KI Network Keyboard Note: During the recording, the REC key on the keyboard lights in red. When user exits the operation interface, the recording continues and user is allowed to stop it. When the window is configured with multiple channels for display (in cycle view mode), the error message will appear on the screen. -
Page 34: Appendix 1: Specifications
User Manual of DS-1100KI Network Keyboard Appendix 1: Specifications Model DS-1100KI Control Mode IP-based 7” TFT LCD monitor with touch panel TFT LCD Panel Resolution: 800×480 Joystick 3-axis joystick Audio Line In 1-ch, 3.5mm connector (2.0Vp-p, 1kΩ) Input / Output 1-ch, 3.5mm connector (Linear, 600Ω) -
Page 35: Appendix 2: Ftp Upgrade
User Manual of DS-1100KI Network Keyboard Appendix 2: FTP Upgrade Enable the FTP service on PC and operate the following steps: Step1: Open the wftp software, and then select Security->Users/rights option. Step1: Create new user. Step3: Input the user name: target, password: target, and then click OK to continue.
Need help?
Do you have a question about the DS-1100KI and is the answer not in the manual?
Questions and answers