HIKVISION DS-1100KI Quick Start Manual
Network keyboard
Hide thumbs
Also See for DS-1100KI:
- User manual (150 pages) ,
- Quick start manual (26 pages) ,
- Quick operation manual (15 pages)
Table of Contents
Advertisement
Quick Links
Advertisement
Table of Contents

Related Manuals for HIKVISION DS-1100KI


Summary of Contents for HIKVISION DS-1100KI
- Page 1 DS-1100KI(B) Network Keyboard Quick Start Guide...
- Page 2 WITHOUT LIMITATION, MERCHANTABILITY, SATISFACTORY QUALITY, OR FITNESS FOR A PARTICULAR PURPOSE. THE USE OF THE PRODUCT BY YOU IS AT YOUR OWN RISK. IN NO EVENT WILL HIKVISION BE LIABLE TO YOU FOR ANY SPECIAL, CONSEQUENTIAL, INCIDENTAL, OR INDIRECT DAMAGES,...
- Page 3 DS-1100KI(B) Network Keyboard Quick Start Guide PRODUCTION OF CHEMICAL OR BIOLOGICAL WEAPONS, ANY ACTIVITIES IN THE CONTEXT RELATED TO ANY NUCLEAR EXPLOSIVE OR UNSAFE NUCLEAR FUEL-CYCLE, OR IN SUPPORT OF HUMAN RIGHTS ABUSES. IN THE EVENT OF ANY CONFLICTS BETWEEN THIS MANUAL AND THE APPLICABLE LAW, THE LATER...
- Page 4 DS-1100KI(B) Network Keyboard Quick Start Guide Regulatory Information FCC Information Please take attention that changes or modification not expressly approved by the party responsible for compliance could void the user's authority to operate the equipment. FCC compliance: This equipment has been tested and found to comply with the limits for a Class B digital device,pursuant to part 15 of the FCC Rules.
- Page 5 DS-1100KI(B) Network Keyboard Quick Start Guide standards listed under the EMC Directive 2014/30/EU, the RoHS Directive 2011/65/EU. 2012/19/EU (WEEE directive): Products marked with this symbol cannot be disposed of as unsorted municipal waste in the European Union. For proper recycling, return this product to your local supplier upon the purchase of equivalent new equipment, or dispose of it at designated collection points.
- Page 6 Before using the product, please read the user manual carefully and keep it for future reference. Data Acquisition Visit our website (http://www.hikvision.com/) for user manuals, application tools and development materials. Scan the QR code of the user manual to get more information.
- Page 7 DS-1100KI(B) Network Keyboard Quick Start Guide Symbol Description Indicates a hazardous situation which, if not avoided, will or could Danger result in death or serious injury. Indicates a potentially hazardous situation which, if not avoided, could Caution result in equipment damage, data loss, performance degradation, or unexpected results.
- Page 8 DS-1100KI(B) Network Keyboard Quick Start Guide Operation Description • Press a numeric button and CAM button to select a camera. • Number represents camera ID. Check camera ID in resource list. Press Number + CAM-G • Press a numeric button and CAM-G button to select an input channel group.
- Page 9 DS-1100KI(B) Network Keyboard Quick Start Guide • Do not subject the battery to extremely low air pressure, which may result in an explosion or the leakage of flammable liquid or gas. • Dispose of used batteries according to the instructions.
-
Page 10: Table Of Contents
DS-1100KI(B) Network Keyboard Quick Start Guide Contents Chapter 1 Introduction ....................... 1 1.1 Product Introduction ......................1 1.2 Panel Introduction ......................... 1 Chapter 2 Activation ........................2 Chapter 3 Network ........................3 Chapter 4 Keyboard ........................4 4.1 Login ............................4 4.2 Add Devices ........................... - Page 11 DS-1100KI(B) Network Keyboard Quick Start Guide 4.7 Connect the Device Through Serial Ports ................21 4.7.1 Connect Video Recorders .................... 21 4.7.2 Connect Analog Matrix ....................22 4.7.3 Connect Analog Dome ....................23 Chapter 5 iSecure Mode ......................25 5.1 Login ............................ 25 5.2 Local Live View ........................
-
Page 12: Chapter 1 Introduction
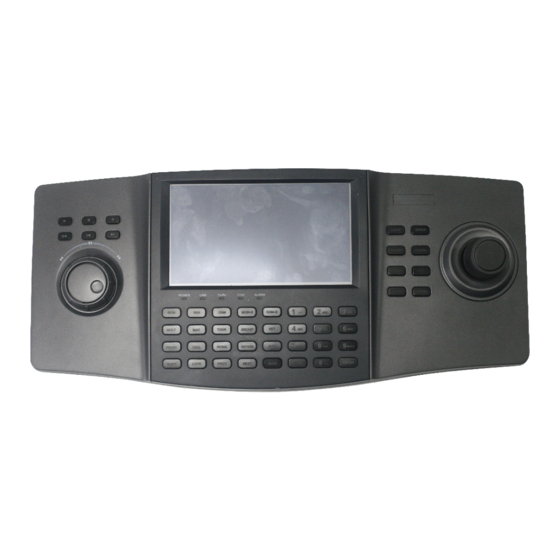
Chapter 1 Introduction 1.1 Product Introduction DS-1100KI(B) is a network keyboard independently developed by Hikvision. It features in 7-inch full view multi-touch LCD screen and four-dimensional joystick. It supports network access to DVR, DVS, NVR, network camera, network dome, video integrated platform, decoder, iSecure, Hikcentral and other platform software, with powerful functions and quick and simple operations. -
Page 13: Chapter 2 Activation
DS-1100KI(B) Network Keyboard Quick Start Guide Chapter 2 Activation The network keyboard can be activated by local menu, SADP software and Web interface. Steps 1. Connect your network keyboard power supply to an electrical outlet, and turn on the network keyboard. -
Page 14: Chapter 3 Network
DS-1100KI(B) Network Keyboard Quick Start Guide Chapter 3 Network Network parameters must be properly configured before you can add network devices and operate the network keyboard over network. Steps 1. Go to System → Network . 2. Configure network parameters. -
Page 15: Chapter 4 Keyboard
DS-1100KI(B) Network Keyboard Quick Start Guide Chapter 4 Keyboard Keyboard mode is mainly applied to small-sized surveillance projects. Network keyboard works as a control center and manages surveillance devices in it. 4.1 Login Steps 1. Tap Keyboard at home page. - Page 16 DS-1100KI(B) Network Keyboard Quick Start Guide Figure 4-2 Device Management 2. Tap Center Device or IPC/IP Dome as desired. 3. Tap 4. Enter device IP address, port, user name, and password. Note • The device name is obtained automatically or can be configured as required.
- Page 17 DS-1100KI(B) Network Keyboard Quick Start Guide Figure 4-3 Add Center Device...
-
Page 18: Add In Batches
DS-1100KI(B) Network Keyboard Quick Start Guide Figure 4-4 Add Network Camera 4.2.2 Add in Batches Add Online Devices in Batches You can add the devices with the same user name and password in batches. Steps 1. Go to Keyboard → Device . -
Page 19: Local Live View
DS-1100KI(B) Network Keyboard Quick Start Guide Figure 4-6 Online Devices 3. Check the devices to be added and tap 4. Enter user name and password. 5. Tap Add. Import Input Channels in Batches The information of added input channel can be generated into an excel file and exported to the USB flash drive for backup. -
Page 20: Preview By Operating Keyboard Shortcut
DS-1100KI(B) Network Keyboard Quick Start Guide 4.3.2 Preview by Operating Keyboard Shortcut Press the keys of the keyboard to preview the input channel. Steps 1. Press 0+MON. 2. Preview the channel as desired. • Press Num+CAM to preview the signal of the corresponding channel. -
Page 21: Ptz Control
• Press Num+CAM to control PTZ without previewing images from speed domes. • The captured image and the recording can be saved in USB flash drive or uploaded to FTP server. For FTP configuration, refer to DS-1100KI(B) Network Keyboard User Manual. 4.3.3 PTZ Control... -
Page 22: Video Wall
DS-1100KI(B) Network Keyboard Quick Start Guide 4.4 Video Wall 4.4.1 Video Wall Configuration Configure Region Divide a video wall into several regions to manage video wall by region. Steps 1. Go to Keyboard → Region . Figure 4-8 Region Management 2. - Page 23 DS-1100KI(B) Network Keyboard Quick Start Guide Link Output Channel to Video Wall Steps 1. Tap of region to configure. Figure 4-10 Region Configuration 2. Tap of a grid. 3. Select a decoding device and select its output channel. 4. Tap OK to finish setting.
-
Page 24: Video Wall Control
DS-1100KI(B) Network Keyboard Quick Start Guide Figure 4-11 Add Output 4.4.2 Video Wall Control Layout Operation Select a monitor to open, close, resize, and divide windows. Steps 1. Press Num+REGION, or press Num+WALL. 2. Tap to select a monitor. 3. Operate the window as desired. - Page 25 DS-1100KI(B) Network Keyboard Quick Start Guide Divide window Press Num+MON and press Num+MULT to divide the window. Expand/ Press Num+MON, press Num+WIN to select a sub-window, and press F2 restore sub- to expand the sub-window to cover the whole monitor. Press F2 again to window restore the sub-window.
- Page 26 DS-1100KI(B) Network Keyboard Quick Start Guide Scene Operation You can switch the scene for a region or video wall. Steps 1. Press Num+REGION, or press Num+WALL. 2. Select a monitor or window on touchscreen. 3. Select a scene as desired.
-
Page 27: Ptz Control
DS-1100KI(B) Network Keyboard Quick Start Guide 4.4.3 PTZ Control You can control the added speed dome, like control PTZ movement, turn on/off light, turn on/off wiper, zoom in/out, increase/decrease focus, increase/decrease iris, set/call preset, patrol and pattern. Steps 1. Display speed dome image on video wall. For detailed steps, see Window Operation . -
Page 28: Video Recorder
DS-1100KI(B) Network Keyboard Quick Start Guide Instant Playback Play videos in 3/5/10/15 minutes. Steps 1. Start video wall live view. For detailed steps, see Window Operation . 2. Press to start playing the video within 5 minutes. Or tap , tap Instant, and select the playback time. - Page 29 DS-1100KI(B) Network Keyboard Quick Start Guide Table 4-3 Button Description Button Description Disable PTZ Exit PTZ control mode. Numeric Key • In editing mode, tap it to enter number 1 to 16. • In live view or PTZ mode, tap it to switch channel.
- Page 30 DS-1100KI(B) Network Keyboard Quick Start Guide Button Description • Left (corresponds to in playback menu): Tap it to switch to previous file/event/tag/day. • Right (corresponds to in playback menu): Tap it to switch to next file/event/tag/day. Enter • Confirm an operation.
-
Page 31: Live View
DS-1100KI(B) Network Keyboard Quick Start Guide Button Description ZOOM- Zoom out. FOCUS- Decrease focus. IRIS- Decrease iris. Directional Button Control PTZ movement. Enter In auto-scan mode, tap it to stop/resume auto-scan. 4.6.2 Live View Video Recorder (Version before 4.0) Whatever interface the video recorder is in, tap ESC till you enter the live view mode. -
Page 32: Connect The Device Through Serial Ports
DS-1100KI(B) Network Keyboard Quick Start Guide 4.7 Connect the Device Through Serial Ports The network keyboard can be connected to the device through RS-232 and RS-485 serial port. After the connection, the keyboard can be used to control the video recorder, analog dome and analog matrix. -
Page 33: Connect Analog Matrix
DS-1100KI(B) Network Keyboard Quick Start Guide Figure 4-15 Connect Video Recorder (PTZ Disabled) Figure 4-16 Connect Video Recorder (PTZ Enabled) 4.7.2 Connect Analog Matrix The keyboard can be connected to the analog matrix through RS-232 serial port. Steps 1. Connect the analog matrix to the RS-232 interface on the keyboard. -
Page 34: Connect Analog Dome
DS-1100KI(B) Network Keyboard Quick Start Guide Figure 4-17 Setting Parameters of RS232 Serial Port 5. Optional: Switch one input port of the analog matrix to the output port. 1) Part of the analog matrix needs to enter the device number in the keyboard. - Page 35 DS-1100KI(B) Network Keyboard Quick Start Guide Figure 4-18 Setting Parameters of RS485 Serial Port 5. Press NUM+CAM and select analog dome. Note One RS-485 serial port can be connected to multiple analog domes. The longer the serial port cable is, the fewer analog dome can be connected at the same time.
-
Page 36: Chapter 5 Isecure Mode
DS-1100KI(B) Network Keyboard Quick Start Guide Chapter 5 iSecure Mode 5.1 Login Steps 1. Tap iSecure at home page. Figure 5-1 Log in to iSecure 2. Tap Server IP on the upper right corner. Figure 5-2 Server IP Configuration 3. Select Http or Https as the login mode. -
Page 37: Local Live View
DS-1100KI(B) Network Keyboard Quick Start Guide 5.2 Local Live View You can preview the cameras on iSecure platform on the touchscreen. 5.2.1 Enable Local Live View Preview the images of cameras by operating keyboard shortcut. Steps 1. Press 0+MON to enter local live view. -
Page 38: Video Wall Control
DS-1100KI(B) Network Keyboard Quick Start Guide Figure 5-3 Add Region 3. Enter video wall ID, start and end coordinates. 4. Tap OK. Note • Up to 16 regions are supported. • The maximum region specification is 6 × 8. • If you do not configure the region, region 1 corresponds to video wall 1, region 2 corresponds to video wall 2, region 16 corresponds to video wall 16 by default. -
Page 39: Ptz Operation
DS-1100KI(B) Network Keyboard Quick Start Guide 5.3.3 PTZ Operation You can control the added speed dome, like control PTZ movement, turn on/off light, turn on/off wiper, zoom in/out, increase/decrease iris, increase/decrease focus, set and call preset, call patrol/ pattern. For detailed steps, see PTZ Control . -
Page 40: Chapter 6 Hikcentral Mode
DS-1100KI(B) Network Keyboard Quick Start Guide Chapter 6 HikCentral Mode The keyboard is accessible to HikCentral platform, and the images of the cameras accessible to HikCentral platform can be displayed on the video wall and previewed locally. 6.1 Login Steps 1. -
Page 41: Local Live View
DS-1100KI(B) Network Keyboard Quick Start Guide 6.2 Local Live View You can preview the cameras on HikCentral platform on the touchscreen. 6.2.1 Enable Local Live View Preview the images of cameras by operating keyboard shortcut. Steps 1. Press 0+MON to enter local live view. -
Page 42: Ptz Operation
DS-1100KI(B) Network Keyboard Quick Start Guide Note In HikCentral interface, press Num+CAM to control PTZ without previewing the images from speed domes. 6.2.2 PTZ Operation You can control the added speed dome, like control PTZ movement, turn on/off light, turn on/off wiper, zoom in/out, increase/decrease iris, increase/decrease focus, set and call preset, call patrol/ pattern. -
Page 43: Video Wall Control
DS-1100KI(B) Network Keyboard Quick Start Guide 4. Tap OK. Note • Up to 16 regions are supported. • The maximum region specification is 6 × 8. • If you do not configure the region, region 1 corresponds to video wall 1, region 2 corresponds to video wall 2, and region 16 corresponds to video wall 16 by default. - Page 44 UD19898B...
Need help?
Do you have a question about the DS-1100KI and is the answer not in the manual?
Questions and answers