Table of Contents
Advertisement
Quick Links
Complementary instructions
Read carefully before
using the machine!
Keep for future reference.
This operator's manual/mounting manual
is to be considered as part of the
machine. Suppliers of new and second-
hand machines are required to document
in writing that the operator's manual/
mounting manual was delivered with the
machine and handed over to the
Version 4.11.00
customer..
h
5902180-
-en-0821
Original instructions
Advertisement
Table of Contents

Related Manuals for Rauch AXIS EMC ISOBUS


Summary of Contents for Rauch AXIS EMC ISOBUS
- Page 1 Complementary instructions Read carefully before using the machine! Keep for future reference. This operator's manual/mounting manual is to be considered as part of the machine. Suppliers of new and second- hand machines are required to document in writing that the operator's manual/ mounting manual was delivered with the machine and handed over to the Version 4.11.00...
- Page 2 Dear customer, By purchasing the AXIS EMC ISOBUS machine control unit for the AXIS EMC fertilizer spreader, you have shown confidence in our product. Thank you very much! We want to justify this confidence. You have purchased a powerful and reliable machine control unit.
-
Page 3: Table Of Contents
3 Attachment and installation Tractor requirements Connections, sockets 3.2.1 Power supply 3.2.2 Connecting the machine control unit 3.2.3 Dosing slider preparation 4 Operation Switching on the machine control unit Navigation within the menus Main menu Fertilizer settings AXIS EMC ISOBUS 5902180-h-gb-... - Page 4 Spreading operation with one section and in border spreading mode Spreading with the automatic operating mode (AUTO km/h + AUTO kg) Idle measurement 5.7.1 Automatic idle measurement 5.7.2 Manual idle measurement Spreading with the AUTO km/h operating mode 5902180-h-gb- AXIS EMC ISOBUS...
- Page 5 Spreading with the MAN km/h operating mode 5.10 Spreading in the MAN scale operating mode 5.11 GPS control 6 Alarm messages and possible causes Meaning of the alarm messages Fault/alarm 6.2.1 Acknowledging an alarm message 7 Special equipment 8 Guarantee and warranty AXIS EMC ISOBUS 5902180-h-gb-...
-
Page 7: User Instructions
Always observe the measures described to prevent this danger. WARNING! Type and source of danger This warning warns of a potentially dangerous situation for personal health. Ignoring these warnings leads to severe injury. ▶ Always observe the measures described to prevent this danger. AXIS EMC ISOBUS 5902180-h-gb-... -
Page 8: Notes On Text Descriptions
A bullet is placed in front of these instructions: • Handling instruction 1.3.2 Lists Lists without a specific sequence are shown as lists with bullet points: • Property A • Property B 5902180-h-gb- AXIS EMC ISOBUS... -
Page 9: References
System / Test> System / Test > Test/diagnosis means that you can reach the menu item Voltage via the menu item System / Test and the menu item Test/diagnosis. ○ The arrow > corresponds to the operation of the scroll wheel and/or the button at the screen (touchscreen). AXIS EMC ISOBUS 5902180-h-gb-... -
Page 10: Layout And Function
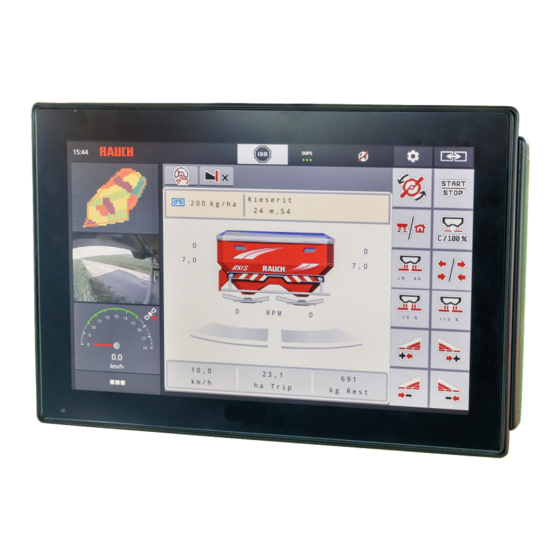
The display shows the current status information as well as the selection and input options for the electronic machine control unit. The most important information concerning the operation of the machine is displayed in the operating screen. 5902180-h-gb- AXIS EMC ISOBUS... -
Page 11: Description Of The Operating Screen
Freely definable display fields button [10] AXMAT- Function is active Button: Adjustment in the fertilizer chart [11] Mineral fertilizer spreader display Metering slide position, right/left [12] Selected operating mode Drop point position, right/left [13] Display of boundary/border settings AXIS EMC ISOBUS 5902180-h-gb-... -
Page 12: Display Fields
• Flow factor (FF) • ha trip • kg trip • m trip • kg left • m left • ha left • Idle time (Time until the next idle measurement) • Torque (Spreading disc drive) 5902180-h-gb- AXIS EMC ISOBUS... - Page 13 The available options are displayed in a list. Select the new value to be assigned to the display field. Press the OK button. The operating screen is displayed. The respective display field displays the new value. AXIS EMC ISOBUS 5902180-h-gb-...
-
Page 14: Display Of The Metering Slide Status
Section activated Section activated In border spreading mode, you can immediately deactivate an entire spreading side. This is particularly helpful for a quick spreading operation in field corners. Softkey section reduction press longer than 500 ms. 5902180-h-gb- AXIS EMC ISOBUS... -
Page 15: Display Of Sections
We recommend restarting the terminal in the following cases: • You have changed the working width. • You have opened a different fertilizer chart entry. After restarting the terminal, the section display changes to match the new settings. AXIS EMC ISOBUS 5902180-h-gb-... -
Page 16: Library Of Icons Used
2. Layout and function Library of icons used The AXIS EMC ISOBUS machine control unit displays icons for the individual menus and functions on the screen. 2.3.1 Navigation Icon Meaning Go to the left; previous page Go to the right; next page... -
Page 17: Operating Screen Icons
Rotate the spreading discs; stop the spreading discs Reset the quantity adjustment to the pre-set application rate Switch between working screen and menu window Switch between boundary spreading and sections on the left, right or both spreading sides AXIS EMC ISOBUS 5902180-h-gb-... - Page 18 Quantity adjustment, left + (plus) Quantity adjustment, left - (minus) Quantity adjustment, right + (plus) Quantity adjustment, right - (minus) Manual quantity adjustment + (plus) Manual quantity adjustment - (minus) Increasing the spreading disc speed (plus) 5902180-h-gb- AXIS EMC ISOBUS...
- Page 19 Pressing and holding (> 500 ms) immediately deactivates an entire spreading side. Increase right section (plus) Activate right boundary spreading function/TELIMAT Right boundary spreading function/TELIMAT active Activate left boundary spreading function Left boundary spreading function active AXIS EMC ISOBUS 5902180-h-gb-...
-
Page 20: Other Icons
Operating mode AUTO km/h + AUTO kg Operating mode AUTO km/h Operating mode MAN km/h Operating mode MAN scale EMC control deactivated Loss of the GPS signal (GPS J1939) The minimum mass flow is undercut The minimum mass flow is undercut 5902180-h-gb- AXIS EMC ISOBUS... -
Page 21: Structural Menu Overview
2. Layout and function Structural menu overview AXIS-M EMC AXIS EMC ISOBUS 5902180-h-gb-... - Page 22 2. Layout and function AXIS-H EMC 5902180-h-gb- AXIS EMC ISOBUS...
-
Page 23: Attachment And Installation
Connecting the machine control unit Depending on the equipment, there are different methods for connecting the machine control unit to the mineral fertilizer spreader. Further information can be obtained from the operator’s manual of your machine control unit. AXIS EMC ISOBUS 5902180-h-gb-... - Page 24 Machine plug [10] Drop point motor, left/right Cable distributor [11] Agitator over-voltage protection Weigh cell left/right [12] Electric agitator motor Metering slide rotary drive, left/right [13] Hopper cover actuator Level sensor left/right [14] ISOBUS connector plug 5902180-h-gb- AXIS EMC ISOBUS...
- Page 25 Machine plug Metering slide rotary drive, left/right Machine control unit Level sensor left/right Machine plug Torque/speed sensor, left/right Cable distributor [10] TELIMAT sensors, top/bottom TELIMAT actuator [11] Hopper cover actuator Weigh cell left/right [12] ISOBUS connector plug AXIS EMC ISOBUS 5902180-h-gb-...
- Page 26 Machine control unit Torque/speed sensor, left/right Machine plug [10] TELIMAT sensors, top/bottom Cable distributor [11] Drop point motor, left/right TELIMAT actuator [12] Hopper cover actuator Weigh cell left/right [13] ISOBUS connector plug Metering slide rotary drive, left/right 5902180-h-gb- AXIS EMC ISOBUS...
-
Page 27: Dosing Slider Preparation
3. Attachment and installation 3.2.3 Dosing slider preparation The machine control has an electronic slide actuator to set the application rate. Please observe the operator's manual for your machine. AXIS EMC ISOBUS 5902180-h-gb-... -
Page 28: Operation
After a few seconds, the start-up screen of the machine control unit is displayed. Subsequently, the machine control unit displays the activation menu for a few seconds. Press the enter key. The operating screen then appears. 5902180-h-gb- AXIS EMC ISOBUS... -
Page 29: Navigation Within The Menus
Confirm settings by pressing the Return key. You will return to the previous menu. Press the Working screen/main menu key. You will return to the working screen. Press ESC. The previous settings are retained. You will return to the previous menu. AXIS EMC ISOBUS 5902180-h-gb-... -
Page 30: Main Menu
Weighing/Trip count. Values regarding spreading work 4.9 Weighing/Trip counter carried out and functions for weighing operation In addition to the sub-menus, in the main menu, the function keys Idle measurement and Bound. sprd.type can be selected. 5902180-h-gb- AXIS EMC ISOBUS... -
Page 31: Fertilizer Settings
Not all parameters are displayed simultaneously on one screen. You can switch to the next or previous menu windows (tabs) using the left/right arrow keys. Fig. 10: Fertiliser settings AXIS-H menu, tab 1 and 2 Fig. 11: Fertiliser settings menu AXIS-M, tabs 1 and 2 AXIS EMC ISOBUS 5902180-h-gb-... - Page 32 4.4.7 RPM Input of the desired spreading disc speed Influences the EMC mass flow control AXIS-M 4.4.7 RPM Influences the EMC mass flow control Factory setting: • AXIS-M 20.2/30.2: 540 rpm • AXIS-M 50.2: 750 rpm 5902180-h-gb- AXIS EMC ISOBUS...
- Page 33 Selection list: • • 40/40 • 50/50 • 60/60 • 70/70 • 70/76 Manufacturer Fertilizer manufacturer input Composition Percentage of the chemical composition Fertilizer class Selection list Selection with arrow keys; Confirmation with the Enter key AXIS EMC ISOBUS 5902180-h-gb-...
-
Page 34: Application Rate
The currently applied application rate is displayed. Enter the new value in the input field. Press OK . The new value is saved in the machine control unit. You can also enter or adjust the application rate directly via the working screen. 5902180-h-gb- AXIS EMC ISOBUS... -
Page 35: Set The Working Width
The currently applied working width is displayed. Enter the new value in the input field. Press OK . The new value is saved in the machine control unit. 4.4.3 Flow factor The flow factor lies within the range of 0.2 to 1.9. AXIS EMC ISOBUS 5902180-h-gb-... - Page 36 For the AXIS EMC mineral fertilizer spreader (AUTO km/h + AUTO kg operating mode), we recommend having the flow factor displayed on the working screen. By doing so, you are able to monitor the flow factor control during spreading. See chapter 2.2.2 Display fields. 5902180-h-gb- AXIS EMC ISOBUS...
-
Page 37: Drop Point
In this menu, the flow factor can be determined based on a calibration and saved in the machine control unit. Execute the calibration: • Before spreading for the first time • If the fertilizer quality has changed significantly (moisture, high dust content, granulate damage) • If a new fertilizer type is used AXIS EMC ISOBUS 5902180-h-gb-... - Page 38 Risk of injury during calibration Rotating machine parts and discharged fertilizer could cause injury. ▶ Before starting the calibration, ensure that all requirements have been met. ▶ Observe the calibration chapter in the operator’s manual for the machine. 5902180-h-gb- AXIS EMC ISOBUS...
- Page 39 Any contact with rotating machine parts (drive shaft, hubs) may lead to bruises, abrasions, and crushing injuries. Body parts or objects may be caught or drawn in. ▶ Switch off the tractor engine. ▶ Switch off the hydraulics system and secure it against unauthorized activation. AXIS EMC ISOBUS 5902180-h-gb-...
-
Page 40: Disc Type
Access the menu Fertiliser settings > Spreading disc. Activate the spreading disc type in the selection list. The Fertiliser settings window is displayed with the new spreading disc type. 5902180-h-gb- AXIS EMC ISOBUS... -
Page 41: Rpm
Access the menu Fertiliser settings > Normal disc speed. Enter the speed value. The Fertiliser settings window is displayed with the new speed. Please observe Chapter 5.6 Spreading with the automatic operating mode (AUTO km/ h + AUTO kg). AXIS EMC ISOBUS 5902180-h-gb-... -
Page 42: Limited Border Spreading Mode
Entering the border spreading application rate: Access the menu Fertiliser settings > Bound.quantity (%). Enter the value in the input field and confirm. The Fertiliser settings window is displayed with the new border spreading application rate. 5902180-h-gb- AXIS EMC ISOBUS... -
Page 43: Calculate Optipoint
Enter the average forward speed in the range of switching positions. The second page of the menu is displayed. Press OK. Press the Continue button. The third page of the menu is displayed. Fig. 15: Calculate OptiPoint, page 3 AXIS EMC ISOBUS 5902180-h-gb-... -
Page 44: Gps Control Info
GPS terminal. • With some terminals, however, a manual entry is required. This menu is for information purposes only. • See the operating manual for your GPS terminal. Access the menu Fertiliser settings > GPS-Control info. 5902180-h-gb- AXIS EMC ISOBUS... -
Page 45: Fertilizer Charts
Management of fertilizer charts can be done via the connection of the WiFi module to the ECU. Creating a new fertilizer chart You can create up to 30 fertilizer charts in the electronic machine control unit. AXIS EMC ISOBUS 5902180-h-gb-... - Page 46 Enter a name for the fertilizer chart. We recommend naming the fertilizer chart after the fertilizer. Specific fertilizers can thus be assigned to fertilizer charts more easily. Edit the parameters of the fertilizer chart. See 4.4 Fertilizer settings. 5902180-h-gb- AXIS EMC ISOBUS...
- Page 47 The active fertilizer chart cannot be deleted. Select the option Delete element. The fertilizer chart is deleted from the list. Managing the selected fertilizer chart via the working screen You can also manage the fertilizer chart directly via the operating screen AXIS EMC ISOBUS 5902180-h-gb-...
- Page 48 Fig. 18: Managing the fertilizer chart via the touch screen Button Application rate Button Fertiliser chart Enter the new value in the input field. Press OK. The new value is saved in the machine control unit. 5902180-h-gb- AXIS EMC ISOBUS...
-
Page 49: Machine Settings
Not all parameters are displayed simultaneously on one screen. You can switch to the next or previous menu windows (tabs) using the left/right arrow keys. Sub-menu Meaning Description AUTO/MAN mode Specifying automatic or manual 4.5.1 AUTO/MAN mode operating mode AXIS EMC ISOBUS 5902180-h-gb-... - Page 50 Activation of the function to control the machine sections via GPS control unit • Task Control on (checked) • Task Control off The manufacturer does not assume any liability in the event of a loss of the GPS signal. 5902180-h-gb- AXIS EMC ISOBUS...
-
Page 51: Auto/Man Mode
By default, the unit is operated in the automatic mode. You only work in manual mode in the following cases: • If there is no speed signal (radar or wheel sensor not available or defective) • Application of slug pellets or seeds (fine seeds) AXIS EMC ISOBUS 5902180-h-gb-... -
Page 52: Quantity
5 Spreading operation. 4.5.2 +/- quantity In this menu, you can set the percentage increment of the application rate change for normal spreading. The base value (100%) is the preset value for the metering slider opening. 5902180-h-gb- AXIS EMC ISOBUS... -
Page 53: Fast Emptying
Before starting the fast emptying process, care must be taken to ensure that all requirements have been met. Observe the operator’s manual for the mineral fertilizer spreader (discharging residual material). AXIS EMC ISOBUS 5902180-h-gb-... - Page 54 The selected section is displayed as an icon (Fig. 21 position [3]). Press Start/Stop. The fast emptying process starts. Press Start/Stop when the hopper is empty. Fast emptying is complete. ESC to return to the Main menu. 5902180-h-gb- AXIS EMC ISOBUS...
-
Page 55: System/Test
Press Start/Stop. The drop point automatically moves to the pre-set value. System/Test In this menu, the system and test settings for the machine control unit can be configured. Access the menu Main menu > System / Test. AXIS EMC ISOBUS 5902180-h-gb-... -
Page 56: Total Data Counter
In this menu, all of the spreader's counter readings are displayed. • spread quantity in kg • spread area in ha • spread time in h • distance traveled in km This menu is for information purposes only. 5902180-h-gb- AXIS EMC ISOBUS... -
Page 57: Test/Diagnosis
Test points slider Test for approaching the various Calibration check position points of the metering sliders Drop point Manual movement of the drop point motor Test points drop pt. Approaching the drop point Calibration check AXIS EMC ISOBUS 5902180-h-gb-... - Page 58 The status of the motors/sensors is displayed. Fig. 24: Test/diagnosis; Example: Metering slider Signal display Position display Signal bar graph The Signal display shows the status of the electrical signals for the left and right side separately. 5902180-h-gb- AXIS EMC ISOBUS...
- Page 59 Fig. 25: System / Test; Example: Test/diagnosis Status display Connected equipment Start self-test Linbus participant status notification The devices indicate various conditions: • 0 = OK; no equipment error • 2 = blockage • 4 = overload AXIS EMC ISOBUS 5902180-h-gb-...
-
Page 60: Service
The information list depends on the equipment of the machine. Weighing/Trip counter This menu provides values regarding spreading work carried out and functions for the weighing operation. Access the menu Main menu > Weighing/Trip count.. The Weighing/Trip count. menu appears. 5902180-h-gb- AXIS EMC ISOBUS... -
Page 61: Trip Counter
If you wish to continuously observe the values during spreading, you may also assign the freely selectable display fields in the working screen kg trip, ha trip or m trip, see 2.2.2 Display fields. AXIS EMC ISOBUS 5902180-h-gb-... -
Page 62: Rest (Ka, Ha, M)
(see below). The Application rate and Working width values cannot be changed in this menu. They are for information purposes only. 5902180-h-gb- AXIS EMC ISOBUS... -
Page 63: Zero Scales
• the tractor is at a standstill. Zero scales: Access the menu Weighing/Trip count. > Zero scales. Press the Zero scales button. The weighing value for the empty scales is now set to 0 kg. AXIS EMC ISOBUS 5902180-h-gb-... -
Page 64: Operating Lights (Spreadlight)
The operating lights will switch off at the end of the entered time, if the metering sliders are closed. Range from 0 to 100 seconds. Remove the check mark in the menu item SpreadLight AUTO [3]. The automatic mode is deactivated. 5902180-h-gb- AXIS EMC ISOBUS... -
Page 65: Hopper Cover
The menu is only used for operating the actuators which open or close the hopper cover. The AXIS EMC ISOBUS machine control unit does not detect the exact position of the hopper cover. • Monitor the movement of the hopper cover. - Page 66 During the movement, an arrow appears which indicates the OPEN direction. The hopper cover will open fully. Pour in fertilizer. Press the Close hopper cover key. During the movement, an arrow appears which indicates the CLOSE direction. The hopper cover will be closed. 5902180-h-gb- AXIS EMC ISOBUS...
-
Page 67: Special Functions
Conversion of metric to imperial units lbs left 1 x 0.4536 kg ac left 1 x 0.4047 ha Working width (ft) 1 x 0.3048 m Appl. rate (lb/ac) 1 x 1.2208 kg/ha Mounting height in 1 x 2.54 cm AXIS EMC ISOBUS 5902180-h-gb-... -
Page 68: Using The Joystick
CCI A3 Joysticks operating levels You can switch between three operating levels with the shift key. The Level that is currently active is displayed by the positioning of a light strip at the bottom edge of the display. 5902180-h-gb- AXIS EMC ISOBUS... - Page 69 The joystick offered is pre-programmed with specific functions at the factory. The meaning and function of the icons can be found in Chapter 2.3 Library of icons used. Please note that the functions of the buttons vary depending on machine type (AXIS-M, AXIS-H). AXIS EMC ISOBUS 5902180-h-gb-...
- Page 70 4. Operation Fig. 33: Button functions Level 1 Fig. 34: Button functions Level 2 5902180-h-gb- AXIS EMC ISOBUS...
-
Page 71: Wlan Module
Transmission of information from the fertilizer charts app to the ECU. This way, the fertilizer settings no longer need to be entered manually. • Transmission of the residual material weight display from the ECU on the smartphone. AXIS EMC ISOBUS 5902180-h-gb-... - Page 72 4. Operation Fig. 36: WiFi module You can find more information on assembly of the WiFi module and communication with the smartphone in the WiFi module assembly instructions. • The WiFi password is: quantron. 5902180-h-gb- AXIS EMC ISOBUS...
-
Page 73: Spreading Operation
When the hopper is empty, refill it: Fill the hopper. Weigh the fertilizer quantity in the hopper. Start your work. Refilling For weighing spreaders only Requirement: ü The kg level sensor function in the Machine settings menu is active. AXIS EMC ISOBUS 5902180-h-gb-... -
Page 74: Telimat Border Spreading Unit
This may cause injury and property damages. ▶ Before pressing the limited border spreading key, make sure that nobody is present in the hazard zone of the machine. 5902180-h-gb- AXIS EMC ISOBUS... -
Page 75: Electrical Telimat Unit
By pressing the TELIMAT, the unit automatically moves to the boundary spreading position by means of an electrical actuating cylinder. This may cause injury and property damages. ▶ Before pressing the TELIMAT key, make sure that nobody is present in the hazard zone of the machine. AXIS EMC ISOBUS 5902180-h-gb-... -
Page 76: Working With Sections
Button Spreading type Activate section on both sides Section on the left, boundary spreading function on the right possible Section on the right, boundary spreading function on the left possible 5902180-h-gb- AXIS EMC ISOBUS... -
Page 77: Spreading With Reduced Sections: Varispread V8
The right section is reduced to 2 steps. The left spreading side spreads across the Function keys for increasing or reducing entire half. spreading width on the right Function keys for increasing or reducing spreading width on the left AXIS EMC ISOBUS 5902180-h-gb-... - Page 78 Press the Increase left spreading width function key or the Increase right spreading width function key. The section of the spreading side will be increased by one step. The sections are not graded proportionally. The VariSpread spreading width assistant sets the spreading widths automatically. 5902180-h-gb- AXIS EMC ISOBUS...
-
Page 79: Spreading With Reduced Sections: Varispread Pro
You can spread fertilizer to sections on one or both sides, to adapt the full spreading width to the field requirements. Every spreading side can be set continuously in automatic mode and in manual mode. Press limited border spreading/sections toggle key. AXIS EMC ISOBUS 5902180-h-gb-... - Page 80 Press the Increase left spreading width function key or the Increase right spreading width function key. The section of the spreading side will be increased by one step. The sections are not graded proportionally. The VariSpread spreading width assistant sets the spreading widths automatically. 5902180-h-gb- AXIS EMC ISOBUS...
- Page 81 5. Spreading operation Fig. 42: Automatic section control Field edge Tramline in the field Headlands tramline Sections 1 to 4: Section reduction on the right hand side Sections 5 to 7: further section reductions AXIS EMC ISOBUS 5902180-h-gb-...
-
Page 82: Spreading Operation With One Section And In Border Spreading Mode
Press the Reduce left spreading width function key in order to reduce the section. • If you press the C/100 % function key, the full working width will be reapplied immediately. • By pressing the Right limited border spreading function key, the boundary spreading function is deactivated. 5902180-h-gb- AXIS EMC ISOBUS... -
Page 83: Spreading With The Automatic Operating Mode (Auto Km/H + Auto Kg)
Press the enter key to clear the alarm message. See 6.1 Meaning of the alarm messages. The Idle measurement screen is displayed. The Idle measurement starts automatically. See 5.7 Idle measurement. Press Start/Stop The spreading starts. AXIS EMC ISOBUS 5902180-h-gb-... -
Page 84: Idle Measurement
It will also automatically start the idle measurement under the following conditions: • The defined period since the last idle measurement has expired. • You have made changes in the Fertilizer settings menu (RPM, type of spreading disc). During the idle measurement, the following window appears. 5902180-h-gb- AXIS EMC ISOBUS... - Page 85 The idle measurement runs in the background, even if the metering slides are closed. However, no screen is shown on the display. However, no screen is shown on the display. Once this idling time has expired, a further idle measurement is started automatically. AXIS EMC ISOBUS 5902180-h-gb-...
-
Page 86: Manual Idle Measurement
In the case of unusual changes in the flow factor, start the idle measurement manually. In the Main menu, press the idle measurement key. The idle measurement is started manually. Spreading with the AUTO km/h operating mode This operating mode is applied by default for machines without a weighing system. 5902180-h-gb- AXIS EMC ISOBUS... -
Page 87: Spreading With The Man Km/H Operating Mode
Make sure nobody is present in the spreading zone of the machine before switching on the spreading discs. AXIS-H only: Press Spreading disc start. Press Start/Stop. The spreading starts. Spreading with the MAN km/h operating mode If there is no speed signal, the MAN km/h operating mode is active. AXIS EMC ISOBUS 5902180-h-gb-... -
Page 88: Spreading In The Man Scale Operating Mode
• when spreading slug pellets or fine seeds The MAN scale operating mode is appropriate for slug pellets and fine seeds since the automatic mass flow control cannot be activated due to the low weight reduction. 5902180-h-gb- AXIS EMC ISOBUS... - Page 89 The Position of dosing slider opening window is displayed. Enter the scale value for the dosing slider opening. Press OK. Switch to the working screen. AXIS-H only: Press Spreading disc start. Press Start/Stop. The spreading starts. AXIS EMC ISOBUS 5902180-h-gb-...
-
Page 90: Gps Control
5.11 GPS control The machine control unit AXIS EMC ISOBUS can be combined with an ISOBUS terminal with SectionControl. Various data is exchanged between both devices to automate control. The ISOBUS terminal with SectionControl communicates the specifications for the opening and closing of dosing sliders to the machine control unit. - Page 91 The Turn on dist. (m) parameter refers to the switch-on distance [A] measured from the field border [C]. At this position in the field, the metering sliders open. This distance depends on the type of fertilizer and represents the ideal switch-on distance for optimized fertilizer distribution. AXIS EMC ISOBUS 5902180-h-gb-...
- Page 92 A greater value means that the switch-on position is closer to the center of the field. Turn off distance (m) The Turn off dist. (m) parameter refers to the turn off distance [B] measured from the field border [C]. At this position in the field, the metering sliders start to close. 5902180-h-gb- AXIS EMC ISOBUS...
- Page 93 An adjustment of the switch-off distance may lead to insufficient fertilization around the switch-off positions in the field. AXIS EMC ISOBUS 5902180-h-gb-...
-
Page 94: Alarm Messages And Possible Causes
A maximum of 30 fertilizer types are stored in the memory for the fertilizer charts. 16 Approach drop pointYes = Start Safety request before the drop point is automatically approached • Drop point setting in the menu Fertiliser settings • Fast emptying 5902180-h-gb- AXIS EMC ISOBUS... - Page 95 Defective or manually switched hydraulics valve 27 Discs started upwithout activation Defective or manually switched hydraulics valve 28 Disc could not start upproperly.Deactivate disc Spreading discs do not rotate. start. • Blockage • No position feedback AXIS EMC ISOBUS 5902180-h-gb-...
- Page 96 Outlet blocked 48 Right dosing error,hopper empty,outflow • Hopper empty blocked! • Outlet blocked 49 Idle meas. implausible.EMC control • Defective sensor deactivated! • Defective transmission 50 Idle meas. impossible.EMC control deactivated! PTO speed not permanently stable 5902180-h-gb- AXIS EMC ISOBUS...
- Page 97 Restart the machine control unit when changing machine type. Implement machine settings. Load fertilizer chart for the machine type. 88 Error at disc speed sensor The spreading disc RPM could not be determined • Cable breakage • Defective sensor AXIS EMC ISOBUS 5902180-h-gb-...
-
Page 98: Fault/Alarm
• This spreading disc type requires conversion of the TELIMAT device. Fault/alarm An alarm message is displayed with a red frame and with a warning symbol. Fig. 50: Alarm message (example) 5902180-h-gb- AXIS EMC ISOBUS... -
Page 99: Acknowledging An Alarm Message
Press the ACK foil key Alarm message confirmation may vary with different ISOBUS terminals. You can use various keys to acknowledge other messages with a yellow frame: • Enter • Start/Stop For this purpose, follow the instructions on screen. AXIS EMC ISOBUS 5902180-h-gb-... -
Page 100: Special Equipment
7. Special equipment Special equipment Illustration Designation Level sensor CCI A3 joystick WiFi module 5902180-h-gb- AXIS EMC ISOBUS... -
Page 101: Guarantee And Warranty
• Claims for damage other than to the RAUCH devices will not be accepted. This also means that no liability will be accepted for damage resulting from spreading errors. Unauthorized modifications of the RAUCH devices may result in consequential damage, for which the manufacturer will not accept any liability.
Need help?
Do you have a question about the AXIS EMC ISOBUS and is the answer not in the manual?
Questions and answers