Advertisement
Quick Links
A S S E M B LY I N S T R U C T I O N S
The Fair eld Arbor
Please read through before starting assembly.
IMPORTANT: CHECK THE INSIDE OF YOUR POSTS FOR ALL MATERIALS.
Check Box for These Contents
In the event of missing or defective parts please call our customer service dept. at 1 800 282 9346 (Mon. to Fri. 8:00 AM to 5:00 PM EST).
1. Rafters (5) 1 1/2" x 4 1/2" x 38" (3.8 x 11.4 x 96.5 cm)- 10838
2. Pergola End Caps (14) - 10700-1
3. Post Caps (4) - 10824
4. Right Posts (2) 4" x4" x 84" 10 x 10 x 213.4 cm) - 10792
5. Left Posts (2) 4" x4" x 84" - 10821
6. Post Trims (4) - 10737-1
7. Carrying Beams (2) 1 1/2" x 4 1/2" x 63 1/2" (3.8 x11.4 x 161.3 cm)- 10834-1
8. Side Panel Top-Rails (2) 1 1/2" x 1 1/2" x 31 5/8" (3.8 x 3.8 x 80.3 cm)- 10822
9. Side Panel Vertical Spindles (10) 7/8" x 1 1/2" x 10 3/8" (2.2x 3.8 x 26.4 cm)-
10795
10. Side Panel Middle Rails (2) 1 1/2" x 1 1/2" x 31 5/8" (3.8 x 3.8 x 80.3 cm)-
10823
11. Side Panel Square Lattices (2) 1/2" x 26 1/2" x 47 3/4" (1.3 x 64 x 118.7 cm)-
10793
12. Side Panel Horizontal Bottom Rails (2) 1 1/2" x 1 1/2" x 31 5/8" (3.8 x 3.8 x
80.3 cm)- 10794
13. 3" Stainless Steel Screws (for Rafters) (30) - 20007
14. Tube of Vinyl Glue - 20000
Tools You Will Need
• Hammer - Tape Measure - Level - Stool or Short Ladder - Shovel - Cordless Drill
General Information
• Read Instructions through carefully before beginning assembly.
• When assembling components, place on a non-abrasive surface
(i.e. shipping box) to avoid scratching.
• We recommend an area approx 10'x 8' for unobstructed assembling.
• You should not need to use excessive force when assembling components.
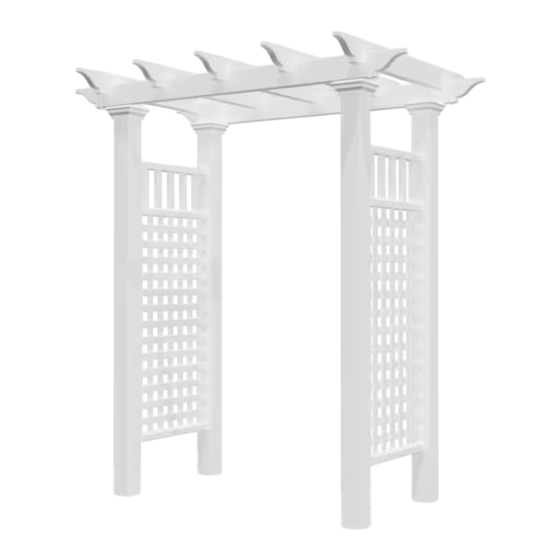
77.75 in
86.5 in
80.5 in
50 in
58 in
58.5 in
1
2
3
4
6
7
8
9
10
11
12
www.wearevita.com
52.25 in
82 in
10.25 in
24 in
32 in
5
13
(Not to scale)
V3.0/111220
1
Advertisement

Related Manuals for vita The Fairfield


Summary of Contents for vita The Fairfield
- Page 1 A S S E M B LY I N S T R U C T I O N S The Fair eld Arbor www.wearevita.com 77.75 in 52.25 in 86.5 in 82 in 80.5 in 58.5 in 50 in 10.25 in 58 in 24 in 32 in...
- Page 2 S T E P O N E Assemble the Arbor Top Lay out the two carrying beams as illustrated with pre- drilled holes facing up. Position the ve rafters over the respective predrilled holes on the carrying beams as illustrated. Note: The self-auguring screws will drill through the internal rib.
- Page 3 S T E P T H R E E S T E P T W O “L” on underside of post top. Attach Side Panels to Posts Set out one post and complete the side panel by inserting the side panel assembly into the holes on the post. Push rails until the tabs snap into place.
- Page 4 S T E P F I V E Connect the Pergola Top to the Posts Move side panels to their nal location and adjust the opening width to 50 in. (127 cm.). Place the pre-assembled arbor top onto the post as illustrated. Fasten the main carrying beams onto the posts using two screws per side as illustrated.
- Page 5 • is located in ground conditions that are not level Consider Using: A - 4x4 Professional Post Extension Kit (30 in./76.2 cm. long), (Kit of 4) • Purchase from Vita, www.wearevita.com • Recommended to be installed in concrete footings (Posts have been extended with 4x4 Professional Post Extension Kit) •...
Need help?
Do you have a question about the The Fairfield and is the answer not in the manual?
Questions and answers