Table of Contents
Advertisement
Quick Links
AIO-CM4-156
AIO-CM4-156 (CS19108RA4156A-N111) is an all-in-one desktop
computer based on Raspberry Pi CM4 – easy to use, perfect for
developers and makers who are accustomed to the Raspberry Pi
and are looking for a computer they can use on a daily basis.
It is fully compatible with the Raspberry Pi 4 Linux
distribution and offers the full Raspberry Pi GPIO connector
for further expansion.
www.chipsee.com
User Manual
Release 1.0
www.chipsee.com
Advertisement
Table of Contents

Subscribe to Our Youtube Channel
Related Manuals for Chipsee AIO-CM4-156


Summary of Contents for Chipsee AIO-CM4-156
- Page 1 AIO-CM4-156 User Manual Release 1.0 AIO-CM4-156 (CS19108RA4156A-N111) is an all-in-one desktop computer based on Raspberry Pi CM4 – easy to use, perfect for developers and makers who are accustomed to the Raspberry Pi and are looking for a computer they can use on a daily basis.
- Page 2 www.chipsee.com...
-
Page 3: Hardware Features
Hardware Features Key Features: CPU Module Raspberry Pi CM4 Lite, Quad Cortex-A72 at 1.5GHz TF card slot for boot. Internal M.2 NVMe connector Storage for SSD card www.chipsee.com... - Page 4 Default 2GB, can also be 1/4/8GB based on CM4 Lite onboard 15.6 inch IPS Display LCD, 1920*1080 Pixel Resolutions, Brightness: 250nit Optional Ten-Point Capacitive Touch with 1.1mm Touch Armored Glass 2 x USB 3.0 Host connector, 1 Type-C USB Slave...
- Page 5 Working 0°- 50°C Temperature0 Debian, Ubuntu Dimension 374*238*33 mm Weight 1600g Plastic Case Black Color CS19108RA4156A- N111 www.chipsee.com...
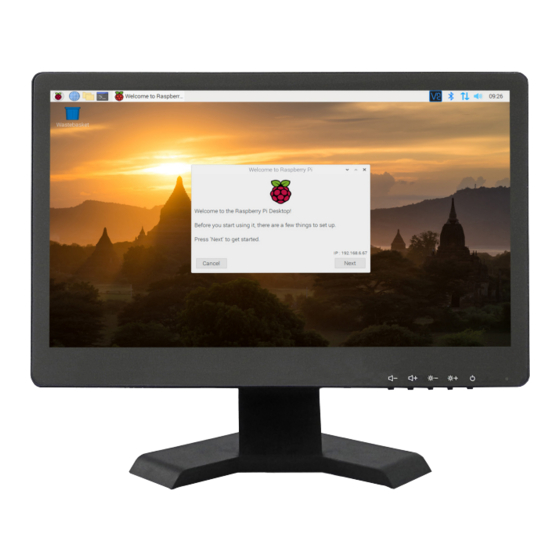
- Page 6 Figure 1: Front View (Debian) www.chipsee.com...
- Page 7 Figure 2: Back View www.chipsee.com...
-
Page 8: Power Input Connector
Figure 3: Side View with available connectors Power Input Connector The product CS19108RA4156A uses a power input DC of 12V. The total power consumption is typically about 8.4W. The power supply connector must be 2.1mm I.D x 5.5mm O.D x 9.5mm. Figure 4 shows the dimensions of a suitable DC power adapter connector. -
Page 9: Lan Connector
C M 4 e M M C . A n d t h e U S B 3 . 0 h o s t w i l l d i s a b l e d automatically when the Type-C Port is connected. - Page 10 Camera The product CS19108RA4156A supports the camera on the front panel, but it is not mounted by default. 40-Pin Expansion Connector The product CS19108RA4156A has a standard Raspberry Pi 40 way HAT connector, as Figure 5 shows. You also can check https://pinout.xyz for more details.
- Page 11 Figure 5: 40-pin Expansion Connector Raspberry Pi Hat adapter www.chipsee.com...
-
Page 12: Status Led
The product also has an available I/O connector that is 100% compatible with any Raspberry Pi cape, or extensions, making the AIO-CM4-156 a perfect fit with your existing tools. The product also comes with an adapter, with a standard Raspberry Pi HAT pinout, to add more flexibility to your project. - Page 13 It can be controlled by software to flash YELLOW when the CPU is working. Buttons There are 5 buttons on the front panel, as shown in Figure 7, that work as Power, Brightness+, Brightness-, Audio output Volume+, Volume-. The product CS19108RA4156A supports 2 boot modes, auto boot, and manual boot.
- Page 14 The product CS19108RA4156A boots from the internal eMMC by default. If you want it to boot from the Type-C connector, you need to push the Volume+ button BEFORE power on, and release 3 seconds after power on. You can use Brightness+ / Brightness- to control the backlight of the LCD.
- Page 15 Functions before the Functions after the Buttons system boot system boot Reduce the volume of Volume- NULL the system Volume+ and Toggle the boot mode NULL Volume- Figure 7: Buttons Dimensions The dimensions of CS19108RA4156A-N111 are 375*238*32.63 mm, as Figures 7~9 show.
- Page 16 Figure 8: Front Panel Dimension www.chipsee.com...
- Page 17 Figure 9: Backside Dimension Figure 10: Side Dimension www.chipsee.com...
- Page 18 Mounting 1. Stand Mounting is default, as Figure 11 shows: Figure 11: Stand Mounting 2. VESA Mounting is shown in Figure 12. www.chipsee.com...
- Page 19 Figure 12: VESA Mounting Chipsee Products Naming Rules CS19108RA4156A-N111 Chipsee Product Abbreviations www.chipsee.com...
- Page 20 Horizontal Resolution Means 800 Pixel Means 1024 Pixel Means 1280 Pixel Means 1440 Pixel Means 1920 Pixel Vertical Resolution Means 480 Pixel Means 600 Pixel Means 768 Pixel Means 800 Pixel Means 900 Pixel Means 1024 Pixel Means 1080 Pixel...
-
Page 21: How To Get Support
If your question is about technical support or troubleshooting for one of our products, we kindly ask you to first check our documentation for a possible solution. If you cannot find the solution you are looking for then please write to service@chipsee.com providing all possible details. www.chipsee.com...
Need help?
Do you have a question about the AIO-CM4-156 and is the answer not in the manual?
Questions and answers