Advertisement
Quick Links
Advertisement

Related Manuals for Body Sculpture BSB-250


Summary of Contents for Body Sculpture BSB-250
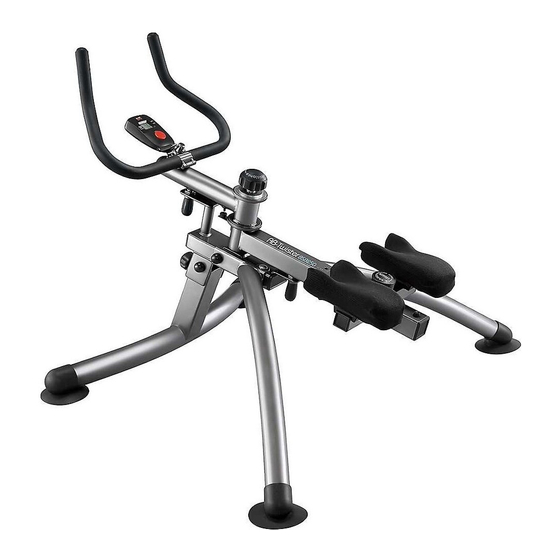
- Page 1 BSB-250 AB TWISTER USER’S MANUAL http://www.body--sculpture.com...
-
Page 2: Table Of Contents
CONTENTS IMPORTANT SAFETY INFORMATION PARTS LIST ASSEMBLY EXERCISE INSTRUCTIONS EXERCISE - 1 -... -
Page 4: Important Safety Information
Important Safety Information Please keep this manual in a safe place for easy reference. 1. It is important to read this entire manual 7. The safety of the equipment can only be before assembling and using the maintained if it is regularly examined for equipment. -
Page 5: Parts List
PARTS LIST SWING ASSEMBLY LEFT AND RIGHT REAR LEGS FRONT SUPPORT KNEE SADDLES & KNEE PAD COVERS HANDLEBARS HARDWARE 1. Long Bolts 2. Short Bolts 3. Washers 4. Locking Nuts 5. Nut Covers 6. Wrench - 2 -... - Page 6 FINAL ASSEMBLED PRODUCT - 3 -...
-
Page 7: Assembly
ASSEMBLY STEP 1 • For easier assembly, pull the rear release knob to allow the knee bar to swing out of the way. • Align the holes on the left leg with the matching holes on the swing assembly. Insert the small bolt through the hole. •... - Page 8 STEP 2 • Loosen and remove the front support knob. (Be careful not to lose the washer when you remove the knob.) • Remove the two small bolts from both sides of the front support, being careful to keep the two washers in place on each bolt. Set aside for now. •...
- Page 9 STEP 3 • Turn bracket knob to open the front handlebar bracket hinge. • Rest the handlebars on the bracket. Cover and close the bracket. • Align the knob and screw it back in place until you feel resistance. • Lift the handlebars to raise them to workout position and tighten the knob to hold them in place.
- Page 10 STEP 4 • The safety bolt screwed into the end of the swing assembly, can be unscrewed by hand. Caution: Always replace this bolt before getting on or using the Twist Handler. • Loosen and remove the safety bolt from the swing assembly. •...
-
Page 11: Exercise Instructions
EXERCISE INSTRUCTIONS Using your AB TWISTER will provide you with several benefits. It will improve your physical fitness, tone your muscles and, in conjunction with a calorie-controlled diet, help you lose weight. 1. THE WARM-UP PHASE This stage helps get the blood flowing around the body and the muscles working properly. It will also reduce the risk of cramp and muscle injury. - Page 12 3. THE COOL DOWN PHASE This stage is to let your Cardio-vascular System and muscles wind down. This is a repeat of the warm up exercise e.g. reduce your tempo, continue for approximately 5 minutes. The stretching exercises should now be repeated, again remembering not to force or jerk your muscles into the stretch. As you get fitter you may need to train longer and harder.
-
Page 13: Exercise
Exercise #1 - Hike the Hip Exercise Objective The primary purpose for this exercise is to help you become familiar with the equipment and learn to use your hips more than your legs when performing any of the lower body workouts. As you advance in your workout routine, you will build on what you learn from this simple and effective exercise. - Page 14 Exercise #2 - Muscular Strength Body should be in the neutral-spine position. Exercise Objective This exercise uses applied resistance to encourage muscle strength by increasing the effort required to perform the upper and lower body workout routines. It will increase the strength of the muscle for the next phase of the program.
- Page 15 down on the release. Give it a slight turn to keep the release open. #3 - Endurance Program Exercise Objective This exercise increases the number of repetitions by decreasing the resistance level. As you build up your muscle strength, the resistance level for the endurance program will also increase over time but should always be lower than your current resistance for the...
- Page 16 EXERCISE SESSION Basic Advanced - 13 -...
- Page 17 COPYRIGHT ©2010 BY BODY SCULPTURE INTERNATIONAL EUROPE LTD ALL RIGHTS RESERVED.UNAUTHORIZED DUPLICATION IS A VIOLATION OF LAW - 14 -...
Need help?
Do you have a question about the BSB-250 and is the answer not in the manual?
Questions and answers