Table of Contents
Advertisement
Quick Links
Advertisement
Table of Contents

Related Manuals for Body Sculpture BSB-512


Summary of Contents for Body Sculpture BSB-512
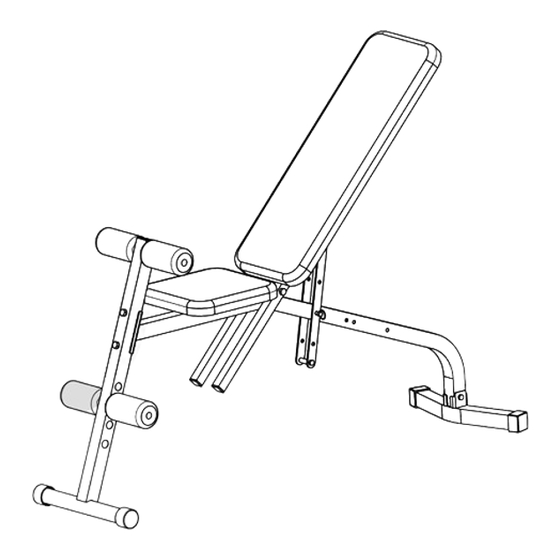
- Page 1 BSB-512 Dumbbell Bench...
- Page 2 Please keep this manual in a safe place for easy reference. It is important to read this entire manual before assembling and using the equipment. Safe and effective use can only be achieved if the equipment is assembled, maintained and used properly.
-
Page 4: Part List
PART LIST PART NO. DESCRIPTION Main Frame Front Stabilizer Rear Base Support Seat Support Frame Backrest Pad Support Backrest Incline Adjustment Frame φ14Xφ10.2X39mm Sleeve Foam Roll Tube Seat Pad Backrest Pad Incline Select Pin Foam Roll Rubber Bumper 38X38X1.2mm End Cap 25X25X1.0mm End Cap Φ19x1.0mm End Cap φ38mm Foot... - Page 7 ASSEMBLY INSTRUCTIONS Tools Required Assembling the Machine: Two Adjustable Wrenches, and one Philips Screw driver. NOTE: It is strongly recommended this machine to be assembled by two or more people to avoid possible injury. Carefully unpack each component, checking against the part list that you have all the necessary parts to complete the assembly of your product PLEASE NOTE that some of the parts may be pre-fitted to major components.
- Page 8 Step 2 (See Diagram 2) A). Attach the Seat Pad Support(#4) and Backrest Pad Support(#5) to the U shape bracket on the mid of the Main Frame(#1), Align the hole and secure with one M10X125mm Hex Bolt(#19), twoφ10mm Washers (#27) and one Aircraft Nut(#29). B).Attach the Backrest Incline Adjustment Frame (#6) to the center of the Backrest Pad Support M10X125mm Hex Bolt (#19), twoφ10mm (#5),...
- Page 9 STEP 3 (See Diagram 3) A). Attach the Seat Pad(#9) to the Seat Pad Support Frame(#4), Align the hole and secure with (#24) and four φ6mm four M6X18mm Hex Bolts Washers (#28). B.) Attach the Backrest Pad (#10) to the Backrest Pad Support (#5), Align the hole and secure (#23) and four φ6mm with four M6X40mm Hex Bolts...
- Page 10 STEP 4 (Diagram 4) A). Insert Foam Roll Tube (#8) into the top hole on the Front Stabilizer (#2) with half way. Attach two Foam Rolls (#12) from each side of the foam roll tube (#8) B).Select desired height of the hole on the lower side of the Front Stabilizer (#2), Install the Foam Roll Tube (#8) and two Foam Rolls (#12) with same way showing in Step A.
-
Page 11: Exercise Instructions
EXERCISE INSTRUCTIONS Using your BENCH will provide you with several benefits, it will improve your physical fitness, tone muscle and in conjunction with a calorie controlled diet help you lose weight. 1.The Warm Up Phase This stage helps get the blood flowing around the body and the muscles working properly. It will also reduce the risk of cramp and muscle injury. -
Page 12: Workout Chart
WORKOUT CHART WARNING! PLEASE READ BEFORE EXERCISE Always warm up your body muscle before exercising, easy stretching (without bouncing) and light calisthenics, for several minutes, are recommended to prepare your body. Exercise the complete body every other day, up to three times a week. The one day rest enables the body recover from the previous workout. -
Page 13: Care And Maintenance
Sit-Up Develops the Abdominal muscles. Sit on the bench with your knees bent to about 45 degrees and your feet hooked under the Leg Bar Foam Rollers, Put your hand on your shoulders and your chin on your chest (This will put a slight bow in your back) For this position, Inhale and lie back until your lower back touches the Backrest Board, Exhale as you raise back up to the starting position... - Page 15 COPYRIGHT ©2011BY BODY SCULPTURE INTERNATIONAL EUROPE LTD ALL RIGHTS RESERVED. UNAUTHORIZED DUPLICATION IS A VIOLATION OF LAW.
Need help?
Do you have a question about the BSB-512 and is the answer not in the manual?
Questions and answers