Advertisement
Quick Links
®
CliniMix
Inwall Shower Disinfection kit
PRODUCT CODE:
- WM-PMSKIT
SPECIFICATIONS
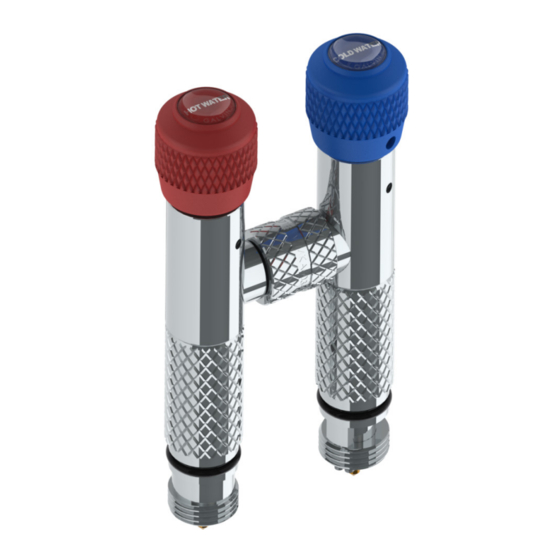
The Inwall Shower Disinfection Plug Kit allows a technician to safely perform the disinfection procedure on
Galvin Engineering in-wall thermostatic mixers.
This kit is effective in killing bacteria formed by stagnant water.
Includes a shower head adaptor and hose to safely pass the hot water from the shower to the floor drain.
IMPORTANT SAFTEY NOTE: Care should be taken when carrying out the disinfection procedure to avoid contact
with hot water and hot surfaces. We recommend the use of protective hand wear.
TECHNICAL DATA
To Suit Shower Body's
To Suit Shower Outlet
Working Pressure Range (kPa)
Working Temperature Range (°C)
NOTE: Galvin Specialised continually strive to improve their products. Specifications may change without notice.
COMPONENT DIMENSIONS
Version 1, 22 October 2019, Page 1 of 6
WM-TMVPMS, WM-
TMVPMSCS, WM-
TMVPMSCSUS, WM-
TMVPMSCS1
Vandal Resistant Shower
Rose (40691)
Min
20
Max
500
Min
60
Max
90
Advertisement

Related Manuals for Galvin Engineering CliniMix WM-PMSKIT


Summary of Contents for Galvin Engineering CliniMix WM-PMSKIT
- Page 1 SPECIFICATIONS The Inwall Shower Disinfection Plug Kit allows a technician to safely perform the disinfection procedure on Galvin Engineering in-wall thermostatic mixers. This kit is effective in killing bacteria formed by stagnant water. Includes a shower head adaptor and hose to safely pass the hot water from the shower to the floor drain.
-
Page 2: Pre-Installation
IMPORTANT: INSTALLATION COMPLIANCE: Galvin Engineering products must be installed in accordance with these installation instructions and in accordance with AS/NZS 3500, the PCA and your local regulatory requirements. Water and/or electrical supply conditions must also comply to the applicable national and/or state standards. - Page 3 Version 1, 22 October 2019, Page 3 of 6 3. Remove handle assembly 4. Remove faceplate and flange Unscrew the tamper proof screw from the handle. Unscrew the three screws and pull out the flange and faceplate from the unit. Pull out handle assembly from the body.
- Page 4 Version 1, 22 October 2019, Page 4 of 6 7. Fit disinfection unit 8. Activate hot handle Ensure both handles on the disinfection unit are Turn hot handle clockwise (until handle stops) to allow fully turned anti-clockwise and the centre nut is water to flow from the hot side of the shower through tight.
- Page 5 Version 1, 22 October 2019, Page 5 of 6 11. Re-assemble 10. Cool down unit Ensure enough time is given for the cold water Turn off hot water by rotating hot handle anti- cooling process of the disinfection unit. Once cool clockwise.
-
Page 6: Troubleshooting
Contact your maintenance manager. WARRANTY The warranty set forth herein is given expressly and is the only warranty given by the Galvin Engineering Pty Ltd. With respect to the product, Galvin Engineering Pty Ltd makes no other warranties, express or implied. Galvin Engineering Pty.