Advertisement
Quick Links
PARTS LIST:
1
Front bumper
1
Winch Tray
1
Driver/left Mounting Bracket
1
Passenger/right Mounting Bracket
1
Driver/left Lower Support Bracket
1
Passenger/right Lower Support Bracket
2
Plastic Plugs for License Plate
4
Rubber Sensor Hole Block Offs
1
Winch Access Cover
Passenger/Right
Support Bracket
Passenger/Right
Frame Mounting
Bracket
PROCEDURE:
REMOVE CONTENTS FROM BOX. VERIFY ALL PARTS ARE PRESENT. READ INSTRUCTIONS
CAREFULLY BEFORE STARTING INSTALLATION. BUMPER IS HEAVY, ASSISTANCE IS HIGHLY
RECOMMENDED TO AVOID POSSIBLE INJURY OR DAMAGE TO THE VEHICLE.
1. Open the hood and remove the plastic cover on top of the radiator and the grille, (Figure 1). Carefully
remove the grille. Remove the license plate and bracket. On models with factory fog lights, unplug both
lights. On models with bumper mounted sensors, unplug all sensors. Release the wiring harnesses
from the clips attached to the back of the bumper and move all wiring harnesses away from bumper.
2. Remove the outer bumper supports from each side of the frame, (Figure 2).
3. Place blocks or jack stands under the front bumper to support it during mounting bolt removal. Once the
bumper has been safely supported, from above the bumper, remove the (2) factory bumper bolts from
each side, (Figure 3). WARNING! Assistance is required to hold the bumper in place during bolt
removal to prevent the bumper from falling. Remove the bumper assembly.
4. Remove the factory bumper brackets from the ends of frame and remove both tow hooks, (Figure 4).
NOTE: Frame Brackets will attach to the tow hook mounting holes.
5. Select a 12mm Bolt Plate. Insert the Bolt Plate into the end of the frame and down through the hole in
the bottom of the frame, (Figure 5). Select the driver side Mounting Bracket. Slide the Bracket over the
end of the frame and over the Bolt Plate. Attach the Bracket to the Bolt Plate with the included 12mm
Flat Washer and 12mm Nylon Lock Nut, (Figures 6 & 7). Leave hardware loose at this time.
6. Next, line up the mounting tabs on the Mounting Bracket with the holes in the sides of the frame. Attach
the Frame Bracket to the sides of the frame with (1) 12mm x 140mm Long Hex Bolt, (2) 12mm Flat
Washers and (1) 12mm Nylon Lock Nut, (Figures 6 & 7). Do not fully tighten hardware at this time.
7. Select the driver/left Support Bracket, (Figure 8). Reuse (2) of the factory bumper bracket bolts to
attach the Support Bracket to the outer holes in the bumper mounting flange on the end of the frame,
2
12mm x 40mm Bolt Plates
2
12-1.75mm x 140mm Hex Bolts
12
12-1.75mm x 55mm Hex Bolts
30
12mm x 37mm OD x 3mm Flat Washers
16
12mm Nylon Lock Nuts
5
6mm Combo Bolts
1
4mm Wrench
8
4mm x 10mm Button Head Screws
1
2.5mm Wrench
(2) License
Plate Plugs
(2) 12mm x 40mm
Bolt Plates
Winch Tray
Page 1 of 6
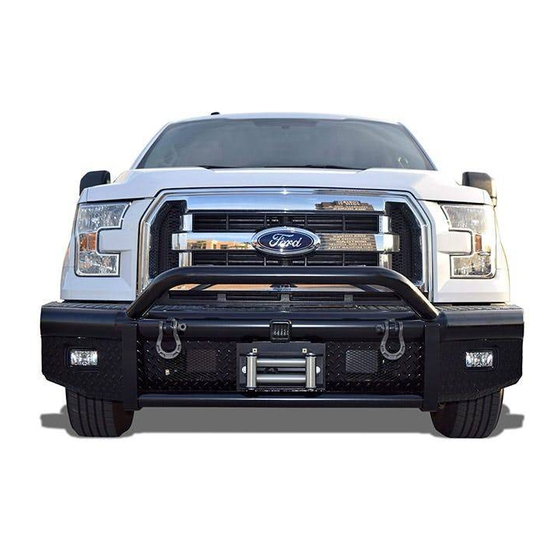
HEAVY DUTY BULL NOSE FRONT BUMPER
2015-17 CHEVY SILVERADO 25-3500
(4) Sensor Plugs
Driver/Left
Support Bracket
Driver/Left Frame
Mounting Bracket
3/30/17 (DP)
Advertisement

Related Manuals for Steelcraft HEAVY DUTY BULL NOSE FRONT BUMPER


Summary of Contents for Steelcraft HEAVY DUTY BULL NOSE FRONT BUMPER
- Page 1 HEAVY DUTY BULL NOSE FRONT BUMPER 2015-17 CHEVY SILVERADO 25-3500 PARTS LIST: Front bumper 12mm x 40mm Bolt Plates Winch Tray 12-1.75mm x 140mm Hex Bolts Driver/left Mounting Bracket 12-1.75mm x 55mm Hex Bolts Passenger/right Mounting Bracket 12mm x 37mm OD x 3mm Flat Washers...
- Page 2 HEAVY DUTY BULL NOSE FRONT BUMPER 2015-17 CHEVY SILVERADO 25-3500 (Figures 8 & 9). Line up the mounting plate on the Support Bracket with the inside of the Frame Mounting Bracket. Do not tighten the Bracket hardware at this time.
- Page 3 HEAVY DUTY BULL NOSE FRONT BUMPER 2015-17 CHEVY SILVERADO 25-3500 Driver Side Installation Pictured Front Front (Fig 1) Remove plastic cover and grille (Fig 2) Remove bumper supports attaching outer end of bumper to frame (arrow) Front (Fig 3) Remove bumper bolts (arrows) to remove...
- Page 4 HEAVY DUTY BULL NOSE FRONT BUMPER 2015-17 CHEVY SILVERADO 25-3500 Driver Side Installation Pictured 12mm Bolt Plate WARNING! Do not crawl under bumper 12mm Flat Washer unless the bumper is properly supported on 12mm Nylon Lock Nut blocks or stands or the bumper may fall.
- Page 5 HEAVY DUTY BULL NOSE FRONT BUMPER 2015-17 CHEVY SILVERADO 25-3500 Driver side installation pictured (3) 12mm x 55mm Hex Bolts (6) 12mm Flat Washers (3) 12mm Nylon Lock Nuts Front Front (Fig 10) Attach Winch Tray to inside of Brackets...
- Page 6 HEAVY DUTY BULL NOSE FRONT BUMPER 2015-17 CHEVY SILVERADO 25-3500 Driver side installation pictured (3) 12mm x 55mm Hex Bolts (6) 12mm Flat Washers (3) 12mm Nylon Lock Nuts Front (Fig 14) Driver/left pictured from back of Bumper (Fig 15) Factory fog light...
Need help?
Do you have a question about the HEAVY DUTY BULL NOSE FRONT BUMPER and is the answer not in the manual?
Questions and answers