Advertisement
Quick Links
Advertisement

Related Manuals for Montezuma M5624H


Summary of Contents for Montezuma M5624H
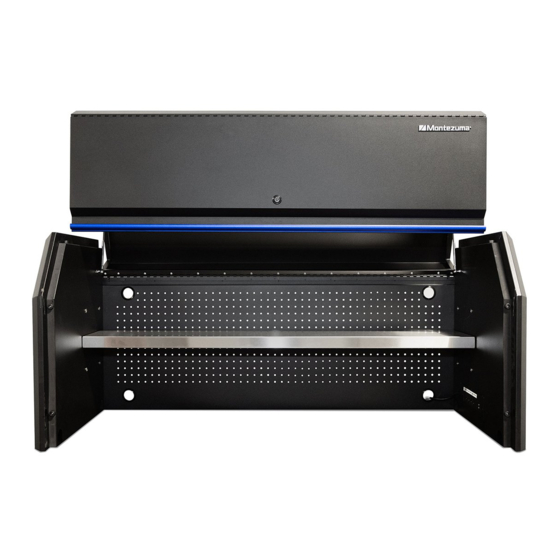
- Page 1 OWNER'S MANUAL 56" X 24" HUTCH M5624H www.montezumastorage.com...
- Page 2 LIFE ORGANIZED Montezuma is committed to helping you succeed in both your work and personal life by being organized, prepared and equipped with the right tools, gear and home supplies at your finger tips. We are here to ensure that your life is organized.
-
Page 3: Specifications
OVERALL DIMENSIONS: 56" W x 24-5/8" D x 25" H (142.2 cm W x 62.5 cm D x 63.5 cm H) NET WEIGHT: 108 lb (49 kg) WE RECOMMEND USING THIS HUTCH WITH THE MONTEZUMA 56" X 24" TOOL CABINET BKM562411TC... -
Page 4: Parts List
PARTS LIST The keys are taped to the door. REF DESCRIPTION PART NUMBER Grommet 314027 M8 x 20 Hex Bolt 321024 Power Strip 333059 Shelf 242035 Washer 324002 M8 x 40 Hex Bolt 321048 Gas Strut 303218 Lock and Key (1201–1204) 304166 To order replacement parts, email service@montezumastorage.com or call 1-800-459-4409 (Monday–Friday, 8:00 am–4:30 pm, CST). - Page 5 M8 x 20 Hex Bolt 6 for attaching side panels 4 for supporting adjustable shelf Grommet 6 for connecting hutch to cabinet without worktop (optional) For cord access Shelf Washer Power Strip For placing at For use with M8 x 20 For power management desired height Hex Bolt...
- Page 6 HUTCH ASSEMBLY Unfold the hutch body as shown. Attach the left and right side panels to the back of the hutch body using three M8 x 20 hex bolts and washers per panel.
- Page 7 Open the hutch door and install the gas strut. Proceed with connecting the hutch to the cabinet before installing the shelf in the hutch. HUTCH-CABINET CONNECTION WARNING: FOR YOUR SAFETY, MOUNT THE HUTCH TO THE CABINET USING ONLY THE HARDWARE PROVIDED. CONNECTING THE HUTCH TO A CABINET WITH A WORKTOP Put the hutch onto the worktop.
- Page 8 On the worktop, mark the locations of the six slotted holes in the hutch. Take the hutch off the cabinet. Remove the worktop by first removing the drawers, then loosening the M6 x 12 Phillips head bolts. Place the worktop on the floor. Drill six 7/16" (1.1 cm) holes at the locations you marked.
- Page 9 Place the worktop and hutch back onto the cabinet. Make sure that both the hutch and the worktop are flush with the front edge of the cabinet and that there are equal gaps on the sides. Connect the hutch, worktop and cabinet together using six M8 x 40 hex bolts and washers.
-
Page 10: Maintenance
MAINTENANCE Periodically clean the hutch front, trim, and other surfaces with mild detergent and water. Grease and oil can be removed with most standard cleaning fluids. For safety, use a nonflammable cleaning fluid. SAFETY RISK OF ELECTRIC SHOCK. To reduce the risk of electric shock, use indoors in a dry location only. - Page 11 This product is warranted to be free from defects in materials and workmanship for a period of five (5) years from the date of original purchase. If this product is defective, email service@montezumastorage.com or call 1-800-459-4409 (Monday–Friday, 8:00 am–4:30 pm, CST). If the product is defective, we will replace the defective part at no cost to you.
- Page 12 Manufactured by: QUALITY CRAFT Surrey, BC, Canada V3S 5N4 service@montezumastorage.com 1-800-459-4409 (Monday to Friday, 8:00 am–4:30 pm, CST) Made in China www.montezumastorage.com M5624H _01/19...
Need help?
Do you have a question about the M5624H and is the answer not in the manual?
Questions and answers