
Related Manuals for Bresser 1877480


Summary of Contents for Bresser 1877480
- Page 1 Digital Night Vision Bino 3x20 Art. No. 1877480 BEDIENUNGSANLEITUNG ..3 INSTRUCTION MANUAL ..8 MANUAL DE USO ....13...
-
Page 2: Manual Download
(código QR) para ver посетив наш сайт по этой ссылке (QR-код). las versiones disponibles. MANUAL DOWNLOAD: Deseja um manual detalhado deste produto numa determinada língua? Visite a nossa Website através da seguinte ligação (QR Code) das versões disponíveis. www.bresser.de/P1877480... -
Page 3: Zu Dieser Anleitung
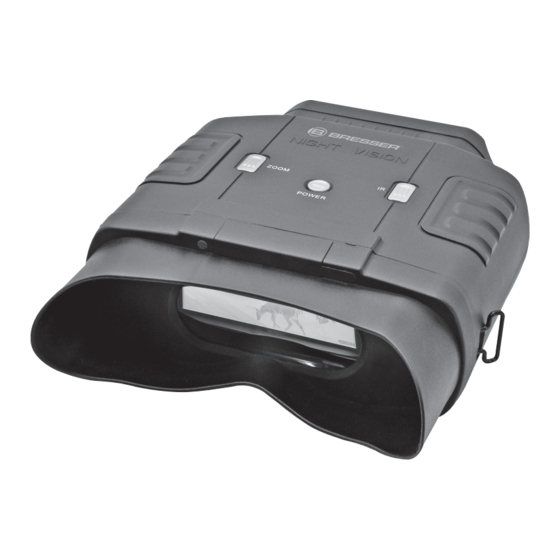
Zu dieser Anleitung VERÄTZUNGSGEFAHR! Lesen Sie vor der Benutzung des Geräts Ausgelaufene Batteriesäure kann zu Verätzungen aufmerksam die Sicherheitshinweise und führen! Vermeiden Sie den Kontakt von Batterie- die Bedienungsanleitung. säure mit Haut, Augen und Schleimhäuten. Spülen Sie bei Kontakt mit der Säure die betroffenen Stel- Bewahren Sie diese Bedienungsanleitung für die erneute Verwendung zu einem späteren Zeitpunkt len sofort mit reichlich klarem Wasser und suchen... - Page 4 Teileübersicht ZOOM POWER Lange gedrückt halten zum Ein- und Ausschalten. POWER Drücken Sie die Taste kurz damit Sie den Bildschirm in 15 Stufen dimmen. IR drücken für 7 Helligkeitsstufen (0 > 1 > 2 > 3 > 4 > 5 > 6 > 7 > 0 …) bei Verwendung in der Nacht.
-
Page 5: Batterien Einlegen
Scharfeinstellungsrad Batteriefächer A+B Stativanschluss Batteriefach Schloss Batterien einlegen (1) Abdeckung öffnen durch entriegeln der Schlösser. (2) Entfernen sie die Batteriefächer (10) und stecken sie jeweils 4x AA Alkalin Batterien hinein (A+B). Wenn sie die Batteriefächer wieder einfügen, sorgen sie dafür, dass die Pfeile nach oben zeigen. -
Page 6: Gerät Einschalten
ZOOM POWER Gerät einschalten (1) Halten Sie die POWER Taste gedrückt um das Gerät einzuschalten. Sobald das Gerät eingeschaltet ist, blicken Sie innen auf den LCD-Bildschirm. (2) Nehmen Sie die Scharfeinstellung am Rad vorne auf der Unterseite vor. (3) Bei Nachtbeobachtung, aktivieren Sie die Infrarotbeleuchtung, durch drücken der IR-Taste. -
Page 7: Fehlerbehebung
Gerät, wenn es längere Zeit nicht benutzt wird! EG-Konformitätserklärung Eine „Konformitätserklärung“ in Übereinstimmung mit den anwendbaren Richtlinien und entsprechenden Normen ist von der Bresser GmbH erstellt worden. Diese kann auf Anfrage jederzeit eingesehen werden. ENTSORGUNG Entsorgen Sie die Verpackungsmaterialien sortenrein. Informationen zur ordnungsgemäßen Entsor- gung erhalten Sie beim kommunalen Entsorgungsdienstleister oder Umweltamt. -
Page 8: General Warning
About this Instruction Manual RISK OF CHEMICAL BURN! Please read the safety instructions and the Leaking battery acid can lead to chemical burns. operating instructions carefully before use. Avoid contact of battery acid with skin, eyes and mucous membranes. In the event of contact, rinse Keep these instructions for renewed use at a later the affected region immediately with a plenty of date. -
Page 9: Parts Overview
Parts overview ZOOM POWER Long press for power on and off POWER Press the button briefly to dim the screen in 15 steps. Press IR for 7 levels of brightness (0 > 1 > 2 > 3 > 4 > 5 > 6 > 7 > 0 …) when using the binoculars at night. -
Page 10: Install Batteries
Focus Wheel Battery Compartment A+B (with directions markings) Tripod Holder Battery Compartment Lock Install batteries (1) Open the covers by unlocking the locks. (2) Remove the Battery Cartridges (10). Put in 4x AA Alkaline batteries in each cartridge (A+B). -
Page 11: Turn On The Device
ZOOM POWER Turn on the device (1) Long press the POWER button to turn on the binocular. Once the power is on, look into the LCD screen inside. (2) Adjust the focus by turning the focus wheel at the front bottom. (3) For night use, turn on the IR by pressing the IR button. -
Page 12: Troubleshooting
This can be viewed any time upon request. UKCA DECLARATION OF CONFORMITY Bresser UK Ltd. has issued a „Declaration of Conformity“ in accordance with applicable guidelines and corresponding standards. The full text of the UKCA declaration of conformity is available at the following internet address: www.bresser.de/download/1877480/... -
Page 13: Sobre Este Manual
Sobre este manual ¡PELIGRO DE ABRASIÓN! El presente manual de instrucciones se debe Si se derrama el ácido de las pilas, este puede considerar parte integrante del aparato. provocar abrasiones Evite el contacto del ácido Antes de utilizar el aparato, lea detenidamen- de las baterías con la piel, los ojos y las mucosas. - Page 14 Resumen de las partes ZOOM POWER Mantenga pulsado el botón para apagar y encender. POWER Presione el botón brevemente para atenuar la pantalla en 15 pasos. Pulse IR para 7 niveles de brillo (0 > 1 > 2 > 3 > 4 > 5 > 6 > 7 > 0 …) durante su uso nocturno.
-
Page 15: Instalación De Las Pilas
Rueda de enfoque Compartimento para pilas Soporte para trípode Cierre del compartimento para pilas Instalación de las pilas (1) Abra las tapa desbloqueando los cierres. (2) Retire los cartuchos (10). Coloque 4 pilas alcalinas AA en cada cartucho (A+B). -
Page 16: Información De La Pantalla
ZOOM POWER Conectar dispositivo (1) Mantenga pulsado el botón POWER para encender el dispositivo. Una vez el dispositivo esté encendido, mire a través de la pantalla LCD. (2) Ajuste el foco de delante con la rueda delantera en la parte inferior. (3) Durante la visión nocturna, active la iluminación infrarroja pulsando la tecla IR. -
Page 17: Resolución De Problemas
Se deben retirar las pilas del aparato si no se va a usar durante un periodo prolongado. DECLARACIÓN DE CONFORMIDAD DE LA UNIÓN EUROPEA (CE) Bresser GmbH ha emitido una „Declara- ción de conformidad“ de acuerdo con las directrices y normas correspondientes. Dicha declaración se puede consultar en cualquier momento, previa petición. -
Page 18: Garantie & Service
(QR code) for available versions. Alternatively you can also send an email to manuals@ bresser.de or leave a message on +49 (0) 28 72 – 80 74-220*. Please always state your name, precise address, a valid phone number and email address, as well as the article number and name. -
Page 19: Garantía Y Servicio
(QR Code) voor alle beschikbare versies. U kunt ook een e-mail sturen naar manuals@ bresser.de of een bericht achterlaten op nummer +49 (0) 28 72 – 80 74-220*. Vermeld alstublieft altijd uw naam, uw exacte adres, een geldig telefoonnummer en e-mailadres, evenals het artikelnummer en het kenmerk. - Page 20 Bresser GmbH Gutenbergstr. 2 · DE-46414 Rhede Germany Bresser UK Ltd. Suite 3G, Eden House, Enterprise Way, Besuchen Sie uns auf • Find us on: Edenbridge, Kent TN8 6Hf, Great Britain www.bresser.de · service@bresser.de...
Need help?
Do you have a question about the 1877480 and is the answer not in the manual?
Questions and answers