Table of Contents
Advertisement
Quick Links
Advertisement
Table of Contents

Related Manuals for Vaisala DRYCAP DM70


Summary of Contents for Vaisala DRYCAP DM70
- Page 1 M212551EN-A Quick Guide â Vaisala DRYCAP Handheld Dew Point Meter DM70...
- Page 2 English versions are This product contains software developed applicable, not the translations. by Vaisala or third parties. Use of the The contents of this document are subject software is governed by license terms and to change without prior notice.
-
Page 3: Table Of Contents
Table of contents Table of contents Introduction to DM70..................3 Parts description....................4 Measurement in dry environments..............4 MI70 indicator....................6 MI70 indicator parts..................6 MI70 status icons....................7 Installing and recharging MI70 batteries............7 Taking measurements................... 9 MI70 first start-up settings................9 Basic measuring steps with DM70..............9 3.2.1 Configuring pressure settings.............. - Page 4 DM70 Quick Guide M212551EN-A...
-
Page 5: Introduction To Dm70
DM70 can be used with an optional sampling cell to measure process dew point. It can also be used as a tool for reading the output of fixed Vaisala dew point transmitters, such as DMT242, DMT132, DMT143, DMT152, and DMT340. -
Page 6: Parts Description
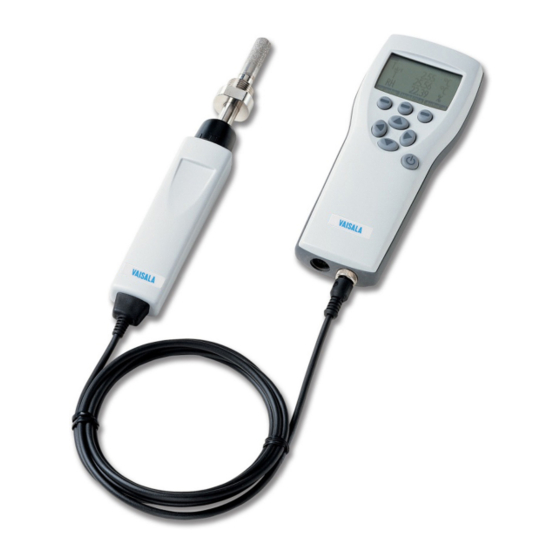
DM70 Quick Guide M212551EN-A 1.1 Parts description Figure 1 DM70 parts Charger socket MI70 indicator Connector ports for probes and cables Calibration button Sampling cell DSC74 (optional) DMP74 probe 1.2 Measurement in dry environments The following recommendations should be taken into account when measuring in very dry environments: •... - Page 7 Chapter 1 – Introduction to DM70 • The tube temperature must never lie under the dew point of the sample gas. This may lead to condensation and false results. • The sample tubing should be of as short length as possible. The surface area should be minimized using the narrowest tubing that the flow conditions allow.
-
Page 8: Mi70 Indicator
Vaisala MI70 handheld indicator is a portable tool for viewing the measurements, recording the data, and configuring the settings of connected Vaisala instruments. MI70 indicators can be used with a wide range of Vaisala instruments, and are also delivered as part of the probe and indicator product packages DM70, GM70, HM70, and MM70. -
Page 9: Mi70 Status Icons
MI70 screen. You can order replacement batteries from Vaisala (item code 26755). Recording icon. Shows that the measurements are being recorded. The bar shows for how long the recording will continue (a set time limit or until the memory runs out). - Page 10 DM70 Quick Guide M212551EN-A The status of the MI70 battery is shown by the battery icon in the upper left corner of the display. Possible statuses are listed in Table 2 (page To recharge the rechargeable battery: 1. Plug in the charger connector to the MI70 indicator. The socket is located at the top of the indicator, covered by a rubber seal.
-
Page 11: Taking Measurements
Chapter 3 – Taking measurements 3. Taking measurements 3.1 MI70 first start-up settings When taking MI70 into use for the first time, configure the basic settings (language, date, and time) as instructed below. 1. Press the Power On/Off button in MI70 to switch the indicator on. 2. -
Page 12: Configuring Pressure Settings
DM70 Quick Guide M212551EN-A 2. With the MI70 indicator power switched off, connect the probe cable to either of the connector ports of MI70. Rotate the metal ring around the cable connector clockwise until it tightens up. 3. Switch MI70 on by pressing the Power On/Off button. 4. -
Page 13: Autocalibration
Chapter 3 – Taking measurements 2. Select Environment with and press 3. To change the pressure unit, press Unit. The default unit is barg. 4. To change the ambient pressure value, press Set. 5. Set the value using the arrow buttons. To change the sign of the pressure value, press +/-. -
Page 14: Sampling Cells
• PTFE tape • Adjustable wrench • Flat head screwdriver DSC74 is a Vaisala sampling cell for connecting DM70 to pressurized processes (optional accessory). DSC74 comes with a quick connector that fits to industry standard compressed air line connectors (suitable for type D, Quick08, NIP08). This allows for easy installation and detachment of the probe without having to shut down the process. - Page 15 Chapter 3 – Taking measurements CAUTION! If you use the thread adapters, the process pressure must be shut down for the installation or removal of the probe. If you use the quick connector, the process pressure can be maintained during the installation or removal of the sampling cell.
-
Page 16: Measuring Multiple Parameters Simultaneously
3.4 Measuring multiple parameters simultaneously MI70 is a generic indicator that can be used with Vaisala interchangeable dew point (DM70 series), humidity (HM70 series), carbon dioxide (GM70 series), and moisture in oil (MM70 series) probes. Two different types of probes can be connected to MI70 simultaneously. - Page 17 Chapter 3 – Taking measurements 1. Switch off the MI70 indicator. 2. Connect the 2 probes to the connector ports (port I and II) on the bottom of the indicator. 3. Switch on MI70. 4. Check that the environment settings of the probes in port I and II are the same if you are taking measurements from the same condition.
-
Page 18: User Interface
DM70 Quick Guide M212551EN-A 4. User interface 4.1 Basic display Figure 5 DM70 basic display Battery indicator. Shows the current status (charge) of the battery. Pressure setting. Measured parameter (up to 3 items on display simultaneously). You can change the shown items in Main menu > Display > Quantities and units. Function key Graphic shows the readings as a curve. -
Page 19: Main Menu
Chapter 4 – User interface To get the statistical info on the graph area (minimum, maximum, and average values), press Info. To get the curve of the other selected parameters, press Next. To get the curves of all the parameters, press Next until the text All appears, and then select All. To zoom in and out, press the up/down arrow buttons. - Page 20 DM70 Quick Guide M212551EN-A Figure 7 Functions menu for DMP74A (left) and DMP74B/C (right) Figure 8 Recording/Viewing menu and Environment menu Figure 9 Settings menu...
-
Page 21: Maintenance
Chapter 5 – Maintenance 5. Maintenance 5.1 Changing the rechargeable battery pack • New rechargeable battery pack • Medium-sized flat head screwdriver In case you are installing a rechargeable battery pack in the MI70 indicator and you have a device with alkaline batteries, remove the metal contact from the probe port end of the battery compartment before installing the battery pack. -
Page 22: Maintenance And Calibration Services
Maintenance and calibration services Vaisala offers comprehensive customer care throughout the life cycle of our measurement instruments and systems. Our factory services are provided worldwide with fast deliveries. For more information, see www.vaisala.com/ calibration. • Vaisala Online Store at store.vaisala.com is available for most countries. - Page 24 www. v aisala.com...
Need help?
Do you have a question about the DRYCAP DM70 and is the answer not in the manual?
Questions and answers