
Subscribe to Our Youtube Channel
Related Manuals for Lindy 39416


Summary of Contents for Lindy 39416
- Page 1 KVM over IP Access DVI-I, USB & PS/2 User Manual Eng lis h No. 39416 lindy.com © LINDY Group - FIRST EDITION (March 2021)
- Page 2 © LINDY Group - FIRST EDITION (March 2021)
-
Page 3: Table Of Contents
Index Safety Instruction……………………………………………………………………………………………….. 4 Introduction………………………………………………………………………………………………………. 5 Package Contents.…….……………………………………………………………………………………….. 5 Features…………………………………………………………………………………………………………… 5 Specification…………………………………………………………………………………………………….. 5 Installation……………………………………………………………………………………………………….. 6 Product overview………………………………………………………………………………………… 6 Connection diagram…………………………………………………………………………………….. 6 Getting started…………………………………………………………………………………………… 7 Operation…………………………………………………………………………………………………………. 7 First Access to Web Management………………………………………………………………………… 7 Web management configuration…………………………………………………………………………… 8 Download……………………………………………………………………………………………… 8 Main……………………………………………………………………………………………………. 8 Virtual Media………………………………………………………………………………………….. -
Page 4: Safety Instruction
User Manual English Safety Instructions ! WARNING ! Please read the following safety information carefully and always keep this document with the product. Failure to follow these precautions can result in serious injuries or death from electric shock, fire or damage to the product. Touching the internal components or a damaged cable may cause electric shock, which may result in death. -
Page 5: Introduction
Thank you for purchasing the KVM over IP Access DVI-I, USB & PS/2. This product has been designed to provide trouble free, reliable operation. It benefits from both a LINDY 2-year warranty and free lifetime technical support. To ensure correct use, please read this manual carefully and retain it for future reference. -
Page 6: Installation
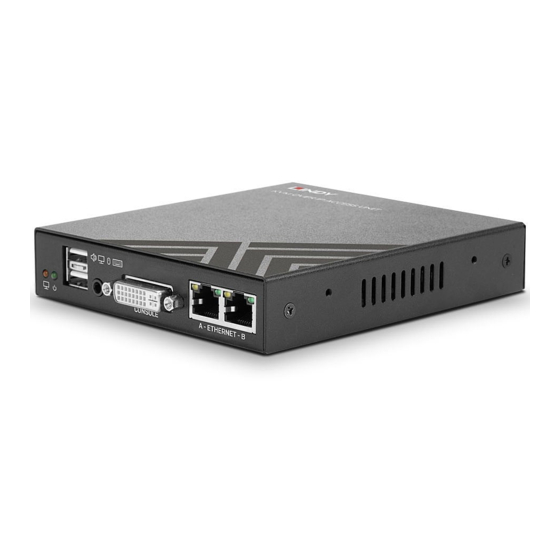
User Manual English Installation Front 1. Video LED – Lights up when remote IP session is active 2. Power LED – Indicates Power 3. 2 x USB Device Ports – USB HID ports to plug in keyboard and mouse 4. Debug port – For service use 5. -
Page 7: Getting Started
User Manual English Getting Started Important! Before starting the installation, please ensure that all devices are powered off. The following steps are for a basic installation using DVI equipment in a standard KVM installation, if you are using VGA equipment, please substitute the DVI-A to VGA adapter (included) and a VGA cable (not included) with DVI cables where required. -
Page 8: Web Management Configuration
User Manual English Web management configuration Download Refer to the chapter Viewer Configuration below. Main Date and Time: Connect the IPKVM to internet and select Synchronize with an Internet Time Server (NTP) to set up the Local Time. Click on Store Settings so save. Security: Specify the encryption level of connections, the certificates, and the password policy choosing from No Password, Global Password, or User Password. - Page 9 User Manual English Networks: TCP Port Base: Specify the port base for viewer connections with the unit. You can choose any available port base, starting from 5900 with an increment of 10 right up to 6400. TCP port base + 8 is the port number you will use for https web management.
- Page 10 User Manual English In Network Name (SSID), select the name of the wireless network (SSID) you want to connect to. If unknown, please get this information from your network administrator. If the wanted SSID does not appear in the list, click on Scan. Eventually, if you cannot get the desired SSID, this is likely because the access point is out of reach.
-
Page 11: Virtual Media
User Manual English Virtual media Remote Media When running a viewer, you can share a DVD/CDROM, USB key, or ISO file with the computer attached to the unit. For example, a CDROM in the drive of the computer running the viewer can appear like a removable mass storage to the KVM IP Access-attached computer. - Page 12 User Manual English Each log entry is composed of the date plus time stamp, and the description of the event. The first letter "K", "H" or "U" indicates whether the message is coming from the KVM server, the HTTP server, or the USB server.
- Page 13 User Manual English Mouse re-synchronization hot keys • Mouse shortcuts • Special feature for anyone who uses a double-byte language such as Chinese, Japanese or • Korean (the CJK languages) and some other languages If the unit is connected to a KVM, you can also setup the KVM hotkeys that will allow selecting •...
-
Page 14: Users
User Manual English Users Local Database In this page you can list, edit, add, or remove user accounts that can access the product. These users are stored in the local database of the unit, they need no external access to an authentication server. In case of conflict, the information in the local database has higher priority than the information provided by the possible authentication server. - Page 15 User Manual English Radius Accounting The Radius Accounting allows the unit to record all user connection and disconnection events on a remote Radius Accounting server. The Radius Accounting is not related to the RADIUS or LDAP server features that can be used to authenticate users. By default, the RADIUS Accounting is disabled.
-
Page 16: Alarms
User Manual English Alarms Emails: Settings to send out Email alarm notifications. SNMP: Settings concerning the SNMP manager that will get the SNMP traps sent by the unit. Selection: Select which events will generate an alarm and the type of alarm that must be sent. -
Page 17: Maintenance
User Manual English Maintenance Software Versions: Basic information on the software. Networking Status: View current Ethernet and Wireless networking information. Software Upgrade: Upgrade the software from this page across the LAN or the Internet (if available). - Page 18 User Manual English Save/Restore Settings: Save the current configuration for future usage or upload a previously saved configuration file. Reboot: This page allows restarting the unit from the boot loader.
-
Page 19: Viewer Configuration
User Manual English Viewer Configuration Viewer for Windows Download and install the viewer by following the on-screen instruction. Click the viewer link icon to launch the Windows viewer. If insufficient rights are granted to the viewer, the User Access Control will pop up for authorization. In the Connection Dialog, type the network information to access the unit, then click Connect. -
Page 20: Connection Dialog
User Manual English Connection Dialog Compression Specify the compression type that will be used to transmit the video from the unit to viewer. The compressions are listed from the lowest to the highest data volume. Note that high compressions need more work and thus longer KVM over IP and viewer processing times. - Page 21 User Manual English Session A user session can be shared or private. If the connection is shared, other users can connect simultaneously. They will see the same video as main user and compete for mouse and keyboard access. If the connection is not shared (private), other users cannot get access to the computer as long as main user don't close the session.
- Page 22 User Manual English Send Shortcut: Provides the list of mouse shortcuts previously defined in the Web (refer to the Viewer Connection section). Click on one of the shortcuts to send the command to the attached computer. Refresh Screen: Forces total update of the viewer screen. Send Ctrl-Alt-Del: Fixed shortcut to let the IPKVM send Control-Alt-Delete command to the attached computer.
-
Page 23: Resolution Configuration
User Manual English Virtual Medium Manage Virtual Medium/ Drive Redirection: Opens the Virtual Medium dialog box. Select the Hard Disk, DVD/CDROM drive or ISO file and click Connect. See details below. Status: Show current Virtual Media connection status. Hard Disk or CD ROM Drive (Windows viewer only): Redirect and map a local drive onto the attached computer. -
Page 24: Troubleshooting
User Manual English Troubleshooting Video problems Make sure the video sent by the computer corresponds to one of the resolutions supported by the IPKVM (refer to the Resolution Configuration section). Check the video resolution detected by the unit in the KVM Server Log. If the computer is sending VGA video signal, check whether the remote screen is well centered in the viewer window, without black borders. - Page 25 Standard IEC 60950-1 or 60065 or 62368-1. LINDY Herstellergarantie – Hinweis für Kunden in Deutschland LINDY gewährt für dieses Produkt über die gesetzliche Regelung in Deutschland hinaus eine zweijährige Herstellergarantie ab Kaufdatum. Die detaillierten Bedingungen dieser Garantie finden Sie auf der LINDY Website aufgelistet bei den AGBs.
- Page 26 Geräte müssen den Sammel- und Rückgabesystemen zugeführt werden! Dort werden sie kostenlos entgegen genommen. Die Kosten für den weiteren Recyclingprozess übernehmen die Gerätehersteller. LINDY bietet deutschen Endverbrauchern ein kostenloses Rücknahmesystem an, beachten Sie bitte, dass Batterien und Akkus den Produkten vor der Rückgabe an das Rücknahmesystem entnommen werden müssen und über die Sammel- und Rückgabesysteme für Batterien separat entsorgt werden müssen.
Need help?
Do you have a question about the 39416 and is the answer not in the manual?
Questions and answers