Advertisement
Quick Links
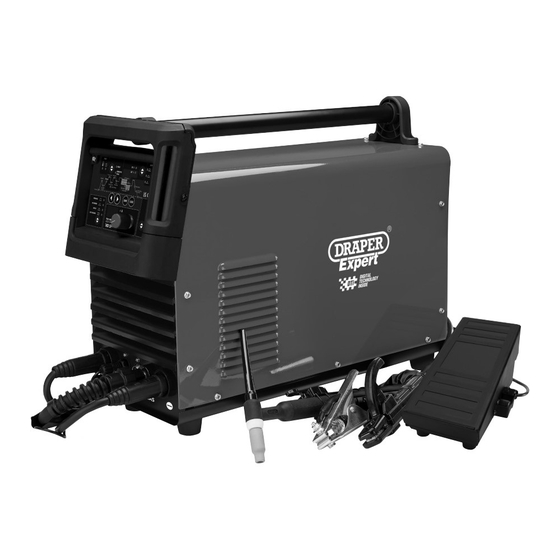
HIGH FREQUENCY
200A TIG/MMA
ALUMINIUM WELDER
70052
These instructions accompanying the product are the original instructions. This document is part of the product,
keep it for the life of the product passing it on to any subsequent holder of the product. Read all these instructions
before assembling, operating or maintaining this product.
This manual has been compiled by Draper Tools describing the purpose for which the product has been designed,
and contains all the necessary information to ensure its correct and safe use. By following all the general safety
instructions contained in this manual, it will ensure both product and operator safety, together with longer life of the
product itself.
All photographs and drawings in this manual are supplied by Draper Tools to help illustrate the operation of the
product.
Whilst every effort has been made to ensure the accuracy of information contained in this manual, the Draper
Tools policy of continuous improvement determines the right to make modifications without prior warning.
Advertisement

Related Manuals for Draper Expert 70052


Summary of Contents for Draper Expert 70052
- Page 1 All photographs and drawings in this manual are supplied by Draper Tools to help illustrate the operation of the product.
- Page 2 INTRODUCTION Danger of ultraviolet radiation. 1.1 SCOPE High frequency TIG/MMA aluminium welder containing Danger of burning splashes. the latest integrated digital technology for optimum performance. This product is intended for trade use with the quality & features to meet and exceed the expectations of the Fan cooled.
- Page 3 – Keep welding cables away from power cables. SPECIFICATION – Regularly inspect the condition of the welding, earth, 2.1 SPECIFICATION and power cables for signs of damage. – Do not leave the machine unattended and remove Stock No............... 70052 the plug from the socket when not in use.
- Page 4 – Protective head and shoulder coverings should be – Take care that no build-up of gas is permitted to form worn when overhead welding. in confined areas. – Avoid taking any fuels with you e.g. cigarette lighters – Cylinders must be in an upright position at all times or matches.
- Page 5 Fig A. If any part is damaged regulations. or missing, please contact the Draper Help Line (see back page). Do not attempt to use the product! The packaging material should be retained during the warranty period, in case the product needs to be returned for repair.
- Page 6 Note: This product has been set to the highest voltage at the factory. Draper Tool’s newest models of welding machines contain the latest digital technology, integrated into every element of the machine’s control, improving every 6.4 RATING PLATE aspect of performance.
- Page 7 Tungsten Ø Amp Range Welding Fan cooled. current (AMPS) ≤1.2mm ≤70A Indoor use Welding 1.6mm 70 - 140A only. Do not current expose to rain. (VOLTS) 2.4mm 140 - 250A Unit’s maximum 3.2mm ≥240A Insulation Class F absorbed rating. current (AMPS).
- Page 8 Yellow 0.9-1.2% Thorium Oxide 1.8-2.2% Thorium Oxide Long life DC welding tungsten alloy providing improved ignition properties and a stable arc. See Lilac 2.8-3.2% Thorium Oxide HSE guidelines. Orange 3.8-4.2% Thorium Oxide Black 0.9-1.2% Lanthanum Oxide Capable of AC/DC welding with similar properties Gold 1.2-1.8% Lanthanum Oxide...
- Page 9 (10) (10.1) Argon (3.1) (7.1) (2.1) FIG. FIG. 7.4 MMA (MANUAL METAL ARC) SETUP – FIG.8 − To attach the electrode holder (9) to the front panel, insert the plug into the connection port marked ‘ ’ (1) and twist to lock. −...
- Page 10 During the MMA welding process, the arc created between the work piece and the consumable electrode rod melts the parent metal and the filler metal in a weld pool. The electrode’s flux coating reacts during this process and develops into a shield gas protecting the weld bead. Part of this reaction leaves a trail of slag which solidifies behind the weld pool protecting the weld as it cools.
- Page 11 Display Used to display the values of each parameter. Data save button Used for save welding data, which can store ten different sets of welding data. Parameter adjusting knob Adjust parameters. Load button Retrieve the stored welding parameters Welding mode selection button Hold for three seconds in the Argon welding, then release the convertible arc welding.
- Page 12 Pulse frequency Adjust the pulse 0.1~20HZ frequency value when pulse mode is adopted Clear width Adjust the cleaning width 10~90 % 30 % when using AC welding Clear depth Adjust the cleaning depth -50~+50 % when using AC welding AC frequency Adjust the frequency of 20~200HZ 80HZ...
- Page 13 150A welding for 3 minutes subject. − Use of an anti-spatter spray – Draper stock 7 minutes down time No.05709 – will help to achieve a cleaner finished weld.
- Page 14 If in doubt, consult components, loose. Draper Tools, or an authorised service agent. etc., as − Check if required. bolts are Welding power supply: loose.
- Page 15 Cables: Component Check points Advisories Grounding cable − Check if all earth wires (for this device and parent metal In order to avoid the risk of grounding) are in place – check electrocution, be sure to conduct if the connections are safe and related checks.
- Page 16 Fault indicator on and no output − Over-heat protection has − Switch off the device and then possibly been activated. restart it after the fault indicator is off. − Wait 2-3min without switching off the unit. The device may then naturally restore its self (the device of pure Argon arc welding does not have over-heat protection function)
- Page 17 This warranty applies in lieu of any other warranty expressed or implied and variations of its terms are not authorised. Your Draper warranty is not effective unless you can produce upon request a dated receipt or invoice to verify your proof of purchase within the warranty period.
Need help?
Do you have a question about the Expert 70052 and is the answer not in the manual?
Questions and answers