Table of Contents
Advertisement
Quick Links
Rev. 7/17/2018
RDC-100
Receiving instructions:
After delivery, remove the packaging from the product. Inspect the product closely to determine whether it
sustained damage during transport. If damage is discovered, record a complete description of it on the bill of lading. If
the product is undamaged, discard the packaging.
NOTE:
The end-user is solely responsible for confirming that product design, installation, use, and maintenance comply
with laws, regulations, codes, and mandatory standards applied where the product is used.
Signal Words............................................................................................................................................................................................. 2
Specifications.......................................................................................................................................................................................... . 2
Hazards of Improper Use................................................................................................................................................................... 2
DCR-100 exploded parts diagram and bill of materials..................................................................................................................... . 3
DCR-100-10 exploded parts diagram and bill of materials............................................................................................................... . 4
Specifications........................................................................................................................................................................................... . 5
Assembly...........................................................................................................................................................................................
Using the Cart.......................................................................................................................................................................................... . 7
Inspections and Maintenance................................................................................................................................................................ 8
Labeling Diagram...................................................................................................................................................................................... 8
Limited Warranty...................................................................................................................................................................................... 9
Copyright 2017 Vestil Manufacturing Corp.
&
RDC-100-10
A
SSEMBLY
Table of Contents
Vestil Manufacturing Corp.
2999 North Wayne Street, P.O. Box 507, Angola, IN 46703
Telephone: (260) 665-7586 -or- Toll Free (800) 348-0868
Fax: (260) 665-1339
www.vestilmfg.com e-mail: info@vestil.com
D
R
RUM
I
NSTRUCTIONS
RDC-100, MANUAL
C
OTATING
ARTS
5 - 6
Page 1 of 9
Advertisement
Table of Contents

Related Manuals for Vestil RDC Series


Summary of Contents for Vestil RDC Series
-
Page 1: Table Of Contents
Rev. 7/17/2018 RDC‐100, MANUAL Vestil Manufacturing Corp. 2999 North Wayne Street, P.O. Box 507, Angola, IN 46703 Telephone: (260) 665‐7586 ‐or‐ Toll Free (800) 348‐0868 Fax: (260) 665‐1339 www.vestilmfg.com e‐mail: info@vestil.com RDC‐100 & RDC‐100‐10 RUM OTATING ARTS SSEMBLY NSTRUCTIONS Receiving instructions: After delivery, remove the packaging from the product. Inspect the product closely to determine whether it sustained damage during transport. If damage is discovered, record a complete description of it on the bill of lading. If the product is undamaged, discard the packaging. ... -
Page 2: Signal Words
Vestil strives to identify every foreseeable hazards associated with the use of its products. However, material handling is inherently dangerous and no manual can address every conceivable risk. Ultimately, the most effective means for preventing accidents is for the end‐user to apply good judgment and foresight whenever using this product. If this product is used improperly or carelessly, the user and/or bystanders might sustain serious personal injuries. To reduce the likelihood of injury: Read and understand the entire manual before assembling, using or maintaining the cart. DO NOT modify this cart in any way UNLESS you first obtain written approval from Vestil. Unapproved modifications automatically void the Limited Warranty (p. 9) and might make the cart unsafe to use. DO NOT attempt to carry or transport loads that exceed the capacity of the cart. Capacity information appears in the “Specifications” table on p. # as well as on label 287 (see “Labeling Diagram” on p. 8.) ALWAYS secure drums to the cart with the (yellow) drum lock. DO NOT stand, sit, or ride on the cart. Only use this cart to move drums. Always watch the drum carefully while the cart is moving. If necessary, secure the drum to the cart, e.g. with ratchet straps. ... - Page 3 09‐514‐012 Weldment, frame, RDC‐100 1 ”‐18 x 2.25” Nylon insert lock nut, gr. 2, zinc 6 37021 4 14 09‐048‐001 Tote, plastic drip pan 1 finish, ”‐18 Caster, swivel with stem, HR‐ Flat washer, low carbon, zinc 7 16‐132‐220 2 15 33012 4 3/1.25‐STM‐2 finish, ” Lock washer, medium split, Bolt, HHCS, #2, zinc plated, 8 33625 2 16 11067 4 plain finish, ” ”‐18x3.5” Copyright 2017 Vestil Manufacturing Corp. Page 3 of 9 ...
- Page 4 6 33625 2 14 Wheel, roller, HR‐3/1‐W 8 plain finish, ” 001 Hex nut, grade A, plain finish, Nylon insert lock nut, gr. 2, zinc 7 36109 2 15 37021 4 ”‐13 finish, ”‐18 Flat washer, low carbon, zinc Bolt, HHCS, #2, zinc plated, 8 33012 4 16 11067 4 finish, ” ”‐18x3.5” Copyright 2017 Vestil Manufacturing Corp. Page 4 of 9 ...
-
Page 5: Specifications
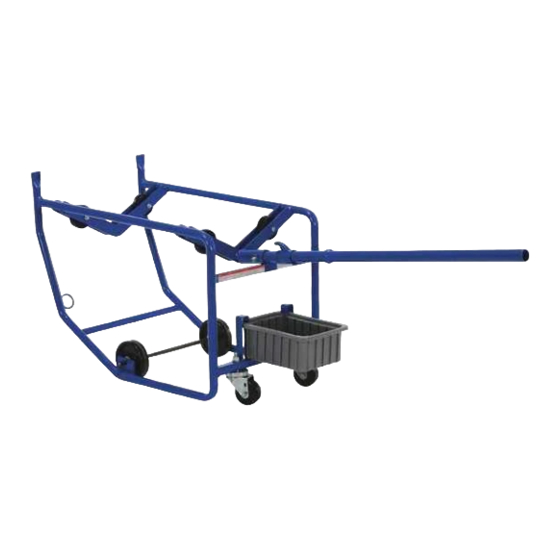
d. Another wheel (16‐132‐066); and e. 1 more flat washer. Axle Cotter Flat pin Hole for washer cotter pin Flat washer Bracket Bracket Copyright 2017 Vestil Manufacturing Corp. Page 5 of 9 ... - Page 6 Hex bolt Lock nut Hex nut Lock washer Caster 5. Install the drip pan ( ). Tilt the pan and slide 6. Insert the handle ( ) into the handle 09‐048‐001 09‐525‐001 it under the retaining brackets. receiver. Fasten the handle to the receiver with a hex bolt (11062) and wing nut (37748). Retaining bracket Drip pan Wing nut Bolt Copyright 2017 Vestil Manufacturing Corp. Page 6 of 9 ...
-
Page 7: Using The Cart
3. Push the top of the cart forward (towards the drum). The rim hook should slide over the top of the rim and seat behind it. 4. Push the drum forward slightly until the bottom of the drum (by the drum retainers) lifts off of the ground. 5. Slide the drum retainers under the bottom of the drum. 6. Carefully rotate the cart back onto its wheels. When the cart and drum are horizontal, the drum is supported by the drum rollers. The drum can be rolled to orient it as needed. 7. Unload the cart by reversing steps 1‐6. NOTE: When the cart is not in use, the handle can be removed and stored by inserting the end of the handle into the storage ring from the front of the cart. Rim hook 1 & 2 3, 4 & 5 Rim hook seats behind rim Rim Drum retainers slide underneath Drum can be drum rolled in either direction 6 Drum roller Storage ring for handle Front Drum supported by rollers Back Copyright 2017 Vestil Manufacturing Corp. Page 7 of 9 ... -
Page 8: Inspections And Maintenance
Step 3: Complete all necessary repairs/replacements. Deformities, severe corrosion or rusting, or excessive wear of any part warrants immediate replacement of that part. DO NOT return the table to service until adjustments and repairs are complete! NOTE: Adjustments and repairs differ significantly from modifications: Adjustments & repairs are simple correction that restores the cart to normal operating condition. Examples include tightening loose fasteners and lubricating moving parts. Modifications are changes that alter the cart from original condition, like bending the frame. NEVER modify the cart without express, written approval from Vestil. Modifications automatically void the limited warranty and might make the device unsafe to use. Step 4: Make a dated record of all repairs, adjustments and replacements. Step 5: Store the cart indoors in a dry location. Labeling Diagram: The table should always be labeled as shown in this diagram. However, label content and location are subject ... -
Page 9: Limited Warranty
LIMITED WARRANTY Vestil Manufacturing Corporation (“Vestil”) warrants this product to be free of defects in material and workmanship during the warranty period. Our warranty obligation is to provide a replacement for a defective, original part covered by the warranty after we receive a proper request from the Warrantee (you) for warranty service. Who may request service? Only a warrantee may request service. You are a warrantee if you purchased the product from Vestil or from an authorized distributor AND Vestil has been fully paid. Definition of “original part”? An original part is a part used to make the product as shipped to the Warrantee. What is a “proper request”? A request for warranty service is proper if Vestil receives: 1) a photocopy of the Customer Invoice that displays the shipping ...
Need help?
Do you have a question about the RDC Series and is the answer not in the manual?
Questions and answers