Roland V-160HD Startup Manual
Streaming video switcher
Hide thumbs
Also See for V-160HD:
- Remote control manual (22 pages) ,
- Reference manual (111 pages) ,
- Remote control manual (38 pages)
Table of Contents
Advertisement
Quick Links
Before using the unit, ensure that its system program is at the most recent version. For information on available upgrades for the system program, see
the Roland website (https://proav.roland.com/).
You can check the system program version by Pressing the [MENU] button
Before using this unit, carefully read "USING THE UNIT SAFELY" and "IMPORTANT NOTES" (the leaflet "USING THE UNIT SAFELY" and the Startup Guide
(p. 12)). After reading, keep the document(s) where it will be available for immediate reference.
Checking the Included Items
Check that all of the included items are present. If any of the
included items are missing, contact your dealer.
 V-160HD unit
 Rack-mount angle mounting screws (6)
 AC adaptor
 Startup Guide (this document)
 Power cord
 Leaflet "USING THE UNIT SAFELY"
 Rack-mount angle (2)
PDF Manual
(download from the Web)
Á Reference Manual
Contains more detailed explanations on operating this unit, a list
of menus and more.
Á Remote Control Guide
Contains a reference of RS-232 commands, MIDI implementation
and other information.
Downloading
1.
Enter the following URL in your computer.
https://proav.roland.com/manuals/
2.
Choose "V-160HD" as the product name.
Ó
Ó
"SYSTEM"
"VERSION. "
Startup Guide
© 2021 Roland Corporation
Advertisement
Table of Contents

Related Manuals for Roland V-160HD


Summary of Contents for Roland V-160HD
- Page 1 Enter the following URL in your computer. https://proav.roland.com/manuals/ Choose “V-160HD” as the product name. Before using the unit, ensure that its system program is at the most recent version. For information on available upgrades for the system program, see the Roland website (https://proav.roland.com/).
-
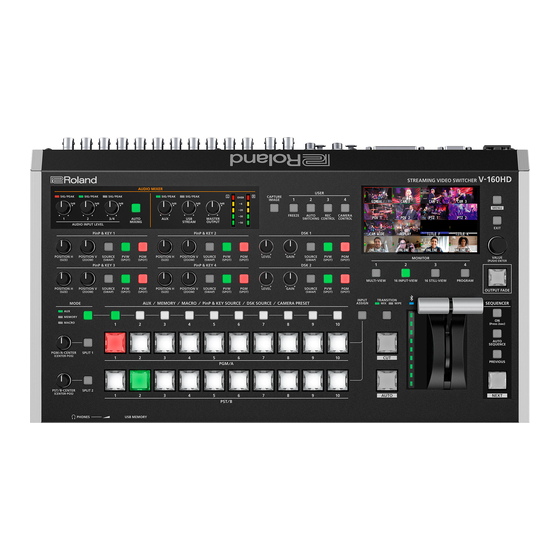
Page 2: Panel Descriptions
Panel Descriptions Top Panel AUDIO MIXER USER [1]–[4] buttons These buttons execute pre-assigned functions. SIG/PEAK indicators (1, 2, 3/4) With the factory settings, the following functions are assigned. These are lit green when audio input is detected. If the input is Button Explanation excessive, the indicator is lit red. - Page 3 PinP & KEY SOURCE PinP & KEY 1–4 or use dedicated software on your computer or iPad to remotely Select the video source for the inset screen [SOURCE] control the V-160HD. (p. 9). DSK SOURCE Video fader DSK 1, 2 [SOURCE] Selects the DSK video source (p.
-
Page 4: Front Panel
Panel Descriptions MONITOR [1]–[4] buttons Front Panel Switches between the video to monitor. Both the display from the monitor of this unit and the output video from the HDMI OUT 3 connector switch at the same time. Button Explanation MULTI-VIEW The final output video, preview output video and the MONITOR [1] videos allocated to the cross-point [1]–[8] buttons... - Page 5 Cord hook Connect the included AC adaptor to this jack. ¹ Use the V-160HD to remotely control a camera that is connected. * Use the cord hook to secure the cord of the AC ¹ Displays a tally on your iOS or Android device (this is the “smart adaptor as shown in the illustration.
-
Page 6: Basic Operations
Turning the Power On Press the [MENU] button to display the menu. Make sure that all devices are powered-off. Press the V-160HD’s [POWER] button to turn on the power. The menu is organized into functions. Turn the [VALUE] knob to select the menu item that you Ó... -
Page 7: Video Operations
Video Operations Switching the Video You can switch between the videos of the PGM/A bus and PST/B bus to specify the final output. Assigning Video Sources Press the [TRANSITION] button to select the transition effect (MIX, WIPE). Assign the video sources (input video and still images) to the cross- point [1]–[10] buttons. - Page 8 Video Operations Compositing Video with Split Here’s how to composite two videos in dividing the screen into left/right or upper/lower. Positioning a video Compositing Using SPLIT Left or upper: Video on the PGM/A bus Right or lower: Video on the PST/B bus Press a PGM/A cross-point [1]–[10] button to select the Split left/right video you want to display upper or on the left.
- Page 9 Video Operations Compositing Video with Picture-in-Picture (PinP) Here’s how to composite an inset screen onto the background video. You can use PinP & KEY 1–4 at the same time to display four inset screens. This example shows you how to composite video using “PinP & KEY 1. ” The operation is the same when using “PinP & KEY 2–4. ” Inset screen 1 (PinP &...
- Page 10 You can further composite titles, subtitles/captions and other video on video composited using split (p. 8) or PinP (p. 9). Ø There are two DSK series on the V-160HD. DSK layers are shown in front of other layers ( memo on p. 9).
-
Page 11: About Rack Mounting
About Rack Mounting Attaching the included rack-mount angles lets you install the V-160HD in a 19-inch rack. Attaching the Rack-Mount Angles Important Notes on Rack Mounting ¹ Before mounting, turn off the power to the V-160HD and detach Turn off the power to the V-160HD and disconnect the the power cord and all connection cables. -
Page 12: Using The Unit Safely
Bluetooth regular backups of the data you’ve stored in the Caution Regarding Radio Frequency Emissions SIG, Inc. and any use of such marks by Roland is unit. under license. ¹ The following actions may subject you to penalty ¹...
Need help?
Do you have a question about the V-160HD and is the answer not in the manual?
Questions and answers