Advertisement
Quick Links
IMPORTANT SAFETY INFORMATION
Adult assembly is required. Checks and
maintenance needs to be carried out on
the main parts (fixings etc.) at regular
intervals. If these checks are not carried
out the product could become unsafe.
WARNING
Not suitable for children under
36 months due to small parts and sharp
points
Before assembly
•
We recommend that time is taken to read
the instructions before starting assembly,
then follow the easy step by step guide.
The instruction sheet is only a guide to
the assembly. Certain items may not be
shown to scale.
•
Check all components prior to assembly
•
This product should be assembled by no
less than 2 people.
•
Never attempt to erect the assembly in
high winds.
•
Drill components where indicated.
x 2
Drill
No.
Components
1
Floor section
2
Window side panel
3
Plain side panel
4
Front panel
5
Back panel
6
Small roof section
7
Large roof section
8
Acrylic windows
9
Plastic beading
10
Roofing felt roll
11
Cover strips
12
Short spacer baton
13
Long spacer baton
14
Short barge board
15
Long barge board
16
Door
17
Window shutters
18
Short door surround trim
19
Long door surround trim
20
Felt battens
21
Roof purlin
No.
Fixing Kit
22
Finials
23
Plastic door hinge
24
Plastic door handle
25
Roller catch kit
26
OSB door spacers
27
65mm nails
28
50mm nails
29
38mm nails
30
20mm nails
31
10mm felt nails
32
50mm screws
33
25mm black screws
34
19mm black screws
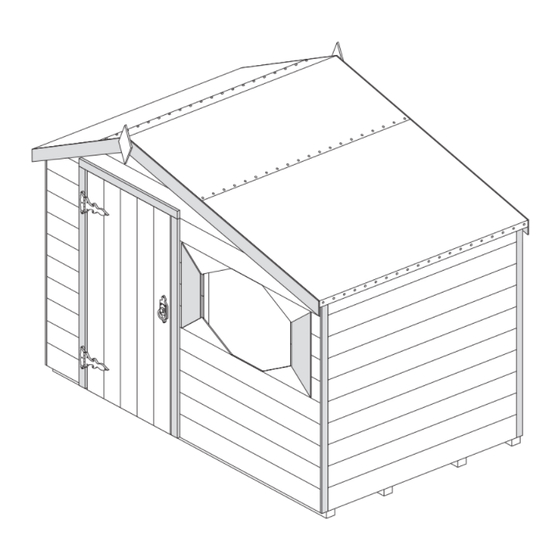
Hideaway, Hideaway Cottage
And Hideout
Assembly Instructions
Recommended tools for assembly
Qty.
•
Cross head screw driver
1
•
Hammer
1
•
Sharp knife
1
•
Drill with 4mm diameter drill bit
•
1
Spirit level
1
1
1
2
8
1
4
1
1
2
2
2
1
4
1
2
12
2
14
1
18
23
Qty.
2
2
1
25
1
16
2
4
6
76
18
Note: Additional parts and fixings for
the Hideout can be found listed in
110
section 9.
12
Additional parts and fixings for the
12
Hideaway cottage can be found listed in
section 10.
4
Hideaway
6
22
4
13
15
17
24
19
English SS027K
Hideaway cottage
10
5
7
21
20
8
9
1
Hideout
11
3
Advertisement

Related Manuals for Rowlinson Garden Products Hideaway


Summary of Contents for Rowlinson Garden Products Hideaway
- Page 1 Note: Additional parts and fixings for the Hideout can be found listed in 10mm felt nails section 9. 50mm screws Additional parts and fixings for the 25mm black screws Hideaway cottage can be found listed in section 10. 19mm black screws...
- Page 2 1. Laying the floor section Prepare a level area for the playhouse to sit. Attach 5 wooden or similar bearers of size 50 x 50 x 1200mm to the floor (Not supplied in kit). To "VALIDATE" the guarantee, this item should be erected on 50mm x 50mm treated wooden or similar bearers (These are not supplied with the kit).
- Page 3 We recommended that a waterproof sealant is applied around the edge of the glazing before fitting. Place window pane on the inside of the window frame, nail the plastic beading into position. For the Hideaway cottage only place window pane in frame followed by the lattice piece, then nail plastic beading into position. Fix shutters into position as shown, attach them using 2 x 38mm nails per shutter making sure that the nail goes through into the frame work on the inside of the the panel.
- Page 4 63mm 38mm 10. Hideaway cottage extra parts To fit chimney pot, place the pot on the smaller roof section near the roof ridge. From the underside of the roof secure the corners of the chimney using 4 x 50mm screws and washers.
Need help?
Do you have a question about the Hideaway and is the answer not in the manual?
Questions and answers