Advertisement
Quick Links
Advertisement

Related Manuals for Sper scientific 850045


Summary of Contents for Sper scientific 850045
- Page 1 Dissolved Oxygen Pen Meter 850045 Instruction Manual...
-
Page 2: Table Of Contents
TABLE OF CONTENTS Features …………………………………...…...……... 3 Front Panel Description ……………………………… 4 Calibration …………………………………………….. 5-6 Measurement Procedures ………………………..…. 7-9 Probe Maintenance …………………….…………… 10-11 Specifications ……..………………………….………. 12-13 Battery Replacement ………………………...….…... -
Page 3: Features
FEATURES Heavy duty polarographic D.O. probe including temperature sensor Automatic Temperature Compensation Microprocessor assures high accuracy Dual display LCD Auto power off IP-67 water resistance. Maximum and Minimum Data hold ... -
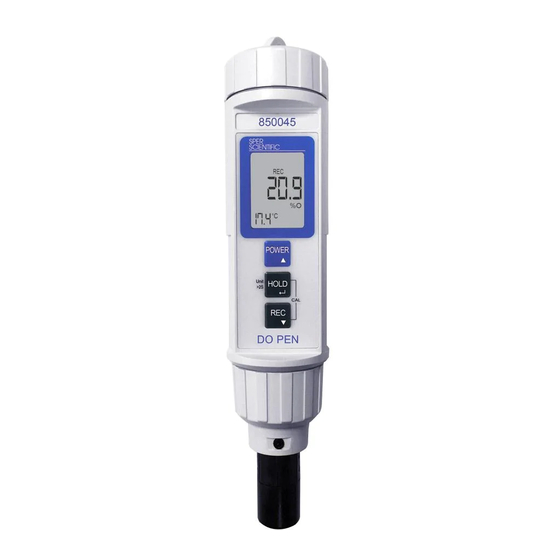
Page 4: Front Panel Description
FRONT PANEL DESCRIPTION FIGURE 1... -
Page 5: Calibration
CALIBRATION Calibration 1. Fill the D.O. meter probe head (completely) with Electrolyte prior to using the first time. Please refer to the Probe Maintenance section (page 10) for instructions. 2. Prior to taking measurements, the D.O. meter should be calibrated using the following steps. 3. - Page 6 CALIBRATION 6. Press and release the HOLD button (Fig., 1-3) - the display will read HOLD. 7. Press and release the REC button (Fig., 1-4) - the display will show a flashing CAL indicator and the upper value will change to 30, then countdown to 0 (takes 30 seconds).
-
Page 7: Measurement Procedures
MEASUREMENT PROCEDURES Dissolved Oxygen (DO) Measurement 1. Make certain the meter has been calibrated (page 5). 2. Press and hold the Unit button (Fig., 1-3) for at least 2 seconds, the display will change from %O to mg/L. 3. The meter is now ready to measure. 4. - Page 8 MEASUREMENT PROCEDURES Temperature Measurement 1. When not in calibration mode, the meter continually displays the temperature at the bottom left hand corner of the LCD in either ºC or ºF. 2. Press and hold the REC button (Fig., 1-4) for at least 2 seconds to switch the temperature unit from ºC to ºF.
- Page 9 MEASUREMENT PROCEDURES Data Record (Maximum & Minimum Reading) 1. The data record function records the maximum and min- imum readings. Press the REC button (Fig., 1-4) to start the Data Record function - the display shows REC. 2. Press the REC button: the REC MAX symbol, along with the maximum value shows on the display.
-
Page 10: Probe Maintenance
PROBE MAINTENANCE Initial Use 1. Unpack the DO meter and fill the probe head with the Electrolyte (OXEL-03) fluid provided. 2. Follow the steps shown in Figure 2. Probe Head & Fluid Maintenance 1. Whenever the DO meter will not calibrate correctly or the DO reading is unstable, check to see if the Electrolyte fluid is dirty or has evaporated. - Page 11 PROBE MAINTENANCE 3. If the diaphragm is damaged replace it with one of the spare probe heads provided with the meter. 4. Refill the new probe head with Electrolyte fluid by following the steps shown below. Figure 2 Fill probe head with Electrolyte fluid.
-
Page 12: Specifications
SPECIFICATIONS Display LCD size: 29mm x 28mm Measurement & Dissolved Oxygen: 0 to 20.0 mg/L Range Temperature: 0 to 50 ºC 32 to 122 ºF Resolution Dissolved Oxygen: 0.1 mg/L Oxygen in Air: 0.1% O Temperature: 0.1 ºC Accuracy Dissolved Oxygen: ±0.4 mg/L Oxygen in Air: ±0.7% O Temperature: ±0.8 ºC/1.5 ºF Power Off... - Page 13 SPECIFICATIONS Water IP-65: 0 to 50 ºC - 32 to 122 ºF Resistance IP-67: 0 to 30 ºC - 32 to 86 ºF Dimension 180 x 40 x 40mm 8.1” x 1.9” x 1.6” Accessories Instruction manual, spare probe head/ Included diaphragm set (2), Electrolyte fluid (OXEL-03), soft carrying case and...
-
Page 14: Battery Replacement
BATTERY REPLACEMENT 1. Replace the batteries when the low battery icon is displayed in the upper left corner of the LCD. Use 4 new AAA batteries. 2. To replace the batteries, open (turn counter-clockwise) the Battery Cover (Fig., 1-6). 3. Ensure the Battery Cover is secured after replacing the batteries. - Page 15 Sper Scientific warrants this product against defects in materials and workmanship for a period of one (1) years from the date of purchase, and agrees to repair or replace any defective unit without charge. If your model has since been discontinued, an equivalent Sper Scientific product will be substituted if available.
Need help?
Do you have a question about the 850045 and is the answer not in the manual?
Questions and answers