Table of Contents
Advertisement
Advertisement
Table of Contents

Related Manuals for Sper scientific 850048


Summary of Contents for Sper scientific 850048
- Page 1 DO Meter Kit 850048 Instruction Manual...
- Page 2 Sper Scientific. FIRST TIME USE or USE AFTER BEING UNPLUGGED FOR MORE THAN ONE HOUR.
-
Page 3: Table Of Contents
TABLE OF CONTENTS Introduction..... . . 4 Attaching and Detaching the Probe ..5 Front Panel Description . -
Page 4: Introduction
INTRODUCTION This meter reads dissolved oxygen (DO) for measuring water quality in labs, industrial and municipal waste water, aquariums, fish hatcheries and environmental testing. Features include automatic temperature compensation (ATC) and manual altitude and salinity compensation. The meter also provides readings in either °C or °F, multiple calibration points (for optional pH and conductivity probes), 99 memory points, a large backlit LCD screen, a low battery icon and one-hour automatic... -
Page 5: Attaching And Detaching The Probe
ATTACHING AND DETACHING THE PROBE Always turn the power OFF before attaching and detaching the probe, and use caution. Please use alignment quide markings on probe and meter for proper connection (see image below). Marker on Marker on Meter Connection Probe Connection To attach the probe to the meter: 1. -
Page 6: Front Panel Description
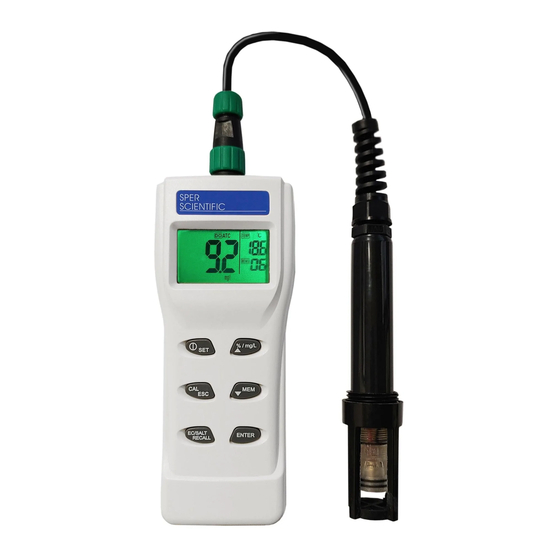
FRONT PANEL DESCRIPTION % / mg/L % / mg/L POWER/SET - Press to turn the meter on % / mg/L and off. In Normal Mode, press for >2 seconds to enter Function (Set) Mode. CAL/ESC - Press to switch between Normal and Calibration Modes. -
Page 7: Lcd Display Description
LCD DISPLAY DESCRIPTION • The DO value is displayed on the left side of the LCD. • The temperature value is displayed on the upper right side of the LCD. • The total number of records saved is displayed on the lower right side of the LCD. -
Page 8: Dissolved Oxygen % Saturation Calibration
DISSOLVED OXYGEN % SATURATION CALIBRATION After attaching the probe, please allow the probe to warm up for 30 minutes before beginning calibration. Calibrate the meter before each use. 1. Remove the protective cap from the DO probe. 2. Press the power button to turn the meter ON. See p.16 to adjust salt &... -
Page 9: Measurement Procedures
MEASUREMENT PROCEDURES 1. Remove the protective cap from the DO probe. 2. Insert the DO probe into the meter. 3. Press the power button to turn the meter ON. 4. Hold the probe in the air until the LCD reading has stabilized. - Page 10 Recall Readings 1. Press and hold RECALL for 2 seconds to enter Recall Mode. 2. Press ▲ or ▼ to scroll through the data in memory. 3. Press CAL/ESC for 2 seconds to return to Normal Mode.
-
Page 11: Function Settings
FUNCTION SETTINGS Entering Function Mode 1. Press and hold SET for >2 seconds to enter Function Mode. 2. Press ▲ or ▼ to scroll through the programmable functions. The meter will display functions for the probe currently in use. The left side of the LCD shows the |function name and the right side shows the function number. -
Page 12: Memory Clear (P10)
Memory Clear Function (P10) Note… This function will clear all 99 records in the memory. Once cleared, the data cannot be recovered. Clearing the memory will delete the records for the current probe type only. For example, if you are using the optional conductivity probe and you clear the memory with that probe inserted, you will not affect any records stored with the DO probe. -
Page 13: Do Review And Set Parameters (P60)
DO Review and Set Parameters Function (P60) 1. Enter Function Mode. Press ▲or ▼ until “COE P60” is displayed. 2. Press ENTER to view the previous DO calibration temperature information. “P61” will be displayed. 3. Press ENTER again. The salinity compensation value will flash and “P62”... -
Page 14: Select Temperature Units (P70)
7. Press ENTER to confirm. 8. Press ▲or ▼ to continue to the next function or press CAL/ESC to exit Function Mode. Select Temperature Units Function (P70) Temperature data can be displayed in either °C or °F. 1. Enter Function Mode. Press ▲or ▼ until “unt P70” is displayed. -
Page 15: Restore Default Settings (P90)
Restore Default Settings (P90) 1. Enter Function Mode. Press ▲or ▼ until “rSt P90” is displayed. 2. Press ENTER. “No” will flash and “P91” will be displayed. 3. Press ▲or ▼ to change the status from “no” to “yes”. 4. Press ENTER to confirm. The meter will revert to the factory default settings. -
Page 16: Ph Electrode Slope (P20)
pH Electrode Slope (View Only) Function (P20) For use with optional pH probe. To view the pH electrode data (slope value): 1. Enter Function Mode. Press ▲or ▼ until “ELE P20” is displayed. 2. Press ENTER to view P22. The slope value will be displayed. -
Page 17: Conductivity Calibration (P30)
Conductivity Calibration (View Only) Function (P30) For use with optional conductivity probe. This function allows you to view previously stored conductivity calibration values. 1. Enter Function Mode. Press ▲or ▼ until “CAL P30” is displayed. 2. Press ENTER to view the calibration information for Range 1. -
Page 18: Conductivity Cell Constant (P40)
Conductivity Cell Constant (View Only) Function (P40) For use with optional conductivity probe. 1. Function Mode. Press the ▲or ▼ buttons until “CEL P40” is displayed. 2. Press ENTER to view the cell constant information screen. “P42” will be displayed. 3. -
Page 19: Do Probe Maintenance
Parameters Default Setting Value P 10 Memory Clear-CLr adjustable P 20 pH Electrode Slope Review 100% P 30 Cond. Calibration Review 146.6 µS, 1413 µS, 12.88 mS, 51.5 mS P 40 Cond. Cell Constant Review 1.00 P 60 DO Review and Set 25°C, 0 ppm, 0 Meter parameters adjustable P 70 Temperature unit setting adj. - Page 20 Refilling the Membrane Set & Electrolyte Solution Replace the membrane set when the membrane is dirty or damaged or when calibration cannot be performed. 1. Remove the protective cap from the DO probe. 2. Unscrew the old membrane set from the probe. 3.
-
Page 21: Battery Installation And Replacement
BATTERY INSTALLATION AND REPLACEMENT The battery compartment is located on the back of the meter. When you are using the meter for the first time or when the low battery icon appears, install/replace all 4 batteries with new AAA heavy-duty alkaline batteries. Be sure to match the polarity (-/+) when you insert the batteries. -
Page 22: Error Codes
Recalibrate the unit with between measuring a similar temperature target and temperature condition as the testing condition of calibration sample. is more than 10°C. Measuring circuit failure. Contact Sper Scientific, Ltd Memory IC failure/ Contact Sper Scientific, Ltd. reading failure. -
Page 23: Specifications
SPECIFICATIONS Parameter Range Accuracy Resolution 2.00 ~ 12.00 ± 0.1 0.01 Conductivity 0 ~ 199.9 ± -1% F.S. 0.1 µS/cm 0 ~ 1999 µS/cm ± 1 digit 1 µS/cm 0 ~ 19.99 0.01 mS/cm 0 ~ 69.99 mS/cm 0.1 mS/cm Salinity 0 ~ 10 ppt ±... -
Page 25: Appendix A: Ph Probe (Optional)
Appendix A 850048PH pH Probe... - Page 26 LCD DISPLAY DESCRIPTION • The pH value is displayed on the left side of the LCD. • The temperature value is displayed on the upper right side of the LCD. • The total number of records saved is displayed on the lower right side of the LCD.
- Page 27 5. Pour the pH buffer into a clean container and place the electrode into the buffer. We recommend starting with a middle range buffer such as pH 7.01. Make sure the pH electrode is completely immersed in the buffer. 6. Press and hold CAL/ESC for 2 seconds to enter Calibration Mode.
- Page 28 pH MEASUREMENT 1. Remove the electrode soaker cap from the pH probe. 2. Rinse the electrode in de-ionized or distilled water. If the probe is dehydrated, soak it for 30 minutes in a KCI Solution. 3. Insert the pH probe into the meter. 4.
-
Page 29: Appendix B: Conductivity/Salinity Probe (Optional)
Appendix B 850048CS Conductivity/Salinity Probe... - Page 30 LCD DISPLAY DESCRIPTION • The conductivity value is displayed on the left side of the LCD. • The temperature value is displayed on the upper right side of the LCD. • The total number of records saved is displayed on the lower right side of the LCD.
- Page 31 3. Insert the conductivity probe into the meter. 4. Press the power button to turn the meter ON. 5. Select a standard buffer close to your measuring range or refer to the table below. Cond. Measuring Range Suggested Buffer Range 0 ~ 199.9 µS 60.0 ~ 170.0 µS 0 ~ 1999 µS...
- Page 32 10. Press ENTER when the conductivity solution value is correct. “SA” will be displayed to indicate that the value has been saved. The meter will return to Normal Mode. 11. Repeat the steps if needed to calibrate for other ranges. 12.
- Page 33 Recalibration Guidelines The meter should be periodically recalibrated to maintain accuracy. Each recalibration will replace the previously saved data for that range. • Recalibrate the meter at least once a week if the conductivity of the solutions being tested is <100 µS. •...
- Page 34 SALINITY MEASUREMENT 1. Remove the protective cap from the conductivity probe. 2. Rinse the probe in de-ionized or distilled water for 30 minutes to remove any impurities. 3. Insert the probe into the meter. 4. Press the power button to turn the meter ON. 5.
-
Page 36: Warranty
WARRANTY Sper Scientific warrants this product against defects in materials and workmanship for a period of five (5) years from the date of purchase, and agrees to repair or replace any defective unit without charge. If your model has since been discontinued, an equivalent Sper Scientific product will be substituted if available.
Need help?
Do you have a question about the 850048 and is the answer not in the manual?
Questions and answers