Table of Contents
Advertisement
Quick Links
Advertisement
Table of Contents

Related Manuals for Sper scientific 850013


Summary of Contents for Sper scientific 850013
- Page 1 Advanced Datalogging Sound Meter 850013 Instruction Manual...
-
Page 2: Table Of Contents
Advanced Datalogging Sound Meter - 850013 Copyright ©2015 by Sper Scientific ALL RIGHTS RESERVED Printed in the USA The contents of this manual may not be reproduced or transmitted in any form or by any means electronic, mechanical, or other means that do not... -
Page 3: Introduction
INTRODUCTION The Sper Scientific Advanced Datalogging Sound Meter (Model 850013) uses a single range of 30 to 130 dB. This dynamic range eliminates the need to manually select and change ranges, alleviating the problem of lost data associated with range changes in auto-ranging models. All test parameters are simultaneously displayed on a large, bright backlit display that features 0.1 dB resolution and a bar graph. -
Page 4: Power Supply
POWER SUPPLY The meter is powered by 4 AA 1.5V batteries or an AC adapter. When using the AC adapter, insert the adapter plug into the DC9V connector on the bottom of the meter. Note… When the AC adapter is connected, the meter will supply power from the adapter rather than the batteries. -
Page 5: Lcd & Panel Description
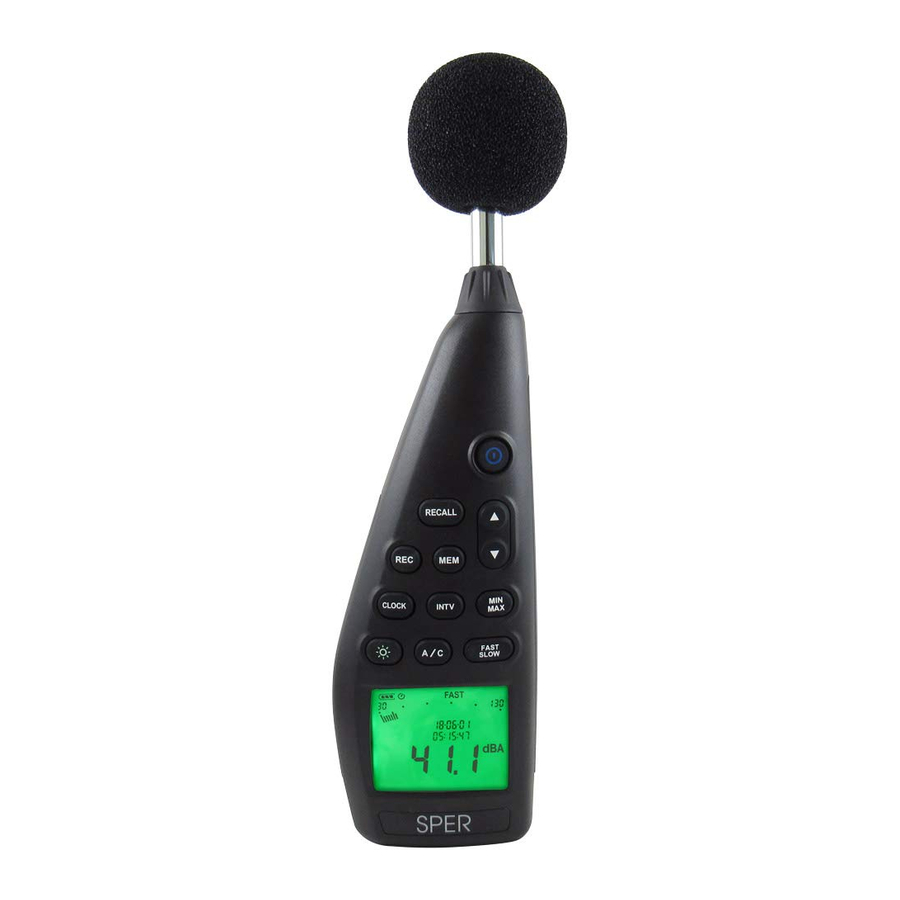
PANEL DESCRIPTION 1. Recall Button 2. Record Button 3. Clock Button 4. Backlight Button 5. Microphone - ½ inch Electret Condenser microphone 6. Power Button 7. Press to increase or decrease the value 8. Tripod Mounting Thread (on back) 9. Memory Button 10. -
Page 6: Calibration
• Level range: 30 to 130 dB 2. Fully insert the microphone housing into an acoustical calibrator with a ½ inch insertion hole such as a Sper Scientific 850016. 3. Switch the calibrator to emit 94.0 dB. Turn the calibrator on. Using the calibration tool, adjust the CAL potentiometer on the meter until the LCD displays 94.0 dB. - Page 7 3. Hold the meter in a comfortable position or attach to a tripod and point the microphone towards the noise source. The sound pressure level reading will appear on the LCD. Maximum and Minimum 1. With the meter turned ON, press MIN/MAX. “MAX” and the maximum value appear on the LCD.
-
Page 8: Battery Replacement
Clearing Auto-Stored Data 1. Press and hold POWER to turn the meter OFF. 2. Press and hold REC. While still holding REC, press and release POWER. “CLr” appears on the LCD. The LCD displays “SURE 5, 4, 3, 2, 1, 0.” (The meter allows 5 seconds to abort the operation by releasing REC.) Continue holding REC until the meter returns to Normal Mode. -
Page 9: Troubleshooting
• Repairs or services not covered in this manual should be performed by qualified personnel only. Please contact Sper Scientific to speak with a technician. • Periodically wipe the meter with a dry cloth. Do NOT use abrasives or solvents on this meter. -
Page 10: Pc Connection
PC CONNECTION System Requirements Windows NT 4.0/ NT2000/ XP/ VISTA Minimum Hardware Requirements PC or Notebook with Pentium 90 MHz or higher, 32 MB RAM; At least 50 MB hard disk space available to install the software. Recommended resolution of 800 x 600. Installing the Software Note…... - Page 11 7. Once the wizard is running, simply follow the prompts until the installation process is completed. For novice users, accept the default values to minimize potential problems during the procedure. Jump to step 10. 8. For installation from the Web, launch your browser application, Go to: www.sperdirect.com/software.htm, find your meter, and download the setup file to your hard drive.
- Page 12 Graph Tool Bar - Display or hide Statistic1 - Display or hide Statistic2 - Normal cursor - When selected, the mouse cursor will become a cross sign when moving through the graph. Click on the graph to mark a cross sign on the graph. - When selected, the mouse cursor will become a “I”...
- Page 13 Graph Functions • To select a rectangular area on the graph to zoom in for detail: There are two vertical lines on the graph (CURSOR A and CURSOR B). Time and value display at the top and right side of each cursor. Move the mouse cursor over cursor A or B and click to drag the cursor to the left or right.
- Page 14 Recording Real Time Data in Waveform 1. Press POWER to turn the meter on. 2. Connect the meter to the PC’s RS232/USB serial port with the USB cable. 3. Start the software program. 4. If the connection is successful, the same value will appear on the Panel Window and the meter.
-
Page 15: Specifications
SPECIFICATIONS Accuracy ± 1.4 dB (under reference conditions at 94 dB, 1 KHz) Measurement range 30 to 130 dB Frequency range 20 Hz to 8 KHz Dynamic range 100 dB Digital display 4 digits Resolution: 0.1 dB Display update: 0.5 seconds Analog display 50 segment bar graph Resolution: 2 dB... -
Page 16: Warranty
WARRANTY Sper Scientific warrants this product against defects in materials and workmanship for a period of five (5) years from the date of purchase, and agrees to repair or replace any defective unit without charge. If your model has since been discontinued, an equivalent Sper Scientific product will be substituted if available.
Need help?
Do you have a question about the 850013 and is the answer not in the manual?
Questions and answers