Advertisement
Quick Links
Download this manual
See also:
Instruction Manual
Advertisement

Related Manuals for Sper scientific 850009


Summary of Contents for Sper scientific 850009
- Page 1 UVA/B Light Meter 850009 Instruction Manual Rev. 5/2/2012 www.eastern-energy.net Email: info@ete.co.th...
- Page 2 Printed in the USA repair or replace any defective unit without charge. If your model has since been discontinued, an equivalent Sper Scientific product will be substituted, if available. This warranty does not cover damage resulting from accident, misuse, or abuse of the The contents of this manual may not be product.
-
Page 3: Table Of Contents
OPTIONAL ACCESSORIES CONTENTS INTRODUCTION ....... 4 840090 Water Resistant Instrument Pouch FEATURES ........5 MATERIALS SUPPLIED………………. 6 840092 Bench-Top Tripod LCD DISPLAY ........7 BASIC FUNCTIONS ......8 840093 Field Tripod MODE AND UNIT SELECTION ..10 MEMORY .......... -
Page 4: Introduction
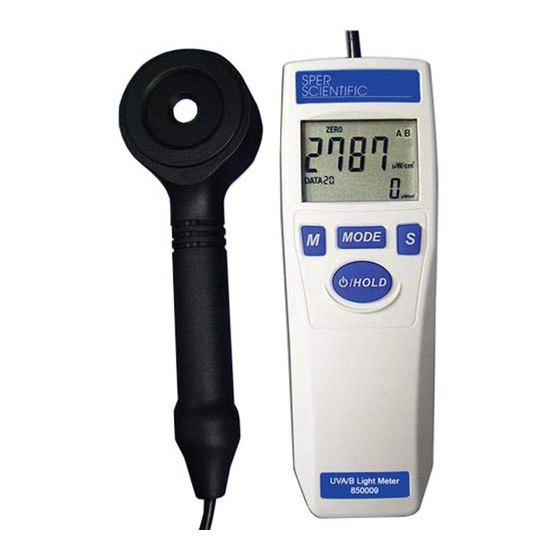
INTRODUCTION SPECIFICATIONS 1 W/cm ~ 9999 W/cm UV Range 1 The Sper Scientific UVA/B Light Meter (Model (Low Illumination) 850009) is a light-weight, portable instrument UV Range 2 0.01 mW/cm that measures damaging UV (ultraviolet) light in 40.00 mW/cm (High both natural and manmade environments. -
Page 5: Features
MAINTENANCE FEATURES Tripod Mounting Socket 1. Dampen a sponge or soft cloth with soap High and low measurement range in and water to clean the housing. milliwatts per square centimeter (mW/cm 2. Take care to prevent any liquids or moisture microwatts per square centimeter (W/ from getting inside the unit during cleaning. -
Page 6: Materials Supplied
MATERIALS SUPPLIED BATTERY REPLACEMENT Meter This unit requires one 9 Volt battery. The icon indicates a low battery. To replace: UV Probe Magnetic Mount 1. Slide off battery cover from the back of the unit. 9 Volt Battery ... -
Page 7: Lcd Display
UVA/B SENSOR LCD DISPLAY Portable Handheld Use Upper casing Sensor Lower casing Mode MAX/MIN/AVG Primary Reading Secondary Reading Self-tapping screws Data Log 10. Time Unit Auto Mode 11. Unit of Measure Note… To avoid wearing the Memory Review 12. UV Type screw holes, limit the number of times you assemble and... -
Page 8: Basic Functions
BASIC FUNCTIONS UVA/B SENSOR Power On/Off 1. Press and hold the HOLD button for 2 Calibration Point conds to turn the meter on. All symbols on the LCD will appear for 1 second. 2. Press and hold the HOLD button for 2 conds to turn the meter off. - Page 9 MEMORY BASIC FUNCTIONS were automatically recorded, “AUTO” Meter Function Flow Chart appears next to “MEM” during the recall. 1. Press MODE to choose the main function (MAX/MIN/AVG, Zero, Unit, Type or Time). 4. As you scroll through data points 0 to 20, the MAX/MIN/AVG Mode is Normal Mode for saved minimum, maximum, or average value this meter and has several sub-functions as...
-
Page 10: Mode And Unit Selection
MODE AND UNIT SELECTION MEMORY Mode Selection To Auto Record: 1. Press MODE continuously to cycle through 1. In Normal Mode, press and hold M for 2 se- MAX/MIN/AVG, Zero, Unit, Type, and Time conds. “AUTO” appears next to “REC” on Modes, respectively. - Page 11 MEMORY MODE AND UNIT SELECTION Manual Recording minimum, or average value is reached on the primary display. Then the secondary In Normal Mode, press M to store the current display updates automatically. The average value that appears on the primary display. The value on the secondary display updates flashing DATA(01~20) icon stops flashing for 2 according to the detected maximum and...
- Page 12 MODE AND UNIT SELECTION MODE AND UNIT SELECTION Zero Adjustment 5. In Zero Mode, press M to clear data points 0 to 20. 1. Press MODE continuously to cycle through modes until you reach Zero Mode. Unit Selection 2. Cover the sensor. If the main display has a 1.
Need help?
Do you have a question about the 850009 and is the answer not in the manual?
Questions and answers