Table of Contents
Advertisement
Quick Links
Advertisement
Table of Contents
Troubleshooting

Related Manuals for Jabbla Tellus 6


Summary of Contents for Jabbla Tellus 6
- Page 1 Tellus 6 Tellus i6...
- Page 2 Jabbla. This document is a translation of the original Dutch user manual.
-
Page 3: Table Of Contents
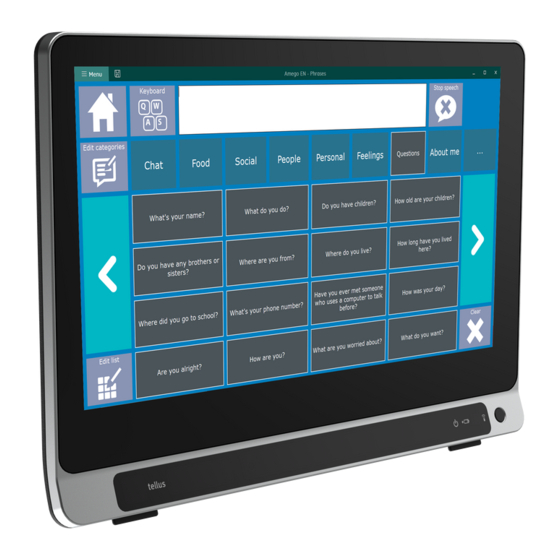
Tellus 6 / Tellus i6 Content Introduction 1 Introduction..........................3 2 Intended use..........................3 3 Prohibited use.......................... 3 4 Service life..........................3 5 The type plate.......................... 3 6 Technical data........................... 3 Description and operation 1 Description and operation......................5 2 What's in the box?........................5 3 Options............................ - Page 4 Tellus 6 / Tellus i6 Control 1 Control options........................21 Touchscreen control................................ 21 Mouse control................................21 Scanning control................................21 Keyboard control................................22 Eye tracking (Tellus i6 only)............................22 2 Calling and sending/receiving text messages................27 3 Using the device environmental control..................27 Settings 1 Setting the buttons on the back of the device................
-
Page 5: A Introduction
Mind Express program. The device has a 14" touchscreen at the front and a 4" screen at the back. Switches can be connected directly. Jabbla-IR remote control is available as standard. During the development of the device a lot of attention was paid to the casing. - Page 6 Tellus 6 / Tellus i6 Specification Explanation ® Operating system Microsoft Windows Hard drive 500 GB SSD Internal memory 8 GB DDR3 Screen 14" capacitative full HD touchscreen (1920 x 1080 pixels) Second screen 4" OLED 1 x USB A 3.2 gen 1 and 1 x USB C 3.2 gen 1...
-
Page 7: B Description And Operation
Tellus 6 / Tellus i6 Description and operation Description and operation The device is a specially developed computer platform with a 14" high-resolution touchscreen at the front and a 4" screen at the back. A full description of all buttons and connections can be found in Getting to know the device on page 7. - Page 8 Tellus 6 / Tellus i6 Start up the device. Press the on/off button (7). During the device startup the on/off indicator (4) will light briefly at one second intervals. Once the device has started up and is ready for use, the on/off indicator will stay on.
-
Page 9: C Getting Started
Tellus 6 / Tellus i6 Getting started Basic device functions Getting to know the device Front view Identification Explanation Touch screen The device has a 14” touch screen. Front camera The device is equipped with a camera at the front. It can also be used to take a photo (e.g., a selfie). - Page 10 Tellus 6 / Tellus i6 Identification Explanation Escape button This button is NOT programmable but can be disabled. Press this button briefly to simulate a right click at the next touch off the screen. Press and hold this button for 1.5 seconds to simulate an ESCAPE.
-
Page 11: Starting Up The Device
Tellus 6 / Tellus i6 Identification Explanation Connection to power supply This connection is to charge the device using the power adapter included. Jack for headphones This output is for connecting headphones to the device. The speakers are not automatically disabled when you connect the headphones. -
Page 12: Putting The Device Into Sleep Mode
Sleep mode is an energy-saving mode that allows you to quickly wake up your computer again. By default, after 3 minutes the Tellus 6 automatically switches to sleep mode. The Tellus 6 can also be put to sleep manually. Do one of the following: •... -
Page 13: Pausing Eye Control (Tellus I6)
Tellus 6 / Tellus i6 Carry out one of the following actions to wake the device from sleep mode: • Press on the screen. • Press the on/off button (7). • Click a mouse button. • Press a key on the keyboard. -
Page 14: Charging The Device
Tellus 6 / Tellus i6 • Via the on/off indicator (4) on the device itself, which can be one of the following colors: Color of indicator Battery level Green 25% - 100% Amber 10% - 25% 0% - 10% •... -
Page 15: 1.10 Displaying Full Screen
Tellus 6 / Tellus i6 Connect the supplied power adapter between the device (13) and the power supply. The battery charge indicator (5) will light up and remain amber while charging. As soon as the battery is fully charged, the battery charge indicator changes to green. -
Page 16: The Portal Or Pageset A User Chooses To Start Up With
Tellus 6 / Tellus i6 In Name of this user, choose a contact from the drop-down list. Choose OK. The portal or pageset a user chooses to start up with Go to the user's portal. Choose Menu > Settings. My Profile. -
Page 17: Importing A Pageset From A Drive
Tellus 6 / Tellus i6 Choose one of the following categories on the left: • Symbol communication • Text communication • Games and music • Education • Apps Select one or more pagesets on the right. NOTE Choose Read more for more information about the pageset. -
Page 18: Control Options
Tellus 6 / Tellus i6 Select a user. Select a pageset. Choose Import file. The pageset is imported and opens immediately. Control options Choosing the (current) control method You can always adjust the control method by which the user selects a cell: mouse/touch, scanning switches, joystick or eye control. -
Page 19: Cloud Backup And Sharing
Tellus 6 / Tellus i6 • quickly fill one or more cells: Select an empty cell. Start typing: as a word is formed, suggestions from pictures and labels appear in the cell. If the cell is not empty, then only the label of the existing cell is changed. -
Page 20: Sharing A Backed-Up User Profile
Mind Express. The user will be notified of these uploaded changes. You can also edit licensed content in edit view (e.g., Jabbla's Score symbol vocabulary), but you cannot use it in the user view. -
Page 21: Uploading The Changes To A User In A Profile Shared With You
Tellus 6 / Tellus i6 In the newly opened browser window, select the email address of the shared user and give all the requested permissions. The following message appears You are correctly logged in. You may close this browser window and return to Mind Express. -
Page 22: D Safety
Tellus 6 / Tellus i6 Safety Safety CAUTION When mounting the device to a wheelchair, ensure that the unit is securely fastened and additionally locked, so that it cannot accidentally fall at the slightest shock or impact. CAUTION The device uses a Li-ion battery. You cannot replace it yourself. Keep to the waste regulations that apply in your region. -
Page 23: E Control
Tellus 6 / Tellus i6 Control Control options Touchscreen control The way to make a selection on the screen can be customized by the user. See Help in Mind Express. NOTE Check that the protective film has been removed from the device. -
Page 24: Keyboard Control
Tellus 6 / Tellus i6 The device can also be operated using switches and a specific scanning algorithm. The switches can be connected directly (19) (20). For more information on activating and setting up the scanning control in Mind Express, see the Mind Express Help Menu >... - Page 25 Tellus 6 / Tellus i6 Figure 1: Eye position Number Explanation Position of the eyes. This line visualizes the distance of the eyes from the screen. The ideal position is when this line is in the center (3). The further away the eye is from the screen, the lower the stripe.
- Page 26 Tellus 6 / Tellus i6 In the Indicator options options group, specify the following options: Option Procedure Show From the drop-down list, choose one of the following options: • When selecting: shows the indicator only when you select the cell.
- Page 27 Tellus 6 / Tellus i6 Visual indicator Example Dot (top) In the Indicator options group, specify the remaining options: Option Procedure Enlarge cell You can enlarge the cell shown with the indicator: • Drag the slider to the right to increase the size of the cell.
- Page 28 Tellus 6 / Tellus i6 Dwell indicator Example Bar at the top Full-circle clock Hollow clock Dot (when selected) Shrinking dot Fill Scanline Set the remaining options: Option Procedure Dwell time Drag the slider to set the dwell time. You can fine-tune the...
-
Page 29: Calling And Sending/Receiving Text Messages
Using the Z-Wave-protocol. A Z-Wave controller is integrated into the Tellus, with which you can control lighting and sockets. For the use and settings of the infrared codes (Jabbla-IR) and for Z-Wave, see the help function for Mind Express via Menu >... -
Page 30: F Settings
Tellus 6 / Tellus i6 Settings Setting the buttons on the back of the device There is the option to assign certain functions to the Up and Down buttons. With a short or long press and click on one of these buttons a program can be launched, a macro run, a key stroke transmitted, the Windows system volume increased or decreased, or a sound file played. -
Page 31: Switching The Loudspeakers On Or Off
Tellus 6 / Tellus i6 Switching the loudspeakers on or off When the device is switched on, by default the speakers are on. Tellus6 in the system tray in the Windows taskbar and select Options from the shortcut menu. Right-click Click on one of the following buttons next to Speakers: •... -
Page 32: Starting Up The Device Using A Switch
Tellus 6 / Tellus i6 Starting up the device using a switch The device can be started up using switch 1. You can specify how long to hold and press switch 1 before the device starts Right-click Tellus6 in the system tray in the Windows taskbar and select Options from the shortcut menu. -
Page 33: Setting The Language Of The Tellus Menu
Tellus 6 / Tellus i6 Setting the language of the Tellus menu Right-click Tellus6 in the Windows system tray and select Choose language from the shortcut menu. Select the desired language. Settings Setting the language of the Tellus menu... -
Page 34: G Maintenance And Troubleshooting
Tellus 6 / Tellus i6 Maintenance and troubleshooting Maintenance Repairs In the event of damage to the device, please contact the distributor of the device. Do not attempt to carry out any repairs yourself. This could damage the device and invalidate your warranty. -
Page 35: Displaying License Information For Mind Express
Tellus 6 / Tellus i6 Tellus6 in the system tray in the Windows taskbar and select Options from the shortcut menu. Right-click Read below all the version numbers that a support employee may need. See also Finding the device serial number... - Page 36 Tellus 6 / Tellus i6 Press the tip of a ball pen into the reset opening (9). The device shuts down. Press the on/off button (7) on the device. The device will restart and can be used again. See also...
-
Page 37: H Decommissioning And Disposal
Tellus 6 / Tellus i6 Decommissioning and disposal Decommissioning Shut down the device. Remove the power adapter between the device and the power outlet. Disposal Do not dispose of the appliance with the household waste! Use specific collection systems to reduce the ecological impact. At the end of its service life, the device must be disassembled and disposed of in an environmentally friendly manner. -
Page 38: Index
Tellus 6 / Tellus i6 Index Accessory pack DAESSY Audio Decommissioning Delay time after selection by dwelling via eye tracking Description Device code show Backup Dimensions add shared user profile Disposal share user profile Dwell upload shared changed user profile... - Page 39 Tellus 6 / Tellus i6 Getting started Maintenance cleaning repair Making a call Memory Hard drive internal Headphones Memory time connection dwell via eye tracking switching on or off Microphone 3, Home automation Mind Express Mounting DAESSY REHADAPT Mounting plate...
- Page 40 Tellus 6 / Tellus i6 start up with switch testing Switches outputs Ready-to-use pageset import Switching off REHADAPT Switching on Repair Repeat dwell via eye tracking Reset button Resetting Technical specifications Resolving faults Time Right-click setting for dwelling via eye tracking...
- Page 41 Tellus 6 / Tellus i6...
Need help?
Do you have a question about the Tellus 6 and is the answer not in the manual?
Questions and answers