Table of Contents
Advertisement
Quick Links
sauder.com
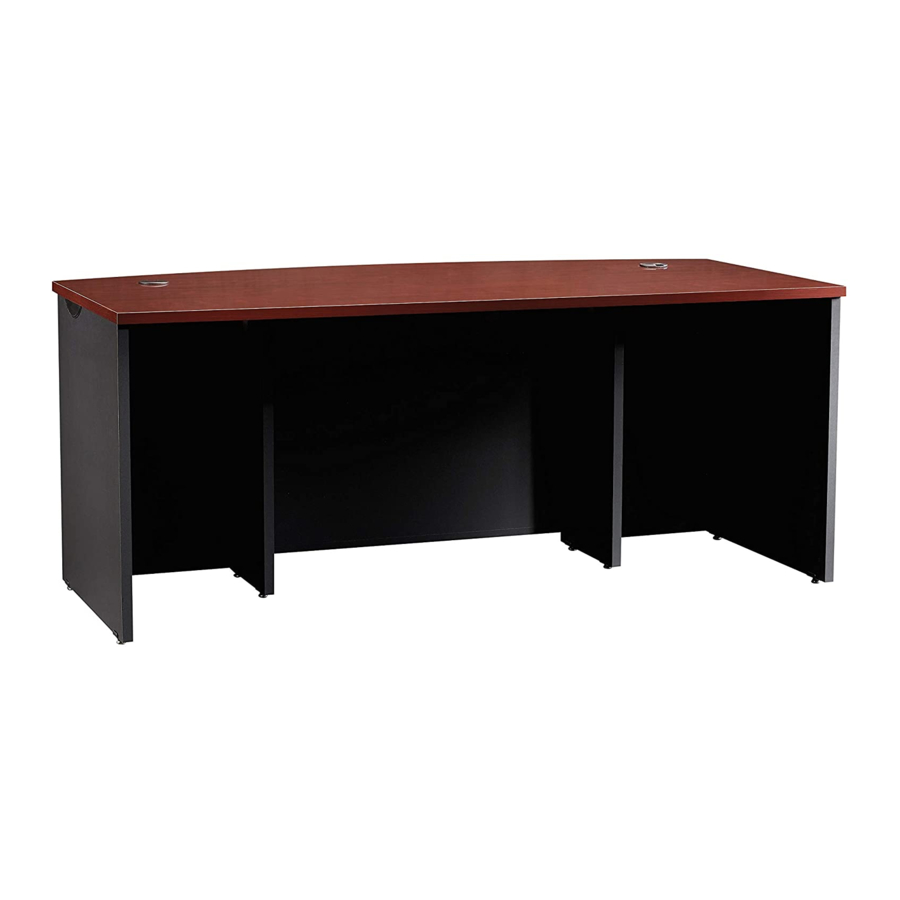
Executive Desk
Via Collection | 401447
Need help? Visit Sauder.com to view video assembly tips or chat with a live rep.
Prefer the phone? Call 1-800-523-3987.
Share your journey!
Get executive
with this decision.
NOTE: THIS INSTRUCTION
BOOKLET CONTAINS IMPORTANT
SAFETY INFORMATION.
PLEASE READ AND KEEP FOR
FUTURE REFERENCE.
English pg 1-13
Français pg 14-16
Español pg 17-19
Lot # 376060
08/11/15
Purchased: __________________
Be sure to give us a ring before
making any returns. 1-800-523-3987
Advertisement
Table of Contents

Subscribe to Our Youtube Channel
Related Manuals for Sauder Via 401447


Summary of Contents for Sauder Via 401447
- Page 1 Via Collection | 401447 NOTE: THIS INSTRUCTION BOOKLET CONTAINS IMPORTANT SAFETY INFORMATION. Need help? Visit Sauder.com to view video assembly tips or chat with a live rep. PLEASE READ AND KEEP FOR FUTURE REFERENCE. Prefer the phone? Call 1-800-523-3987. English pg 1-13 Français pg 14-16...
- Page 2 Assembly Tools Required Part Identifi cation No. 2 Phillips Screwdriver Tip Shown Actual Size Hardware Identifi cation Assembly Steps 5-13 Hammer Not actual size Français 14-16 Español 17-19 Skip the power trip. Safety 20-22 This time. Warranty Page 2 401447 www.sauder.com/services...
-
Page 3: Part Identification
Use this part identifi cation to help identify similar parts. A2 RIGHT END (1) B2 LEFT END (1) C2 RIGHT UPRIGHT (1) D2 LEFT UPRIGHT (1) E3 TOP (1) MODESTY PANEL (1) G2 BACK (2) MODESTY PANEL MOLDING (1) www.sauder.com/services 401447 Page 3... -
Page 4: Hardware Identification
HOLE PLUG - 8 TOUCH-UP PEN - 1 MANAGER - 2 BLACK 1-7/8" FLAT HEAD SCREW - 6 BROWN 1-1/2" FLAT HEAD SCREW - 3 BLACK 7/8" LARGE HEAD SCREW - 2 BLACK 9/16" LARGE HEAD SCREW - 2 Page 4 401447 www.sauder.com/services... - Page 5 Assemble your unit on a carpeted fl oor or on the å empty carton to avoid scratching your unit or the fl oor. To begin assembly, push a SAUDER TWIST-LOCK® å FASTENER (I) into the large holes in the ENDS (A2 and B2), UPRIGHTS (C2 and D2), MODESTY PANEL (F), and BACKS (G2).
- Page 6 Step 2 Fasten the MODESTY PANEL (F) to the TOP (E3). Tighten å ® How to use the SAUDER TWIST-LOCK FASTENER three TWIST-LOCK® FASTENERS. 1. Insert the dowel end of the FASTENER into the hole of the adjoining part. Fasten the MODESTY PANEL MOLDING (H) to the å...
-
Page 7: Twist-Lock® Fastener
S T E S u r f a c N E R Short edge with i t h o I S T TWIST-LOCK® - L O FASTENER ® F A S T E N E R www.sauder.com/services 401447 Page 7... - Page 8 Fasten the UPRIGHTS (C2 and D2) to the MODESTY PANEL (F). Use å you do something else. six BLACK 1-7/8" FLAT HEAD SCREWS (W). BLACK 1-7/8" FLAT HEAD SCREW (6 used for the MODESTY PANEL) Page 8 401447 www.sauder.com/services...
- Page 9 I S T E R S T E N F A S i t h o ® f a c S u r - L O I S T E R S T E N F A S www.sauder.com/services 401447 Page 9...
- Page 10 Push the RUBBER SLEEVES (59G) onto the METAL å BRACKETS (R). The RUBBER SLEEVES will be a tight fi t. BLACK 9/16" LARGE HEAD SCREW (2 used for the CORD MANAGERS) BLACK 7/8" LARGE HEAD SCREW (2 used for the METAL BRACKETS) Page 10 401447 www.sauder.com/services...
- Page 11 fi rst. (8 used) NOTE: If you will be attaching the 401446 Return to this Desk, use the second set of holes instead of the fi rst. www.sauder.com/services 401447 Page 11...
- Page 12 The 401447 Executive Desk may be attached to the å legs. And, you know, 401446 Desk Return and 401448 Credenza as shown in your arms. the diagrams below. 401447 401447 401446 401446 401448 401448 401447 401447 401446 401446 Page 12 401447 www.sauder.com/services...
- Page 13 This completes assembly. To clean your unit, dampen a cloth with tap water and wipe. å And to celebrate, why not share your success story? 75 lbs. To cover unused screw holes To cover TWIST-LOCK® FASTENERS www.sauder.com/services 401447 Page 13...
-
Page 14: Liste De Pièces
élément et conserver le livret pour future référence. EXTRÉMITÉ DROITE ..........1 59G MANCHON EN CAOUTCHOUC .....2 Pour contacter Sauder EXTRÉMITÉ GAUCHE ..........1 FIXATION TWIST-LOCK® ........29 en ce qui concerne cet MONTANT DROIT ............1 COUVERCLE DE TWIST-LOCK® ....29 élément, faire référence... - Page 15 ÉTAPE 4 Pour commencer l'assemblage, enfoncer une FIXATION TWIST-LOCK® SAUDER (I) dans les gros trous des EXTRÉMITÉS (A2 Fixer les MONTANTS (C2 et D2) aux ARRIÈRES (G2) et au et B2), les MONTANTS (C2 et D2), le VOILE DE FOND (F) et DESSUS (E3).
- Page 16 fi gurant sur les pages arrière du manuel d’instructions. Ceci complète l'assemblage. Pour nettoyer l’unité, humidifi er un chiff on avec de l’eau du robinet et essuyer. Page 16 401447 www.sauder.com/services...
-
Page 17: Lista De Partes
59G MANGUITO DE GOMA ...........2 et conserver le livret pour future référence. EXTREMO IZQUIERDO ..........1 SUJETADOR TWIST-LOCK® ......29 Pour contacter Sauder PARAL DERECHO ............1 CUBIERTA DE SUJETADOR TWIST-LOCK® .. 29 en ce qui concerne cet PARAL IZQUIERDO .............1 MEDIO-OJAL ..............2 élément, faire référence... - Page 18 PASO 4 Para comenzar el ensamblaje, empuje un SUJETADOR TWIST-LOCK® SAUDER (I) dentro de los agujeros grandes de los Fije los PARALES (C2 y D2) a los DORSOS (G2) y al PANEL EXTREMOS (A2 y B2), de los PARALES (C2 y D2), del VELO DE SUPERIOR (E3).
- Page 19 NOTA: Por favor, lea las páginas de atrás del folleto de instrucciones en cuanto a importante información de seguridad. Esto completa el ensamblaje. Para limpiar la unidad, humedezca un paño con agua de llave y limpie. www.sauder.com/services 401447 Page 19...
- Page 20 • This product is not designed to support a not designed to support a television is heavy. Plus the weight and location of the television. hazardous. picture tube tends to make TVs unbalanced and prone to tipping forward. Page 20 401447 www.sauder.com/services...
- Page 21 à Les téléviseurs peuvent être particulièrement un téléviseur. cet eff et. lourds. De plus, le poids et l’emplacement du tube image ont tendance à rendre les téléviseurs instables et enclins à tomber vers l’ a vant. www.sauder.com/services 401447 Page 21...
- Page 22 Además, el peso y la ubicación del tubo de imagen tienden a causar la inestabilidad de televisores y propensa a volcarse hacia adelante. Page 22 401447 www.sauder.com/services...
-
Page 23: Year Limited Warranty
à compter de la date d'achat la première fois et qui sont signalés à Sauder dans les limites de couverture de la contre tout défaut de matériaux ou de fabrication des composantes de mobilier Sauder. - Page 24 Dear Valued Customer: So, how did it go? Thanks so much for choosing Sauder® furniture. I hope the Set a world record for speed? purchase and assembly process was a positive experience Feeling good about yourself? and you feel good about the furniture you just built. If you Nice.
Need help?
Do you have a question about the Via 401447 and is the answer not in the manual?
Questions and answers