Advertisement
Quick Links
sauder.com
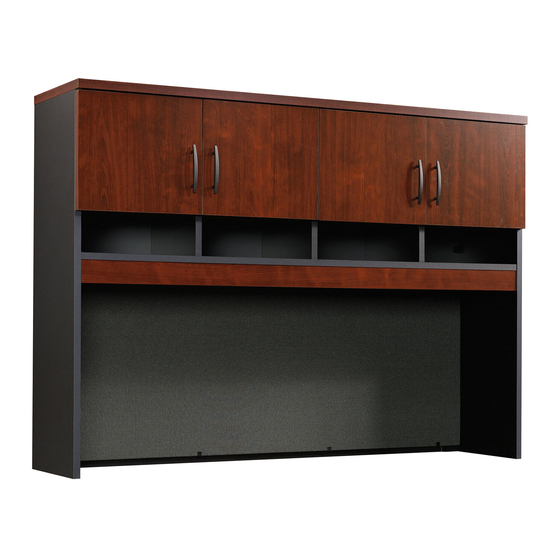
Hutch
Via Collection | Model 419717
Need help? Visit Sauder.com to view video assembly tips or chat with a live rep.
Prefer the phone? Call 1-800-523-3987.
Share your journey!
Knick-knack
paddywhack,
give your stuff a home.
NOTE: THIS INSTRUCTION
BOOKLET CONTAINS IMPORTANT
SAFETY INFORMATION.
PLEASE READ AND KEEP FOR
FUTURE REFERENCE.
English pg 1-19
Français pg 20-22
Español pg 23-25
Lot # 376718
10/09/15
Purchased: __________________
Be sure to give us a ring before
making any returns. 1-800-523-3987
Advertisement

Related Manuals for Sauder Via 419717


Summary of Contents for Sauder Via 419717
- Page 1 Via Collection | Model 419717 NOTE: THIS INSTRUCTION BOOKLET CONTAINS IMPORTANT SAFETY INFORMATION. Need help? Visit Sauder.com to view video assembly tips or chat with a live rep. PLEASE READ AND KEEP FOR FUTURE REFERENCE. Prefer the phone? Call 1-800-523-3987.
- Page 2 Part Identifi cation No. 2 Phillips Screwdriver Tip Shown Actual Size Hardware Identifi cation Assembly Steps 5-19 Hammer Not actual size Français 20-22 Electric drill with 1/4" bit Español 23-25 (ONLY in indicated step) Safety Warranty Page 2 419717 www.sauder.com/services...
-
Page 3: Part Identification
LARGE UPRIGHT (2) LEFT END (1) SMALL UPRIGHT (3) TOP (1) CENTER UPRIGHT (1) UPPER SHELF (1) RIGHT DOOR (2) LOWER SHELF (1) LEFT DOOR (2) UPPER BACK (1) VALANCE (1) LOWER BACK (1) BULLETIN BOARD (1) www.sauder.com/services 419717 Page 3... -
Page 4: Hardware Identification
BLACK 9/16" LARGE HEAD SCREW - 10 BLACK 1-7/8" FLAT HEAD SCREW - 15 BROWN 7/16" LARGE HEAD SCREW - 8 BLACK 1/2" FLAT HEAD SCREW - 16 BLACK 2-1/4" FLAT HEAD SCREW - 4 GOLD 1" MACHINE SCREW - 8 Page 4 419717 www.sauder.com/services... - Page 5 Assemble your unit on a carpeted fl oor or on the empty carton to avoid scratching your unit or the fl oor. å To begin assembly, push a SAUDER TWIST-LOCK® FASTENER (7F) into the large holes in the LOWER SHELF (E). Repeat å...
- Page 6 Step 2 Fasten the UPPER BACK (F) to the TOP (C). Tighten å ® How to use the SAUDER TWIST-LOCK FASTENER four MINI TWIST-LOCK® FASTENERS. 1. Insert the dowel end of the FASTENER into the hole of the adjoining part.
- Page 7 - L O F A S T E N ® E R S S u r f a c i t h I S T - L O F A S T E N ® E R S www.sauder.com/services 419717 Page 7...
- Page 8 Step 4 Insert six METAL PINS (1R) into the SMALL UPRIGHTS (I). å Insert the METAL PINS (1R) in one end of the SMALL å UPRIGHTS (I) into the holes in the UPPER SHELF (D). Finished edge Page 8 419717 www.sauder.com/services...
- Page 9 S T E ® F A - L O I S T I T W M I N i t h f a c S u r BLACK 1-7/8" FLAT HEAD SCREW (9 used in this step) www.sauder.com/services 419717 Page 9...
- Page 10 NOTE: Be sure the PINS in the ENDS insert into the holes å in the UPPER SHELF (D). r f a w i t o l e r f a w i t l e s Page 10 419717 www.sauder.com/services...
- Page 11 LOWER BACK (G). Use eight BROWN 7/16" LARGE HEAD BLACK 9/16" LARGE HEAD SCREW SCREWS (6S). Do not tighten the SCREWS. (10 used in this step) BROWN 7/16" LARGE HEAD SCREW (8 used in this step) www.sauder.com/services 419717 Page 11...
- Page 12 Push a MINI TWIST-LOCK® FASTENER COVER (62P) onto the MINI TWIST-LOCK FASTENERS® along the top edge of å the LOWER BACK (G). Notch Use these holes for your purchased light. Notch (14 used) (12 used) Notch To cover TWIST-LOCK® FASTENERS To cover MINI TWIST-LOCK® FASTENERS Page 12 419717 www.sauder.com/services...
- Page 13 Step 9 Set the BULLETIN BOARD (N) onto the bottom four å BULLETIN BOARD BRACKETS (63G). Now, slide the top BULLETIN BOARD BRACKETS (63G) å down so they wrap around the BULLETIN BOARD. www.sauder.com/services 419717 Page 13...
- Page 14 NOTE: The DOORS with the RAISED HINGES (31H) will be å the INNER DOORS and the DOORS with the HINGES (53H) will be the OUTER DOORS. These DOORS will be the INNER DOORS. Raised area These DOORS will be the OUTER DOORS. Page 14 419717 www.sauder.com/services...
- Page 15 Repeat this step for the INNER DOORS (K and L). å INNER RIGHT DOOR (K) See the next step for DOOR adjustments. å OUTER LEFT DOOR (L) INNER LEFT DOOR (L) OUTER RIGHT DOOR (K) GOLD 1" MACHINE SCREW (8 used in this step) www.sauder.com/services 419717 Page 15...
- Page 16 Tighten the screws after making adjustments. To adjust the DOORS in or out (depth), loosen the mounting å screw one turn and move the DOORS in or out, as needed. Tighten the mounting screw after making adjustments. (vertical adjustment) Page 16 419717 www.sauder.com/services...
- Page 17 Use four BLACK 2-1/4" FLAT HEAD SCREWS (26S) as shown below. Loosen eight TWIST-LOCK® FASTENERS. 4 0 1 4 4 8 C r e d e n z a T BLACK 2-1/4" FLAT HEAD SCREW (4 used in this step) www.sauder.com/services 419717 Page 17...
- Page 18 401448 Credenza Top with Hutch to the Credenza Ends and Back. Tighten eight TWIST-LOCK® FASTENERS. NOTE: Be sure the METAL PINS insert into the holes in the TOP. å 401448 Credenza Top 401448 Credenza Page 18 419717 www.sauder.com/services...
- Page 19 This completes assembly. Clean with your favorite å furniture polish or a damp cloth. Wipe dry. And to celebrate, why not share your success story? No load 60 lbs. total 60 lbs. total www.sauder.com/services 419717 Page 19...
-
Page 20: Liste De Pièces
élément et conserver le livret pour future référence. EXTRÉMITÉ DROITE ..........1 31H CHARNIÈRE DE REHAUSSE .......4 Pour contacter Sauder EXTRÉMITÉ GAUCHE ..........1 53H CHARNIÈRE ..............4 en ce qui concerne cet DESSUS ................1 12K POIGNÉE ................4 élément, faire référence... - Page 21 Pour commencer l'assemblage, enfoncer une FIXATION TWIST- Fixer les EXTRÉMITÉS (A et B) au DESSUS (C), à la TABLETTE LOCK® SAUDER (7F) dans les gros trous dans la TABLETTE SUPÉRIEURE (D), à la TABLETTE INFÉRIEURE (E), à l'ARRIÈRE INFÉRIEURE (E). Répéter cette étape pour les EXTRÉMITÉS (A et SUPÉRIEUR (F) et à...
- Page 22 Serrer les vis après avoir ajusté. Pour ajuster les PORTES vers l'intérieur où vers l'extérieur (profondeur), desserrer la vis de montage un tour et déplacer les PORTES vers l'intérieur ou vers l'extérieur. Serrer la vis de montage après avoir ajusté. Page 22 419717 www.sauder.com/services...
-
Page 23: Lista De Partes
31H BISAGRA LEVANTADA ...........4 et conserver le livret pour future référence. EXTREMO IZQUIERDO ..........1 53H BISAGRA ................4 Pour contacter Sauder PANEL SUPERIOR ............1 12K TIRADOR ................4 en ce qui concerne cet ESTANTE SUPERIOR ..........1 TARJETA CON TOPES DE FIELTRO ....1 élément, faire référence... - Page 24 Para comenzar el ensamblaje, empuje un SUJETADOR SUPERIOR (D), al ESTANTE INFERIOR (E), al DORSO SUPERIOR (F) y TWIST-LOCK® SAUDER (7F) dentro de los agujeros grandes del al DORSO INFERIOR (G). Apriete ocho SUJETADORES TWIST-LOCK® ESTANTE INFERIOR (E). Repita este paso para los y ocho MINI SUJETADOR TWIST-LOCK®.
- Page 25 Para ajustar las PUERTAS hacia atrás o hacia adelante (profundidad), afl oje el tornillo de montaje una vuelta y mueva las PUERTAS hacia el interior o hacia el exterior según sea necesario. Apriete el tornillo de montaje después de hacer los ajustes. www.sauder.com/services 419717 Page 25...
- Page 26 El soportar un televisor. diseñadas para soportar un televisor. peso y la ubicación del tubo de imagen tienden a causar la inestabilidad de televisores y por eso tendrán la tendencia a inclinarse hacia adelante. Page 26 419717 www.sauder.com/services...
-
Page 27: Year Limited Warranty
à compter de la date d'achat la première fois et qui sont signalés à Sauder dans les limites de couverture de la contre tout défaut de matériaux ou de fabrication des composantes de mobilier Sauder. - Page 28 Dear Valued Customer: So, how did it go? Thanks so much for choosing Sauder® furniture. I hope the Set a world record for speed? purchase and assembly process was a positive experience Feeling good about yourself? and you feel good about the furniture you just built. If you Nice.
Need help?
Do you have a question about the Via 419717 and is the answer not in the manual?
Questions and answers