Advertisement
Quick Links
sauder.com
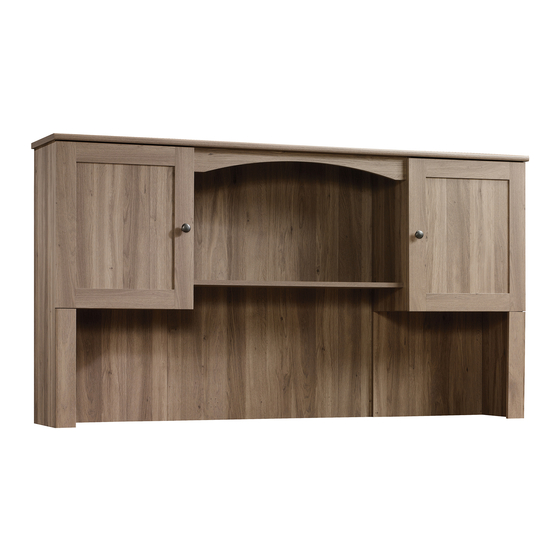
Hutch
Harbor View Collection | Model 417587
Need help? Visit Sauder.com to view video assembly tips or chat with a live rep.
Prefer the phone? Call 1-800-523-3987.
Share your journey!
Knick-knack
paddywhack,
give your stuff a home.
NOTE: THIS INSTRUCTION
BOOKLET CONTAINS IMPORTANT
SAFETY INFORMATION.
PLEASE READ AND KEEP FOR
FUTURE REFERENCE.
English pg 1-22
Français pg 23-25
Español pg 26-28
Lot # 366449
11/13/14
Purchased: __________________
Be sure to give us a ring before
making any returns. 1-800-523-3987
Advertisement

Subscribe to Our Youtube Channel
Related Manuals for Sauder Harbor View 417587


Summary of Contents for Sauder Harbor View 417587
- Page 1 Harbor View Collection | Model 417587 NOTE: THIS INSTRUCTION BOOKLET CONTAINS IMPORTANT SAFETY INFORMATION. Need help? Visit Sauder.com to view video assembly tips or chat with a live rep. PLEASE READ AND KEEP FOR FUTURE REFERENCE. Prefer the phone? Call 1-800-523-3987.
- Page 2 Use this part identifi cation to help identify similar parts. RIGHT END (1) LEFT END (1) RIGHT UPRIGHT (1) LEFT UPRIGHT (1) TOP (1) SHELF (1) BOTTOM (2) LARGE BACK (1) BACK (2) SMALL BACK (2) DOOR (2) VALANCE (1) MOLDING (2) Page 2 417587 www.sauder.com/services...
- Page 3 Part Identifi cation www.sauder.com/services 417587 Page 3...
- Page 4 CAM COVER - 8 BLACK 9/16" LARGE HEAD SCREW - 16 BLACK 1-7/8" FLAT HEAD SCREW - 12 BROWN 7/16" LARGE HEAD SCREW - 12 BLACK 1/2" FLAT HEAD SCREW - 8 GOLD 1" MACHINE SCREW - 2 Page 4 417587 www.sauder.com/services...
- Page 5 Look for this icon. It means a Step 1 video assembly tip is available at www.sauder.com/services/tips Assemble your unit on a carpeted fl oor or on the empty å carton to avoid scratching your unit or the fl oor. Push sixteen HIDDEN CAMS (1F) into the ENDS (A and B), å...
- Page 6 Righty tighty. NOTE: Be sure the edges of the ANGLE BRACKETS are å Lefty loosey. even with the edges of the ENDS. Finished edge Finished edge BLACK 9/16" LARGE HEAD SCREW (4 used in this step) Page 6 417587 www.sauder.com/services...
- Page 7 BLACK 9/16” LARGE HEAD SCREWS (1S). NOTE: There are no pre-drilled holes in the MOLDINGS (M). å The SCREWS will tighten into the grooves. BLACK 9/16" LARGE HEAD SCREW Groove (4 used in this step) Finished edge Finished edge www.sauder.com/services 417587 Page 7...
- Page 8 Tighten Risk of damage or Arrow injury. HIDDEN CAMS must be completely Arrow Maximum tightened. HIDDEN 210 degrees CAMS that are not completely tightened may loosen, and parts may separate. To Minimum completely tighten: 190 degrees Page 8 417587 www.sauder.com/services...
- Page 9 S u r D E N H I D i t h f a c S u r D E N H I D Maximum Arrow 210 degrees Minimum 190 degrees www.sauder.com/services 417587 Page 9...
- Page 10 Step 6 Fasten the SHELF (F) to the UPRIGHTS (C and D). Use å four BLACK 1-7/8" FLAT HEAD SCREWS (2S). Finished edge BLACK 1-7/8" FLAT HEAD SCREW (4 used in this step) Page 10 417587 www.sauder.com/services...
- Page 11 Fasten the TOP (E) to the ENDS (A and B) and å UPRIGHTS (C and D). Tighten eight HIDDEN CAMS. Rounded edge S u r f a c i t h h o l Maximum Arrow 210 degrees Minimum 190 degrees www.sauder.com/services 417587 Page 11...
- Page 12 Use four BLACK 9/16" LARGE HEAD SCREWS (1S). NOTE: Be sure the edges of the ANGLE BRACKETS are å even with the edges of the VALANCE. BLACK 9/16" LARGE HEAD SCREW (4 used in this step) Page 12 417587 www.sauder.com/services...
-
Page 13: Etop
Fasten the VALANCE (L) to the UPRIGHTS (C and D) and å TOP (E). Use four BLACK 9/16" LARGE HEAD SCREWS (1S) through the ANGLE BRACKETS on the VALANCE and into the TOP. BLACK 9/16" LARGE HEAD SCREW (4 used in this step) www.sauder.com/services 417587 Page 13... - Page 14 ENDS (A and B). Fasten the SMALL BACKS (J) to the BOTTOMS (G). Use å four BLACK 1-7/8" FLAT HEAD SCREWS (2S). BLACK 1-7/8" FLAT HEAD SCREW (4 used in this step) Finished edge Page 14 417587 www.sauder.com/services...
-
Page 15: Large Back
BACK (H) and into the SMALL BACKS (J). NOTE: Perforations have been provided for access å through the BACK. Carefully cut out the holes needed. NAIL (46 used in this step) BROWN 7/16" LARGE HEAD SCREW (6 used in this step) www.sauder.com/services 417587 Page 15... - Page 16 Fasten two HINGES (13H) to each DOOR (K). Use eight å BLACK 1/2" FLAT HEAD SCREWS (11S). Don't worry. It isn't Rome. This can be built in a day. BLACK 1/2” FLAT HEAD SCREW (8 used in this step) Page 16 417587 www.sauder.com/services...
- Page 17 DOOR where it comes in contact with the LEFT UPRIGHT (D). Repeat this step for the other DOOR (K). å See the next step for DOOR adjustments. å Stop Mounting screw Hinge GOLD 1" MACHINE SCREW (2 used in this step) www.sauder.com/services 417587 Page 17...
-
Page 18: Door
To adjust the DOORS in or out (depth), loosen the mounting å screw one turn and move the DOORS in or out, as needed. Tighten the mounting screw after making adjustments. Mounting screw (depth) Adjusting screw (horizontal) (vertical adjustment) Page 18 417587 www.sauder.com/services... - Page 19 Step 15 NOTE: You have two options for mounting your Hutch to å the 417586 Corner Computer Desk. For option 1, go to Step 16. For option 2, go to Step 17. OPTION 1 OPTION 2 www.sauder.com/services 417587 Page 19...
- Page 20 NOTE: There are no pre-drilled holes in the back edge of the DESK TOP. Use a little extra force to start the screws. å Remove this screw. BROWN 7/16" LARGE HEAD SCREW (6 used for the LARGE BACK) Loosen these HIDDEN CAMS. BLACK 1-7/8" FLAT HEAD SCREW (4 used for the Desk Top) Page 20 417587 www.sauder.com/services...
- Page 21 NOTE: There are no pre-drilled holes in the back edge of the RETURN TOP. Use a little extra force to start the screws. å Remove this screw. Loosen these HIDDEN CAMS. BROWN 7/16" LARGE HEAD SCREW (6 used for the LARGE BACK) BLACK 1-7/8" FLAT HEAD SCREW (4 used for the Desk and Return Top) www.sauder.com/services 417587 Page 21...
- Page 22 This completes assembly. Clean with a damp cloth. Wipe dry. å And to celebrate, why not share your success story? 10 lbs. 30 lbs. 25 lbs. (8 used) To cover HIDDEN CAMS 30 lbs. Page 22 417587 www.sauder.com/services...
- Page 23 élément et conserver le livret pour future référence. EXTRÉMITÉ DROITE ..........1 EXCENTRIQUE ESCAMOTABLE ....16 Pour contacter Sauder EXTRÉMITÉ GAUCHE ..........1 CHEVILLE D'EXCENTRIQUE ......16 en ce qui concerne cet MONTANT DROIT ............1 27G CONSOLE À ÉQUERRE .........8 élément, faire référence...
- Page 24 REMARQUE : Des lignes perforées ont été prévues pour accéder Fixer la TABLETTE (F) aux MONTANTS (C et D). Utiliser quatre facilement à l'ARRIÈRE. Découper avec précaution les trous VIS TÊTE PLATE 48 mm NOIRES (2S). nécessaires. Page 24 417587 www.sauder.com/services...
- Page 25 fi gurant sur les pages arrière du manuel d’instructions. au Bureau d’Ordinateur d’ a ngle 417586. Pour option nº 1, aller à Ceci complète l'assemblage. Nettoyer avec un tissu humide. Essuyer. l'étape 16. Pour option nº 2, aller à l'étape 17. www.sauder.com/services 417587 Page 25...
- Page 26 EXTREMO IZQUIERDO ............1 PASADOR DE EXCÉNTRICO ......16 necesita ponerse en PARAL DERECHO ..............1 27G SOPORTE ANGULAR ..........8 contacto con Sauder en PARAL IZQUIERDO ..............1 13H BISAGRA ................4 cuanto a esta unidad, refi érase al número PANEL SUPERIOR ..............1 POMO ..................2...
- Page 27 Fije el ESTANTE (F) a los PARALES (C y D). Utilice cuatro TORNILLOS NEGROS DE CABEZA PERDIDA de 48 mm (2S). PASO 7 Fije el PANEL SUPERIOR (E) a los EXTREMOS (A y B) y a los PARALES (C y D). Apriete ocho EXCÉNTRICOS ESCONDIDOS. www.sauder.com/services 417587 Page 27...
- Page 28 EXCÉNTRICO ESCONDIDO en los FONDOS (G). NOTA: Por favor, lea las páginas de atrás del folleto de instrucciones en cuanto a importante información de seguridad. Esto completa el ensamblaje. Limpiar con un trapo húmedo. Seque con un paño. Page 28 417587 www.sauder.com/services...
- Page 29 Les téléviseurs peuvent être très lourds. De un téléviseur téléviseur. plus, le poids et l’emplacement du tube image ont tendance à rendre les téléviseurs instables et enclins à tomber vers l’ a vant. www.sauder.com/services 417587 Page 29...
- Page 30 El soportar un televisor. diseñadas para soportar un televisor. peso y la ubicación del tubo de imagen tienden a causar la inestabilidad de televisores y por eso tendrán la tendencia a inclinarse hacia adelante. Page 30 417587 www.sauder.com/services...
- Page 31 à compter de la date d'achat la première fois et qui sont signalés à Sauder dans les limites de couverture de la contre tout défaut de matériaux ou de fabrication des composantes de mobilier Sauder.
- Page 32 Dear Valued Customer: So, how did it go? Thanks so much for choosing Sauder® furniture. I hope the Set a world record for speed? purchase and assembly process was a positive experience Feeling good about yourself? and you feel good about the furniture you just built. If you Nice.
Need help?
Do you have a question about the Harbor View 417587 and is the answer not in the manual?
Questions and answers