Table of Contents
Advertisement
Quick Links
Advertisement
Table of Contents

Related Manuals for Shuttle SK41G


Summary of Contents for Shuttle SK41G
- Page 1 XPC Installation Guide XP C 準 系 統 安 裝 手 冊 Use for (適 用 機 種 ): SK41G M645...
- Page 2 2. This device must accept any interference received, including interference that may cause undesired operation. Trade mark s Shuttle is a registered trademark of Shuttle Inc.. AMD, Athlon XP/Duron are registered trademarks of AMD Corporation. PS/2 is a registered trademark of IBM Corporation.
- Page 3 的這項規定可提供合理的保護標準,使得符合標準的設備在室內安裝但不會導致有害 的干擾。本設備可能會產生射頻能量,若不按指示安裝會對無線電通信造成有害的干 擾。但是某些特殊的安裝也會導致干擾的出現。如果本設備干擾無線電或電視的接 收,使用者應該使用下述的一種或多種方法排除干擾: ▓ 更改接收天線的方向和位置。 ▓ 增加電腦和接收器之間的距離。 ▓ 把電腦和接收器的電源線路分開,不使用同一個插座。 ▓ 請經銷商或有經驗的無線電/電視技術人員給予幫助。 版 權 © Copyright 2002 by Shuttle Inc. All Rights Reserved. 未經浩鑫同意,本使用說明手冊所有內容,禁止未經授權或局部修改之複製、銷售、 租借、發表等事項。 告 示 版權申明:2002版權所有手冊。 本手冊內提及之其餘品牌及產品名稱為各相應品牌所用人之商標或註冊商標。 浩鑫生產廠商可對本手冊內所有資料,文書及規格未經事先告示及做出修改。 浩鑫對本文件內之錯誤與疏失無需負責,且未對文件資料更新作出承諾。 商 標 Window s95, Window s98, Window sME, Words 為...
-
Page 4: Table Of Contents
2.3 CPU And Coole r Installa tion / 安 裝 處 理 器 及 散 熱 風 扇 7 ▓ ▓ 2.3.1 SK41G Se ries 系 列 ................. 7 2.4 Install DDR SDRAM / 安 裝 記 憶 體 模 組... -
Page 5: Xpc In Trodution / Xpc 特色介紹
▓ 1.1 XPC In trodution / XPC 特色介紹 C o m p a c t, Li g h t , S ty l is h XPC is p ro b ab ly the s ma lles t & th e ligh tes t sys tem c u rren tly a vaila ble in the market tod a y. -
Page 6: Xpc Func Tion Illustratio N / Xpc 功能說明
▓ 1.2 XPC Func tion Illustratio n / XPC 功能說明 Fr o n t / 正面構造 ▓ HDD LED/硬碟指示燈 Power LED/電源指示燈 Earphone/耳機 Power Switch/開關機按鈕 Mic/麥克風插孔 Reset/系統覆置按鈕 SPDIF-Out USB/USB插座 1394/1394連接埠 Ba c k / 背面構造 ▓ Optional Parallel Port / 預 留 印 表 機 連 接 埠 LAN Port/乙太網路... -
Page 7: Acc Essor Ies / 配件內容
▓ 1.3 Acc essor ies / 配件內容 1. I.C.E. tech Socket 462 1. 熱導管散熱片 x 1, 螺絲 x 4, CPU保護 heat-pipe x 1, screws x 4, & 銅片 x 1 copper shim X 1 2. Front feet x 2 2. 前腳座 x 2 3. -
Page 8: Hardware Installation / 硬體安裝
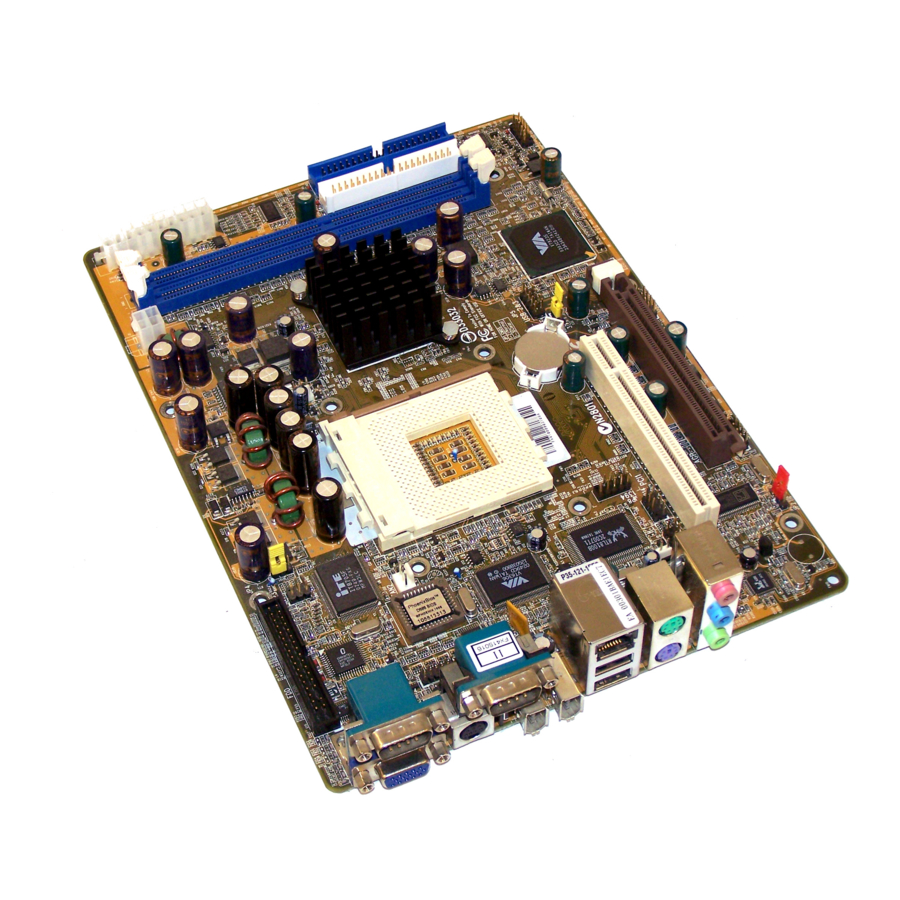
▓ 2.1 Hardware Installation / 硬體安裝 2 .1 .1 M a in b o a rd / 主機板介紹 ▓ IDE1 Connector (HDD)/ IDE1 連接埠 硬碟 Floppy Connector/ CPU Socket/ DDR DIMMs/ 軟碟機連接埠 處 理 器 腳 座 DDR記憶體插槽 Back Panel/ 背... -
Page 9: Start To I Nsta Ll / 開 始 安 裝
▓ 2.2 Star t To Insatll / 開始安裝 2 .2 .1 Op e n Ch a s s is Co ver / 移開機殼上蓋 ▓ 1. Remove 3 screws of chassis cover. 鬆開三顆背板固定螺絲。 2. Remove the cover. 移開機殼上蓋。 2 .2 . 2 Remo ve HDD / FDD / CD-R OM Ra c k/ 移開硬體週邊支架 ▓... -
Page 10: In S Ta Ll Fdd C A B Le / 安裝軟碟機排線
3. Loosn 4 screws of the Rack. 鬆開四顆支架螺絲。 4. Remove all front covers. 取下所有擋板。 2 .2 .3 In s ta ll FDD C a b le / 安裝軟碟機排線 ▓ 1. FDD cable. 軟碟機排線。 2. Plug FDD cable to the FDD connector. 安裝軟碟機排線於主機板的軟碟機連接埠口。... -
Page 11: Cpu And Coole R Installa Tion / 安 裝 處 理 器 及 散 熱 風 扇
▓ 2.3 CPU And Cooler Installation / 安裝處理器及散熱風扇 2 .3 .1 SK4 1 G Series /SK4 1 G Series 系列 ▓ No te: SK41G supports AMD Socket 462 Athlon XP/Duron processor. ® ® Please follow our steps to complete the CPU installation. - Page 12 5. Place the copper shim on top of CPU die. Follow the directional word, “UP” as mounting. 將 CPU 保護銅片置於 CPU 上,安裝時請注意 銅片上之字樣 “UP”必須朝向腳座上之 “SOCKET 462”字樣。 6. Insert the four screws in the holes on the heat- pipe’ s four cut edges; later place the heat-pipe on the CPU socket and match the screws with the holes on the socket.
-
Page 13: Ins Tall Ddr S Dram / 安裝記憶體模組
▓ 2.4 Ins tall DDR S DRAM / 安裝記憶體模組 Install the DDR module to the DIMM1 / DIMM2. 安裝記憶體於主機板上的記憶體插槽。 1. Unlock the DIMM latch. 將 DIMM 兩側卡榫向外扳開。 2. Plug DDR module into the DIMM slot and lock the latch. 安插 DDR 於插槽上,並確認方向是否有誤。 3. -
Page 14: Ins Tall Cables And Rack / 安裝排線及支架
▓ 2.5 Ins tall Cables And Rack / 安裝排線及支架 2 .5 .1 In s ta ll HDD Ca b le / 安裝硬碟排線 ▓ 1. HDD cable. 硬碟排線。 2. Plug HDD cable to the IDE 1 connector. Place the other side of HDD cable as picture shows. -
Page 15: Install Rack / 安 裝 支 架
3. Follow the picture to secure the cable to the chassis. 將排線嵌入磁架側方的定位夾,以固定排線(排線固定方式如下所示)。 1st pin No te: Please leave the red line (1st pin) close to front panel. 注 意 : 排線第一 pin(即有紅色印字面為第一 pin)面向面板。 4. Let the cable through the reserved hole. 將排線穿過磁架定位孔。... - Page 16 2. Tighten all the devices with their own screws. 鎖上螺絲,將光碟機、軟碟機與硬碟固定於支架上。 3. Please tighten the screws on the standard line to make sure that FDD/CD-ROM will be in the same level with front panel. 為確保軟 / 光碟機安裝後能對齊面板,請按照右圖中之標準線鎖上軟 / 光碟 機。 4. Leave the cable as picture shows to make installing rack much easier. 參照右圖,將排線向外拉出,並將電源線預先安裝於散熱裝置旁,以利硬碟及...
- Page 17 5. Put the rack into the chassis. 連同光 / 軟碟機與硬碟,將支架安裝入系統機殼內。 6. Tighten the rack with 2 screws. 對齊螺絲孔位後,鎖上兩顆螺絲以固定支架。...
-
Page 18: Ins Tall Peripher Als / 安裝周邊裝置
▓ 2.6 Ins tall Peripher als / 安裝周邊裝置 1. Put HDD cable in the rack clip. 拉出並固定硬碟排線於支架下方固定夾。 2. Put HDD power conncotor in the rack Clip. 拉出並固定硬碟電源線於支架下方固定夾。 3. Connect HDD power connector and cable to the HDD. 安裝硬碟電源線及硬碟排線於硬碟插槽。 HDD cable Pow er connector 4. -
Page 19: Install Acce Ssories / 安裝附件
5. Plug IDE cable and power connector to CD-ROM. 安裝排線與電源線於光碟機插槽。 CD-ROM cable Pow er connector No te: Remember to minimize the IDE cable and secure it with when fabricate the CD-ROM cable. 注 意 : 組裝光碟機時,線材長度應自行整理至最短,並用束線帶固定之, 以免影響系統運作。 ▓ 2.7 Install Acce ssories / 安裝附件 2 .7 .1 In s ta ll fro n t feet / 安裝造形前腳座... -
Page 20: Install Agp/Pci Card / 安 裝 Agp/Pci 介 面 卡
2 .7 .2 In s ta ll AGP /P CI Ca rd / 安裝 AGP /P CI 介面卡 ▓ 1. Take AGP Card for example to install expansion card. 以 AGP 卡為例,說明擴充卡之安裝步驟。 2. Remove 2 screws from back panel bracket and lift up AGP/PCI door. 先鬆開... -
Page 21: Co Mple Te / 完成組裝
▓ 2.8 Co mple te / 完成組裝 2 .8 . 1 Clo s e th e C h a s s is Co ver / 安裝機殼上蓋 ▓ 1. Shut the cover and tighten it with screws. 固定機殼上蓋,並鎖上背板固定螺絲。 2 .8 .2 Co mp let e / 組裝完成 ▓...
Need help?
Do you have a question about the SK41G and is the answer not in the manual?
Questions and answers