
Related Manuals for lefant T8 Series


Summary of Contents for lefant T8 Series
- Page 1 Robotic Vacuum Cleaner User Manual Applicable for T8 Series Please read the instructions carefully before using this product and keep it properly. Applicable for T800 Series...
- Page 2 Instruction Manual, please contact our Customer Service Center where atechnician can address your specific problem or question. For more information,please visit the Lefant ROBOTICS official website: www.lefantlife.com or send email to support@lefantlife.com The Company reserves the right to make technological and/or design changes...
-
Page 3: Table Of Contents
Contents 1.Important Safety Instructions ······························· 2.Product Composition ········································· 3.Operating and Programming ································ 3.1 Notes Before Cleaning·············································· 3.2 Quick Start························································· 3.3 Cleaning Mode Selection············································ 3.4 Scheduling setting·················································· 3.5 APP download and network configuration····························· 4.Maintance ························································ 4.1 Dust Bin and Filters················································ 4.2 Roller Brush and Side Brushes······································ 4.3 Other Components·················································... -
Page 4: Important Safety Instructions
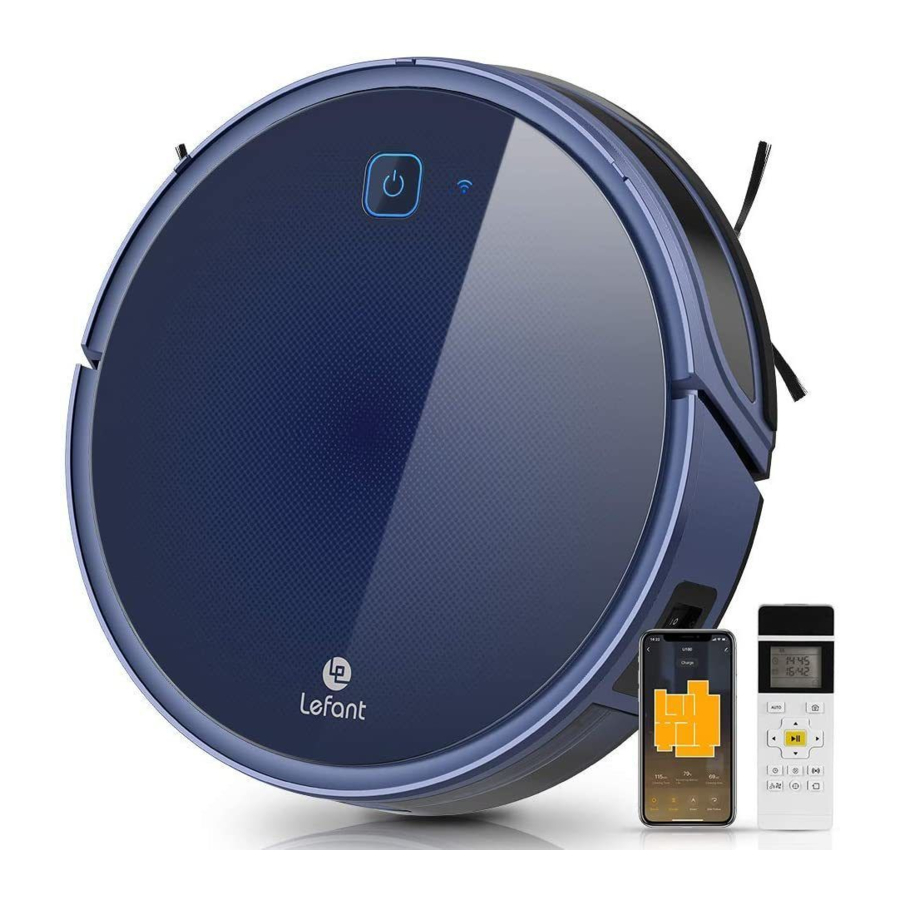
1.Important Safety Instructions When using an electrical appliance, basic precautions should always be followed, including the following: READ ALL INSTRUCTIONS BEFORE USING (THIS APPLIANCE) WARNING: Read all safety warnings and instructions. 1.Do not leave appliance when plugged in. Unplug from outlet when not in use and before servicing. - Page 5 2.Product Composition Robot Start/Pause Button Wi-Fi Indicator Light Anti-collision Sensor Dust Bin/Water Tank and Bumper Infrared Receiver Power Switch Anti-drop Sensors Battery Cover Roller Brush Driving Wheels Dust Bin Universal Wheel Charging Contacts Side Brushes...
-
Page 6: Product Composition
2.Product Composition Charging Dock Cleaning Tool Power Indicator Light Power Adapter Charging Dock Pins Power Adapter Port Remote Control Week display bar clock icon Clock time display Schedule time display Appointment icon Mode status display Return to Charger AUTO Mode Button Mode Button Direction Control Button START/PAUSE Button... - Page 7 2.Product Composition Dust Bin Filter Net Sponge Filter High Efficiency Filer(HEPA) Dust Bin Cover Dust Bin Release Button...
-
Page 8: Operating And Programming
3.Operating and Programming 3.1Notes Before Cleaning Please refer to the following guidelines to check the cleaning area before using the robot. Remove power cords and small objects from the The product is not suitable for use on long-pile Floor that could entangle the products. carpet. -
Page 9: Quick Start
3.Operating and Programming 3.2 Quick Start Charging Dock Placement Connect the adapter to the charging Dock Place the Charging Dock on a level floor surface against the wall with the base perpendicular to the ground.Keep the immediate area 2m(6.6’) in front of the charger and 1m(3.3’) on both sides of the charger clear of objects and reflective surfaces. - Page 10 3.Operating and Programming Start to Charge Turn on the Robot Turn the robot’s Side Power Switch to the ON position. “-” indicates ON and“O” indicates OFF. Robot is powered ON when button glows a continuous BLUE. Charge Robot Place robot on the Charging Dock making sure the Charging Contacts on robot and the Charging Dock Pins make a connection.
- Page 11 3.Operating and Programming Auto Cleaning Mode Robot will clean in Random Cleaning Pattern designed for carpet cleaning by default. AUTO The robot will enters sleep mode after standby for 10 minutes, and the AUTO button light goes off. If you need to select another mode, please refer to the section (mode selection).
-
Page 12: Cleaning Mode Selection
3.Operating and Programming 3.3 Cleaning Mode Selection The Robot has several cleaning modes to choose from to effectively clean different floors. Cleaning modes are selected using the Remote Control. Spot Cleaning Mode (less than 3 minutes) This mode is applicable for an area of highly concentrated dirt or duct. -
Page 13: Scheduling Setting
3.Operating and Programming 3.4 Scheduling setting Robot has a Time Scheduling function. Robot can be programmed to automatically clean at a specific time using the Remote Control,even if nobody is at home.The current time of day and the cleaning times are scheduled using the Remote Control. The remote control is 24-hour system. - Page 14 3.Operating and Programming Schedule the Cleaning Time using Remote Control SUN MON TUE WED THU FRI SAT SUN MON TUE WED THU FRI SAT Press button, the icon and the week Press the Buttons to switch “hour” “minute” column area flash on the Remote Control and“week”.
-
Page 15: App Download And Network Configuration
Scan the QR code to download and install the app This app is compatible with IOS9.0 and Android 4.0 or above. ios system: Please search“Lefant life”in the app store. Android system:Please scan the QR code or search “Lefant Life”on google play to download. - Page 16 3.Operating and Programming If you experience with network pairing failure, please restart the robot and start over again. Or try the AP mode network pairing method instead. AP MODE Network paring (Only works with 2.4G WIFI) AP mode Press and hold the Start/Pause button Turn on the power button and the device will enter 6 seconds, after hear the 2 times "beep"...
- Page 17 3.Operating and Programming Add Manually- Wi-Fi-AP Mode Turn on the power button and the device will enter Press and hold the Start/Pause button the standby state. 6 seconds, after hear the 2 times "beep" sound, the robot will enter to network configuration mode. device will enter the standby state.
- Page 18 3.Operating and Programming Connect your phone to a Wi-Fi that starts with then name“SmartLife”. After successfully connecting to the Wi-Fi, return the the APP and start the network configuration. T800...
-
Page 19: Maintance
4.Maintance 4.1 Dust Bin and Filters When cleaning and maintaining the robot and its accessories,turn off the robot and unplug the Charging dock. Remove the dustbin, open the dustbin cover,and empty the Dust Bin. Remove the dust filter.HEPA is not recommended for washing. Pat the High Efficiency Filter clean. -
Page 20: Roller Brush And Side Brushes
4.Maintance 4.2 Roller Brush and Side Brushes Cleaning Roller Brush Turn the robot over. Push both buttons on the Roller Brush Cover and remove it. Remove the Roller Brush.Use the Multi-Function Cleaning Tool tocut off and remove any hair tangled around the Roller Brush. Cleaning the Side Brushes Use the Multi-Function Remove the Side Brushes. -
Page 21: Other Components
4.Maintance 4.3 Other Components Clean the anti-collision sensor Wipe the Anti-Drop Sensors with panel. the brush or the felt side of the Multi- Function Cleaning Tool to maintain their effectiveness. Wipe the Charging Contacts and Charging Dock Pins with the brush of the Multi-Function Cleaning Tool or a dry clean cloth to maintain their effectiveness. -
Page 22: Indicator Light
5.Indicator Light Lighting Effects Robot Status AUTO Display Status WiFi Display Status Red light/pink light/ Charging As per current networking status blue light breathing Red light goes off Finished Charging As per current networking status When the machine fails Red light flashes or lights up As per current networking status Low Battery Red light is always on... -
Page 23: Troubleshooting
Please connect to 2.4G WiFi signal. Please scan the QR code in the user manual or Download the incorrect APP search“Lefant life”on google play or app store. Side brush, rolling brush,entangled, It is recommended to clean and maintain the brush, roller brush,dustbin and filters regularly. - Page 24 Malfunction Possible Causes Solutions Robot has not made a connection Be sure that robot’s Charging Contacts have made with the Charging Dock. a connection with the Charging Dock Pins. Plug in the Charging Dock and ensure robot is Charging Dock is unplgged Robot will powered ON.
-
Page 25: Technical Parameters
7. Technical Parameters Product Model T800 Vacuum Cleaner Rating 19V,0.6A Changing Dock Rating 19V,0.6A AD-0121900060US AC adapter model lnput:100-240V~50-60Hz;0,5A AC adapter rating Output:DC 19V;0,6A;Class II;... - Page 26 Official website Shenzhen lohas Technology Co.,LTD http://www.lefantlife.com / support@lefant.com Part of the eastern section,level 4 Building 3, Longcheng Industrial Park, Huanggekeng Community, Longcheng Street, Longgang District, Shenzhen T8-LH20201120...
Need help?
Do you have a question about the T8 Series and is the answer not in the manual?
Questions and answers