Table of Contents
Advertisement
Quick Links
Advertisement
Table of Contents

Related Manuals for Bosch HSG656X.6A


Summary of Contents for Bosch HSG656X.6A
- Page 1 Oven HSG656X.6A User manual and installation instructions [en]...
-
Page 2: Table Of Contents
en Safety Table of contents 1 Safety Observe the following safety instructions. 1.1 General information USER MANUAL ¡ Read this instruction manual carefully. Safety .............. 2 ¡ Keep the instruction manual and the Preventing material damage ....... 4 product information safe for future refer- ence or for the next owner. -
Page 3: Safety
Safety en ▶ If smoke is emitted, the appliance must be WARNING ‒ Risk of injury! switched off or the plug must be pulled out Scratched glass in the appliance door may and the door must be held closed in order develop into a crack. to stifle any flames. -
Page 4: Preventing Material Damage
en Preventing material damage electronic implants, e.g. heart pacemakers or Hot liquid may spill over the sides of the ac- insulin pumps. cessory when it is removed from the cooking ▶ Wearers of electronic implants must stay at compartment. least 10 cm away from the control panel. ▶... -
Page 5: Environmental Protection And Saving En- Ergy
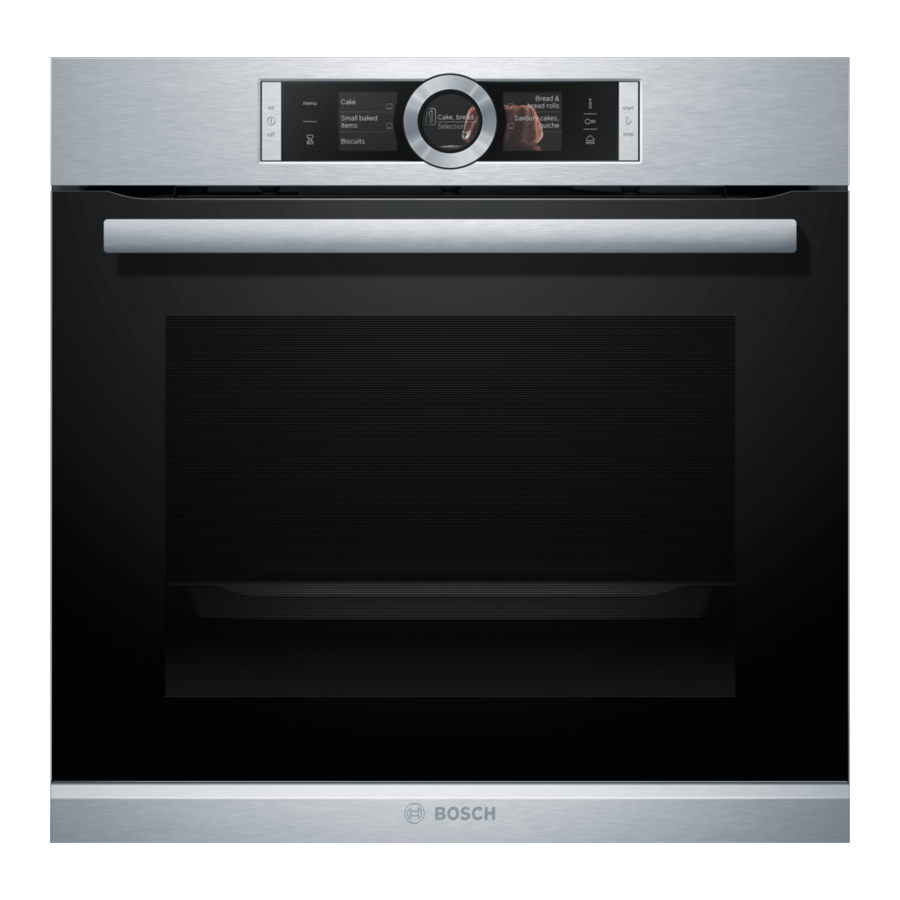
Environmental protection and saving energy en Only leave the cooking compartment to dry with the ▶ 2.2 Steam door open if a lot of moisture was produced during Follow these instructions when using the steam func- operation. tion. Fruit juice dripping from the baking tray leaves stains that cannot be removed. - Page 6 en Familiarising yourself with your appliance 4 Familiarising yourself with your appliance 4.1 Control panel Buttons The buttons on the left- and right-hand side of You can use the control panel to configure all functions the control panel have a pressure point. Press- of your appliance and to obtain information about the ing a button will execute its function.
-
Page 7: Familiarising Yourself With Your Appliance
Familiarising yourself with your appliance en ¡ Heating line 4.4 Touch displays Once operation has started, the white line below the The touch displays act as both displays and controls. temperature turns red as the cooking compartment The touch displays are divided into several text fields. heats up. - Page 8 en Operating modes Lighting Water tank One or more oven lights illuminate the cooking com- You need the water tank for the types of steam heating. partment. The water tank is behind the control panel. When you open the appliance door, the light in the → "Filling the water tank", Page 16 cooking compartment switches on.
-
Page 9: Operating Modes
Operating modes en Symbol Type of heating Temperature What it's used for and how it works range Possible additional options 4D hot air 30–250 °C Bake and roast on one or more levels. The fan distributes the heat from the ring-shaped heating element in the back wall evenly around the cooking compartment. -
Page 10: Accessories
en Accessories Symbol Type of heating Temperature Defrosting 30–60 °C Gently defrost vegetables, meat, fish and fruit. Thanks to the moisture, the food does not dry out or use its shape. Sous-vide 50–95 °C Cook meat, fish, vegetables and desserts under a vacuum, at low temperatures and with 100% steam. - Page 11 You will find a comprehensive range of products for your appliance in our brochures and online: www.bosch-home.com Accessories vary from one appliance to another. When purchasing accessories, always quote the exact product number (E no.) of your appliance.
-
Page 12: Before Using For The First Time
en Before using for the first time 7 Before using for the first time Implement the settings for the initial configuration. Calibrate the appliance. Clean the appliance and accessories. 7.1 Before using for the first time Malfunctions may occur when using filtered or deminer- Before using the appliance for the first time, ask your alised water. -
Page 13: Basic Operation
You can briefly pause operation and then continue. If ▶ you cancel operation completely, the settings will be re- a The Bosch logo appears in the display. The types of set. heating then appear. To pause operation briefly: Briefly press ... -
Page 14: Rapid Heating
en Rapid heating Press to start. Press the type of heating that you want to use. a The appliance starts heating. a The corresponding default temperature appears in the display. a The target temperature, the time and how long the appliance has already been in operation are shown Changing the temperature in the display. - Page 15 Time-setting options en minutes. The timer has its own audible signal so that To continue without setting a cooking time, press ‒ you can tell whether it is the timer or a cooking time to start. which has elapsed. When the food is ready, press to switch the ‒...
- Page 16 en Steam 11 Steam Food can be cooked particularly gently using steam. Fill the water tank with water up to the "max" You can use the special types of steam heating, or use mark. steam assistance with certain types of heating. WARNING ‒ Risk of scalding! Hot steam may escape when you open the appliance door.
- Page 17 Steam en Sous-vide When the food is ready, press to switch the ‒ appliance off. Sous-vide is a type of low-temperature cooking during Empty the water tank and dry the cooking compart- which vacuum-sealed food is cooked at low temperat- ment. ures between 50–95 °C and 100% steam.
- Page 18 en Steam Cleaning the water tank in the dishwasher will damage Note: If the water tank runs dry during operation, a notification appears in the display. The appliance Do not clean the water tank in the dishwasher. continues to operate without added steam. ▶...
-
Page 19: Steam
Meat probe en 12 Meat probe Cook with precision by inserting the meat probe into Thick Insert the meat probe diagonally into the the food and setting a core temperature on the appli- pieces meat from above, pushing it in as far as ance. - Page 20 en Assist Press to start. Changing the temperature a The appliance starts heating. After the start of the operation, the core temperature a The time, how long the appliance has already been is highlighted in white. You can use the control ring in operation, and the core temperature are shown in to change the core temperature directly.
-
Page 21: Meat Probe
Assist en Meat probe Category Foods You can use the meat probe for several dishes. Dessert, Dessert, compote If the meat probe is plugged in, only the dishes that are compote possible with the meat probe are available for selec- Disinfecting Sterilising bottles tion. -
Page 22: Childproof Lock
en Childproof lock Press the required meal. For some dishes, you can continue cooking if ne- ‒ cessary. a The settings for the dish appear in the display. → "Adding extra cooking time", Page 22 a For dishes with baking sensor operation, no settings When the dish is ready, press to switch the ap- appear;... -
Page 23: Sabbath Mode
Basic settings en Press to start the operation. Press to switch the appliance off. ‒ a The appliance starts to heat and the time starts to The appliance automatically switches off after ap- count down. prox. 10 to 20 minutes. Once the cooking time has elapsed, an audible sig- nal sounds. - Page 24 en Home Connect 17 Home Connect This appliance is network-capable. Connecting your ap- 17.1 Setting up Home Connect pliance to a mobile device lets you control its functions Requirements via the Home Connect app, adjust its basic settings ¡ The appliance is connected to the power supply and and monitor its operating status.
- Page 25 17.7 Declaration of Conformity timisation, troubleshooting or security updates. To do this, you must be a registered Home Con- Robert Bosch Hausgeräte GmbH hereby declares that nect user, have installed the app on your mobile device the appliance with Home Connect functionality meets and be connected to the Home Connect server.
- Page 26 en Cleaning and servicing 18 Cleaning and servicing Do not use cleaning products with a high alcohol To keep your appliance working efficiently for a long ▶ content. time, it is important to clean and maintain it carefully. Do not use hard scouring pads or cleaning ▶...
- Page 27 Cleaning and servicing en Cooking compartment Area Suitable cleaning agents Information Enamel surfaces ¡ Hot soapy water Soak any heavily soiled areas and use a brush or steel wool. Leave the appliance door open to dry the cooking compartment ¡ Vinegar water after cleaning it.
- Page 28 en Cleaning function EcoClean If a prompt to clean appears in the display, use the ▶ 18.3 Cleaning self-cleaning surfaces in the cleaning function to clean the cooking compart- cooking compartment ment. Do not use oven cleaner or abrasive cleaning aids. The back panel, ceiling and side walls in the cooking ▶...
-
Page 29: Cleaning Assistance
Cleaning assistance en Note: Do not open the appliance door while the 19.4 Wiping the appliance clean following cleaning function is running. The cleaning result the cleaning function would no longer be correct and the operation is in- Allow the appliance to cool down. terrupted. -
Page 30: Drying
en Drying Press "Cleaning". 21.1 Preparing descaling Press "Descaling". ATTENTION! a The duration appears in the display. The duration The length of time for which the descaler is left to work cannot be changed. is based on the recommended, liquid descaler. Other Press to start. -
Page 31: Appliance Door
Appliance door en Pull the whole rail to the front and remove it. ¡ For both pull-out rails, ensure that you can pull them forwards and out. First, push the rail into the middle of the rear socket until the rail rests against the cooking compartment wall, and then push this back ... - Page 32 en Appliance door Close the appliance door fully . Grab hold of the Close the locking levers on the left- and right-hand appliance door with both hands (on the left and hinges . right) and pull it upwards and out . a The locking levers are closed.
- Page 33 Appliance door en Lift out the inner pane and set it down carefully 24.4 Fitting the door panes on a flat surface. Lift out the intermediate pane and set it down WARNING ‒ Risk of injury! carefully on a flat surface. The hinges on the appliance door move when the door is opened and closed, which could trap your fingers.
-
Page 34: Troubleshooting
en Troubleshooting Open the appliance door and attach the door seal. Push the inner pane upwards until it is in the left- and right-hand retainers . Slide the inner pane into the left- and right-hand retainers . Put the door cover in position and push down on it until you hear it click into place. -
Page 35: Customer Service
Troubleshooting en Fault Cause and troubleshooting "Sprache Deutsch" appears in There has been a power cut. the display. Implement the settings for the initial configuration. ▶ – Language – Clock – Water hardness The operation does not start or is Different causes are possible. interrupted. - Page 36 en Troubleshooting Fault Cause and troubleshooting Intense steam generation when If the cooking times are too short, the appliance is not automatically calibrated. steaming. If a lot of steam is generated repeatedly, the appliance is recalibrated. Reset the appliance to the factory setting. → "Basic settings", Page 23 Repeat the calibrations.
-
Page 37: How It Works
Next time, set lower or higher values. ▶ Tip: A lot of information about the food preparation and corresponding set- ting values can be found on our website www.bosch-home.com. 26 Disposal Find out here how to dispose of old appliances cor- This appliance is labelled in accord- rectly. - Page 38 en How it works ¡ If you are cooking bakes directly in the universal Calculating the cooking time, e.g. 20+35: pan, place the universal pan into the cooking com- ¡ To calculate the cooking time, assume 20 minutes partment at level 2. per 500 g of meat. Then add an extra 35 minutes to ¡...
- Page 39 How it works en Grilling 28.5 Steaming Grill food if you want it to be crispy. Cook dishes gently. The food remains particularly suc- The "Grill" heating function is good for cooking thinner culent. pieces of poultry, meat and fish such as steaks, drum- In contrast to steam-assisted cooking, the meat does sticks and burgers.
- Page 40 en How it works Food Accessories/cook- Shelf pos- Heating Temperature in Steam in- Cooking time ware ition function °C tensity in mins → Page 8 Rich fruit cake High Ø 23 cm tin 140–160 120–180 Fruit pie Plate Ø 20 cm 160–170 55–65 Pie tin Fruit pie Plate Ø 20 cm 170–190 60–75...
- Page 41 How it works en Food Accessories/cook- Shelf pos- Heating Temperature in Steam in- Cooking time ware ition function °C tensity in mins → Page 8 Complete meal with Wire rack Calculation chicken for chicken Wire rack (see table above) Complete meal with Wire rack ...
- Page 42 en How it works Food Accessories/cook- Shelf pos- Heating Temperature in Steam in- Cooking time ware ition function °C tensity in mins → Page 8 1. Boiled potatoes 1. Perforated 1. 4 1. 25 2. Frozen salmon fillet steaming tray, size 2. 4 2.
- Page 43 How it works en Food Accessory/cook- Shelf pos- Searing Heating function Temperature Cooking ware ition time in → Page 8 in °C time in mins mins Veal medallions, 4 cm Uncovered cook- 30 - 50 thick ware Saddle of lamb, bone- Uncovered cook- 30 - 45 less, 200 g each ware Preheat the appliance.
- Page 44 en How it works To kill the germs, dip the vacuum-sealing bag con- ▶ WARNING ‒ Risk of scalding! taining the uncooked food into boiling water for no Hot water collects on the vacuum-sealing bag dur- more than 3 seconds. ing cooking. a This minimises the germs on your ingredients and Use an oven cloth to carefully lift the vacuum- ▶...
- Page 45 How it works en Food Accessory/cookware Heating Temperat- Cooking Tips for sous-vide cooking function ure in °C time in → Page 8 mins Duck breast, 350 g each Wire rack Cut into the layer of fat, season the meat side with Universal pan a little salt and pepper, and vacuum-seal it along with a small piece of orange peel Cod, 140 g each...
- Page 46 en How it works Food Accessory/cookware Shelf posi- Heating Temperature in °C/ Cooking time tion function Dough proving in mins → Page 8 heating function White bread Bowl on wire rack 1. 2 1. 35–40 1. 30–40 Universal pan 2. 2 2.
- Page 47 How it works en ¡ Hot water sponge cake – When baking on two levels, place the springform tins at diagonally opposite corners of the wire racks. Recommended settings for baking Food Accessories/cook- Shelf pos- Heating Temperature in Steam intens- Cooking ware ition function...
-
Page 48: Installation Instructions
en Installation instructions Recommended settings for steaming Food Accessory/cookware Shelf posi- Heating Temperature in °C Cooking time tion function in mins → Page 8 1, 2 Peas, frozen, two containers 2 pcs 5+3+1 Steam containers, XL size Universal pan Broccoli, fresh, 300 g Steam containers, XL ... - Page 49 Installation instructions en ATTENTION! Carrying the appliance by the door handle could break it. The door handle cannot sup- port the weight of the appliance. ▶ Do not carry or hold the appliance by the door handle. 29.2 Appliance dimensions You will find the dimensions of the appliance here ¡...
- Page 50 en Installation instructions 29.4 Installation underneath a hob If the appliance is installed under a hob, the following minimum dimensions must be adhered to (including substructure, if applicable). The minimum worktop thickness a is based on the required minimum clearance . Hob type a raised in mm a flush in mm...
- Page 51 Installation instructions en ¡ The appliance must only be connected using the Screw the appliance into place. power cable provided. ¡ The power cable must be plugged in at the rear of the appliance until you hear a clicking sound. A 3 m power cable can be obtained from the after-sales service.
- Page 52 Expert advice for your Bosch home appliances, help with problems or a repair from Bosch experts. Find out everything about the many ways Bosch can support you: www.bosch-home.com/service Contact data of all countries are listed in the attached service directory.
Need help?
Do you have a question about the HSG656X.6A and is the answer not in the manual?
Questions and answers