
Related Manuals for Carson eFLEX MM-840


Summary of Contents for Carson eFLEX MM-840
- Page 1 © MM-840 eFLEX 75x/300x DIGITAL MICROSCOPE WITH FLEXIBLE NECK INSTRUCTION MANUAL...
-
Page 2: Table Of Contents
Table of Contents Important information.............. 4 Product description..............4 Computer requirements & software installation......5 Package contents..............6 Product overview ..............7 Product specification............... 8 Assembling the stand............. 9 Attaching the microscope to the stand........10 Focusing ................11 Preparation ................11 For viewing an object at a distance or on the stand .............. - Page 3 Adjusting the LED light intensity ..........15 Taking a snapshot ..............16 Using the xploview software............17 System settings menu.............. 18 Device setup ................. 19 Timed shot setup ..............19 Movie setup ................19 Save setting ................19 Language setting ..............19 Advanced settings ...............
-
Page 4: Important Information
Important information Please read this instruction manual carefully before using this product, and retain these instructions for future reference. Improvements and changes to this text necessitated by typographical errors, or improvements to the software and/or equipment may be made at any time without notice. Product description 1. -
Page 5: Computer Requirements & Software Installation
Computer requirements & software installation Go to www.carson.com/software to download the latest software and corresponding software installation guide for the MM-840. The computer requirements (operating system, etc.) may be different depending on the software version. -
Page 6: Package Contents
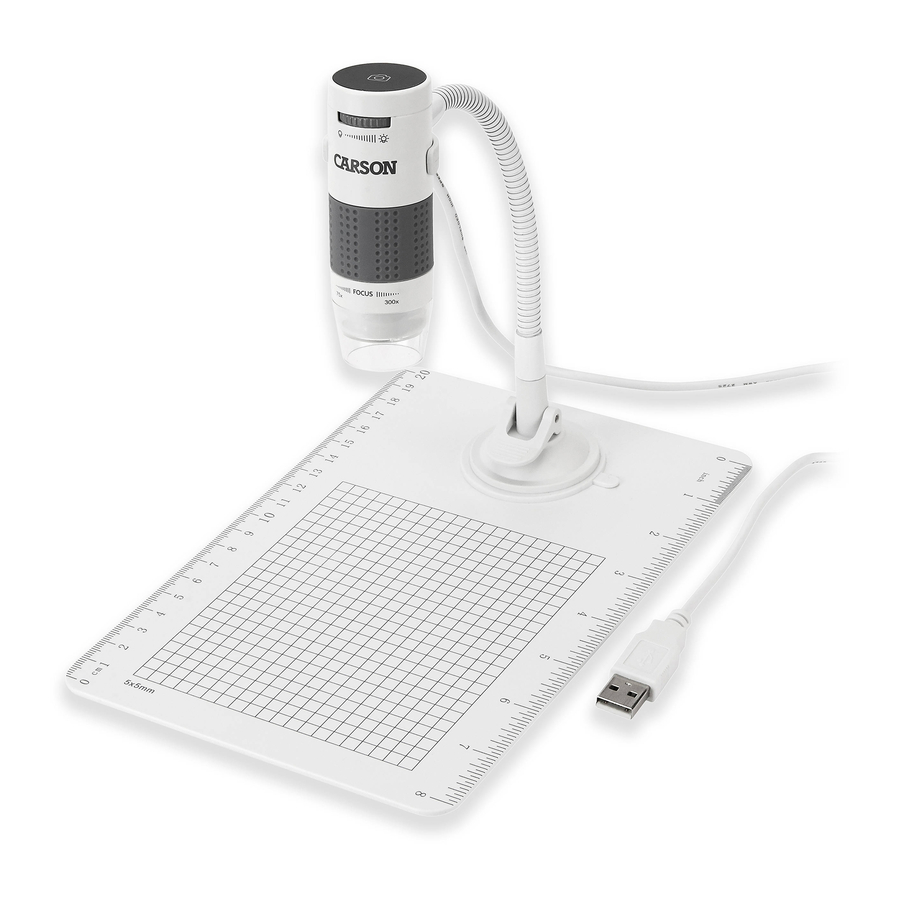
Package contents 1. Microscope 2. Stand 3. Observation pad... -
Page 7: Product Overview
Product overview 1. Snapshot button 6. LED 7. Stand bracket 2. Light intensity knob 3. USB cable 8. Flexible tube 4. Focusing knob 9. Locking lever 5. Objective lens Suction cup... -
Page 8: Product Specification
Product specification Connection type USB 2.0 Effective magnifications 75x, 300x (on a 21” monitor)* 5.6 x 4.2mm (75x) Effective viewing area 1.4 x 1.1mm (300x) Illumination Four LEDs Sensor CMOS 1600 x 1200 pixels (UXGA) Maximum snapshot resolution Maximum video 640 x 480 pixels (VGA) capturing resolution Size... -
Page 9: Assembling The Stand
Assembling the stand 1. Screw the stand bracket and the suction cup base to the flexible tube as shown in the diagram below. 2. Make sure the mounting surface is free from oil and dirt, and ensure the locking lever is in the vertical position. 3. -
Page 10: Attaching The Microscope To The Stand
Attaching the microscope to the stand Secure the microscope to the stand as shown below. -
Page 11: Focusing
Focusing Preparation Rotate the focusing knob to the left (clockwise) to the furthest position. -
Page 12: For Viewing An Object At A Distance Or
For viewing an object at a distance or on the stand From the preparation position, rotate the focusing knob to the right (counter-clockwise) until the image is sharp and clear. The closer the microscope to the object, the higher the magnification power. -
Page 13: 75X Effective Magnification (21" Monitor)
75x effective magnification (21” monitor) Place the microscope directly on top of an object or a specimen slide. From the preparation position, rotate the focusing knob to the right (counter-clockwise) until the first focal point has been reached where the image is sharp and clear. Effective magnification of 75x can be achieved when viewing on a 21”... -
Page 14: 300X Effective Magnification (21" Monitor)
300x effective magnification (21” monitor) Place the microscope directly on top of an object or a specimen slide. From the preparation position, rotate the focusing knob to the right (counter-clockwise) until the second focal point has been reached where the image is sharp and clear. Effective magnification of 300x can be achieved when viewing on a 21”... -
Page 15: Adjusting The Led Light Intensity
Adjusting the LED light intensity Rotate the light intensity knob clockwise or counter-clockwise to increase or decrease the LED light intensity. Increasing the LED Reducing the LED light intensity light intensity... -
Page 16: Taking A Snapshot
Taking a snapshot The snapshot button is touch-sensitive. Touch the snapshot button located on top of the device to take a snapshot. -
Page 17: Using The Xploview Software
Using the xploview software The following buttons are available: Clicking this will open the system settings menu (see next section). Clicking this will capture the on screen image of the device. Clicking this will activate or deactivate the timed shot feature. When activated, images will be captured at a regular interval. -
Page 18: System Settings Menu
System settings menu The first time the xploview software is started, the default settings will be loaded, you may change these settings manually in the system settings menu. -
Page 19: Device Setup
Device setup If the image captured by the Digital Microscope was not displayed by default, you can change this by selecting it from the "Device" drop-down menu. The resolution of images you capture can be changed from the "Resolution" drop-down menu. Timed shot setup The frequency and duration of automatic images capture can be adjusted under this option. -
Page 20: Advanced Settings
Advanced settings By clicking the "More..." button on the right of the system settings menu, you will be able to manually adjust all of the image settings. Note that the settings available may be different, depending on your operating system. Saved files With the xploview application software opened, you can locate the saved files folder by clicking the "More..."... -
Page 21: Full Screen Viewing
Full screen viewing To activate the full screen mode, click the full screen button located on the bottom right hand corner of the xploview application software window. To exit full screen mode, either double click on the screen, or press the “Esc” button on the keyboard. Care and maintenance Keep the device dry and protect it from water and moisture. -
Page 22: Warning
Warning Do not place lighted Digital Microscope upon the eye, doing so may cause permanent eye damage. Do not attempt to open or dismantle the Digital Microscope.
Need help?
Do you have a question about the eFLEX MM-840 and is the answer not in the manual?
Questions and answers