
Related Manuals for Abus PLBW10100


Summary of Contents for Abus PLBW10100
- Page 1 PLBW10100 Nexello Motion Detector Important information and FAQs about this product and other products can be found on the website www.abus.com Manual version: 1.2 Firmware version: 1.58...
- Page 2 ABUS Security Center is limited to the purchase price of the product.
- Page 3 Please ensure that the packaging contains the DSK (Device Specific Key) card. This card shows the DSK of your ABUS Z-Wave device. Please store it in a safe place. Every S2 (Security 2) certified Z-Wave controller needs the DSK to include (teach-in) the device.
- Page 4 English Notes on handling batteries Make sure that batteries are not in the hands of children. Children could put batteries in their mouths and swallow them. This can cause serious damage to health. In this case, consult a doctor immediately! ...
-
Page 5: Table Of Contents
English Table of contents Product launch ..........................6 1.1. Scope of delivery ........................6 1.2. Device features ........................6 1.3. Operating principle ........................7 1.4. Performance features ......................7 1.5. Use in systems of different manufacturers ................7 1.6. DSK code ..........................7 Functional overview .......................... -
Page 6: Product Launch
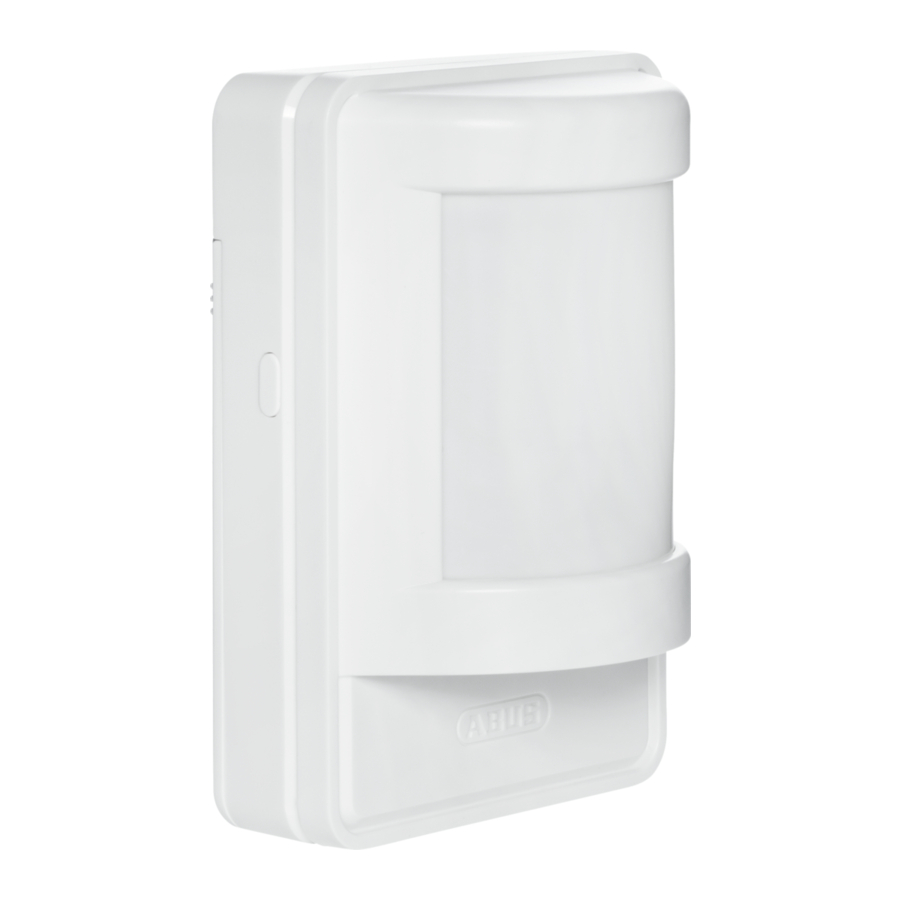
English 1. Product launch 1.1. Scope of delivery Nexello Motion Detector 1x Duracell CR123A battery Mounting material: screws, dowels Quick guide & safety instructions DSK card 1.2. Device features Designation Comment Front cover Slided onto the holder Fresnel Lens For motion detection Status... -
Page 7: Operating Principle
English 1.3. Operating principle The device was developed for use in alarm and home automation systems that use the Z-Wave wireless standard. The device has the following functions: Motion detector It uses Passive Infrared (PIR) technology to detect movement in a defined area by detecting the changes in thermal radiation caused by the moving body inside or outside the detection zone. -
Page 8: Functional Overview
English 2. Functional overview 2.1. Inclusion / teach-in device This product supports SmartStart: SmartStart-enabled products can be added to a Z-Wave network by scanning the Z-Wave QR code present on the product with a controller that provides SmartStart integration. No further action is required, and the SmartStart product will be automatically added within 10 minutes of powering up near the network. -
Page 9: Planning, Assembly And Installation
English The successful inclusion is displayed in the app or on the Z-Wave controller and the status LED on the device lights seconds. Repeat the inclusion process if it was not successful. If a new attempt fails as well, first carry out a factory reset on the device, see 2.5. - Page 10 English Mount the PIR detector at a height of 1.9m -2.3m At this height the detection range of the detector is optimised, i.e. 8m range and 80° angle of detection. Use the bracket as a template to mark the position of two drill holes on the wall.
-
Page 11: Exclusion / Teach Out Device
English 2.3. Exclusion / teach out device Activate the exclusion mode (learn mode) on the Z- Wave controller. (for more details, please refer to the Z-Wave controller's user manual) Press the "-" button (Remove / Exclusion) in your Z- Wave app and follow the instructions to set the Z-Wave controller to Exclusion mode. -
Page 12: Resetting To Factory Settings
English 2.4. Resetting to factory settings Press and hold the Link button for at least 5 seconds. Release the button when the red LED stops blinking and lights up continuously. The device is now reset to factory settings. Hint: Please use this procedure only if the primary network controller is missing or otherwise not functional. -
Page 13: Behaviour Pir Sensor
English 2.6. Behaviour PIR sensor Warm up phase It takes about 1 minute for the PIR sensor to warm up after the battery is inserted and for the unit to signal motion alarms. Hint: This has no effect on the inclusion/exclusion process. ... -
Page 14: Advanced Z-Wave Parameters
English 3. Advanced Z-Wave Parameters 3.1. Association Groups Z-Wave devices can control other devices directly. This direct control is called association in Z-Wave. The device ID of the device to be controlled must be stored in the controlling devices. This is done in so-called association groups. -
Page 15: Reports
English 3.3. Reports Notification report Event Type Attribute Parameter Length Event Parameters Motion alarm 0x07 0x00 0x08 Motion alarm 0x08 0x07 0x01 0x00 acknowledgement Tamper alarm 0x07 0x03 0x00 Tamper alarm 0x03 0x07 0x00 0x01 acknowledgement Battery alarm (replace soon) 0x08 0x0A 0x00... -
Page 16: Configuration Parameters
English 3.4. Configuration parameters Z-Wave products can be used directly after inclusion in the network. However, configuration settings can be used to adapt the behaviour of the device even better to the requirements of the application and to activate additional functions. Use your Z-Wave controller to initiate the changes to the parameters. -
Page 17: Supported Command Classes
English Defines which additional reports are to be sent in the event of a movement alarm. Light values after 1 = Sensor multilevel report (LUX) movement alarm 2 = Light alarm report is sent 3 = Lux and light alarm report is sent. (Hexadecimal: 0x0 - 0x03) Threshold value from which LUX value the light alarm (day) is sent. -
Page 18: Technical Data
English 4. Technical data Parameters PLBW10100 Dimensions (W x H x D) 90 x 61 x 42,5 mm Weight 106 g >0° – 40°C Operating temperature IP class IP 20 (indoor area) Radio frequency 868.42 MHz (Z-Wave Plus, Europe) Modulation...
Need help?
Do you have a question about the PLBW10100 and is the answer not in the manual?
Questions and answers