
Subscribe to Our Youtube Channel
Related Manuals for Inalto ARCBBQ


Summary of Contents for Inalto ARCBBQ
- Page 1 U S E R M A N U A L I N A L T O . H O U S E BBQ Canopy Rangehood — M O D E L C O D E A R C B B Q A H I G H E R L E V E L O F L I V I N G V .
- Page 2 It is important that you read through the following use and care manual thoroughly to familiarise yourself with the installation and operation requirements of your appliance to ensure optimum performance. Again, thank you for choosing an InAlto appliance and we look forward to being of service to you.
-
Page 3: Table Of Contents
20 Warranty Information Customer Care InAlto recommends the use of original spare parts. When contacting our customer service team on 1300 11 4357, please ensure that you have the following information at hand (which can be found on your appliances’ rating plate). -
Page 4: Safety Instructions
The following statements you will see in this This manual explains the proper use of your booklet have these meanings: new InAlto rangehood. Please read this manual carefully before using the product. WARNING: Indicating information concerning This manual should be kept in a safe place for your personal safety. - Page 5 ELECTRICAL CONNECTION • Ensure the cooker hood is switched off before carrying out maintenance, to avoid any Check that the mains voltage matches with possibility of electric shock. the voltage on the data plate inside the cooker • Never carry out flambé cooking under the hood.
- Page 6 Safety Instructions (Continued) DISPOSAL OF THE APPLIANCE SAFETY WARNINGS – FOR THE INSTALLER Old appliances should not simply be disposed When installing the cooker hood, make sure you of with normal household waste and should be adhere to the minimum and maximum distances delivered to a collection and recycling centre from the cooker hood base to the cook top for electric and electronic equipment.
- Page 7 THIS PAGE IS INTENTIONALLY LEFT BL ANK...
-
Page 8: Your Inalto Rangehood
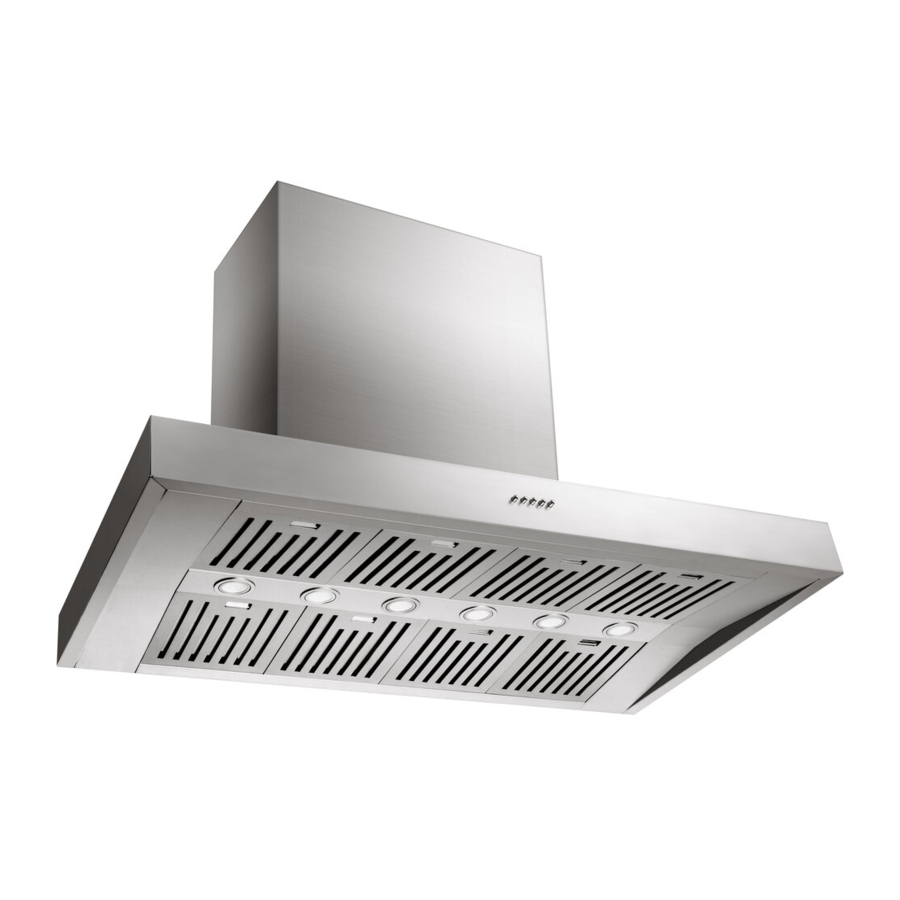
Your InAlto Rangehood YOUR RANGEHOOD I N A LT O . H O U S E SPECIFICATIONS MODEL ARBC90TPS Dimensions 1200mm × 700mm × 689-1279mm (W × D × H) Extraction 2000m3/hr Weight 42.3kg Speed Settings Lighting 6 x 1W Rotatable LED Lights Aluminium Filters 8 ×... - Page 9 RANGEHOOD COMPONENTS Your InAlto Box Canopy Rangehood is supplied with: • 1 × Rangehood • 2 × Expandable 150mm pipe • 1 × Packet of fasteners and wall plugs • 2 × Stainless Steel flue pieces (upper and lower) • 1 × Wall Bracket (“hook”) for the rangehood •...
-
Page 10: Installation Instructions
Installation Instructions WARNING: Before starting the installation, POSITIONING THE RANGEHOOD please refer to the Safety Information section. IMPORTANT: The height of the rangehood • Always switch the power off prior to underside must be a minimum of 600mm* to a beginning the installation. - Page 11 accessories are not. during cleaning or maintenance. – All ducting must comply with building codes – All ducting must comply with building cod – A 150mm round ducting adapter is supplied, – If you are re-circulating the air, rather than duc –...
- Page 12 – Duct to the outside atmosphere using the shortest duct run possible – Always use correctly sized ducting – DO NOT reduce the size of the ducting – Use cylindrical ducting whenever possible – Always use solid ducting – Always use non-flammable ducting –...
- Page 13 I N S TA L L AT I O N I N S T R U C T I O N S two exhaust pipes onto the one-way-valve as shown below. C O N T I N U E D I N S TA L L AT I O N I N S T R U C T I O N S C O N T I N U E D Chimney Installation...
-
Page 14: Using Your Rangehood
P E R AT I N G YO U R R A N G E H O O D Using Your Rangehood CONTROLS Your Rangehood features push button controls with three speed levels of extraction. 0 Off Button Of f button Used for turning the fan off. -
Page 15: Maintenance & Cleaning
Maintenance & Cleaning CAUTION: CHANGING A LIGHT GLOBE • Before maintenance or cleaning is carried The LED lights should not require service. out, the rangehood should be disconnected If there is an issue with a light, please contact from the main power supply. Ensure that the our After Sales Service Team. - Page 16 THIS PAGE IS INTENTIONALLY LEFT BL ANK...
-
Page 17: Troubleshooting & Technical Data
Troubleshooting & Technical Data OPERATION IN CASE OF EMERGENCY In the event of an emergency you should: • Switch off all rangehood controls. • Switch the rangehood off at the power outlet and immediately unplug. • Call the Residentia Support Team on 1300 11 HELP (4375) Some minor faults can be fixed by referring to the instructions given in the table below. - Page 18 Attach your receipt to this page...
-
Page 19: Purchase Details
Purchase Details For your reference, please record the following information in the form below. The product details can be found on the rating plate, and installation details and purchase details can can be found on your sales invoice. STORE DETAILS STORE NAME ADDRESS TELEPHONE... -
Page 20: Warranty Information
Warranty Information AUSTRALIAN WARRANTY TERMS & CONDITIONS This warranty only applies to Appliances RANGEHOOD APPLIANCES purchased and used in Australia and is in addition to (and does not exclude, restrict, or This document sets out the terms and conditions modify in any way) any non-excludable statutory of the product warranties for Residentia Group warranties in Australia. - Page 21 (a) the Appliance is damaged by: failure. The benefits to you given by this warranty accident are in addition to your other rights and remedies (ii) misuse or abuse, including failure to properly under a law in relation to the Appliances or services maintain or service to which the warranty relates.
- Page 22 THIS PAGE IS INTENTIONALLY LEFT BL ANK...
- Page 23 Simply visit the below website, or ask your retailer 24 months on the microwave magnetron; Waste for help: www.inalto.co.nz/register disposers have a 12 month warranty. The provision of service under this warranty is...
- Page 24 A H I G H E R L E V E L O F L I V I N G — W W W . I N A L T O . H O U S E —...
Need help?
Do you have a question about the ARCBBQ and is the answer not in the manual?
Questions and answers