
Related Manuals for Inalto ASL60DR2S


Summary of Contents for Inalto ASL60DR2S
- Page 1 U S E R M A N U A L I N A L T O . H O U S E 60cm & 90cm Slide-out Rangehoods — M O D E L C O D E / S A S L 6 0 D R 2 S / A S L 9 0 D R 2 S A H I G H E R L E V E L O F C O O K I N G V .
-
Page 2: Welcome
It is important that you read through the following use and care manual thoroughly to familiarise yourself with the installation and operation requirements of your appliance to ensure optimum performance. Again, thank you for choosing an InAlto appliance and we look forward to being of service to you. -
Page 3: Table Of Contents
20 Warranty Information Customer Care InAlto recommends the use of original spare parts. When contacting our customer service team on 1300 11 4357, please ensure that you have the following information at hand (which can be found on your appliances’ rating plate). -
Page 4: General Safety
General Safety G E N E R A L S A F E T Y Read this manual thoroughly before first use, Electrical safety and cord handling even if you are familiar with this type of product. The safety precautions enclosed herein reduce Voltage and frequency: Before plugging the the risk of fire, electric shock and injury when unit into an appropriate electrical outlet, make... - Page 5 General Safety Continued CAUTION: Do not touch the light bulbs after CAUTION: Do not touch the light bulbs after the appliance has been used as they may be hot. the appliance has been used as they may be Let them cool down before cleaning and Usage restriction: This rangehood is not intended hot.
-
Page 6: Installation Instructions
Installation Instructions I N S TA L L AT I O N Installation Kit The installation kit contains the following parts: Part ID Description Illustration Rangehood Rear-underside support mounting bracket 40mm Height Front Fascia Rail Charcoal Filters 1 set —Already installed (2 pcs) Screws (ST4 x 30mm) Screws (ST4 x 8mm) - Page 7 Unpacking Rangehood standard confi guration • This product has been packaged to protect This product has been supplied with it against transportation damage. Unpack “recirculation mode” as the default setting. the appliance and remove all packaging The rangehood is suitable for both recirculation materials from around the rangehood.
- Page 8 White Plastic Cover Charcoal filters • When choosing the outdoor exhausting mode, • If you intend to use the rangehood with the you can cover the front outlet (part ID 9) with air recirculating back into the kitchen, it is the white plastic cover.
- Page 9 Installation height: Installation height: For optimum performance, it is recommended that the rangehood be installed at a height of For optimum performance, it is recommended that the rangehood be installed at a height of between 650-750mm from the cooking surface. See Fig. 10 for detailed AS/NZS minimum distance between 650-750mm from the cooking surface.
- Page 10 Top-mounting in a cabinet • Determine where in the top cabinet you want to install the rangehood, then drill 4 holes of Ø4mm at the bottom of the hanging board of your cabinet (Fig. 12). Top-mounting in a cabinet • Determine where in the top cabinet you want to install the rangehood, then drill 4 holes of Ø4mm at the bottom of the hanging board of your cabinet (Fig.
-
Page 11: Your Inalto Rangehood
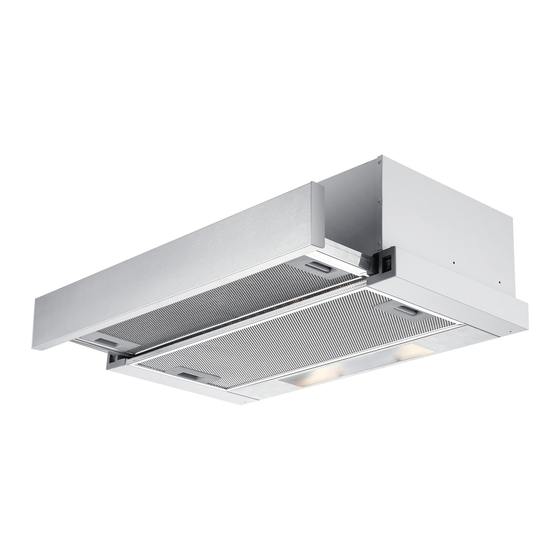
Your InAlto Rangehood P R O D U C T O V E R V I E W P R O D U C T O V E R V I E W K E Y Rangehood housing K E Y... - Page 12 THIS PAGE IS INTENTIONALLY LEF T BL ANK...
-
Page 13: Operation Instructions
O P E R AT I N G YO U R R A N G E H O O D Operation Instructions O P E R AT I N G I N S T R U C T I O N S Controls When the rangehood is plugged up, the ‘1’... -
Page 14: Cleaning & Maintenance
Cleaning & Maintenance O T H E R U S E F U L I N F O R M AT I O N Cleaning and maintenance Charcoal filters CAUTION! If you are using the rangehood with the air CAUTION! •... - Page 15 The suction power will be lowered NOTE: with charcoal filters installed. egular To remove and/or install new filters, please see page 11. Replacing a light bulb If the light bulb needs replacing, proceed as follows: ke the • Slide out the front panel for easier access and remove the two aluminium mesh filters (Fig.
-
Page 16: Troubleshooting
Troubleshooting & Technical Data Troubleshooting guide If you experience problems with your rangehood, or it appears not to be operating correctly, check in the list below for answers to frequently asked questions. If none of the solutions offered help you solve your problem, please contact our after sales support line for advice. - Page 17 • Slider • Lamp & lamp holder • Motor • Outlet • Reflector • Filter (aluminium mesh, inner and outer) Specifications Rated voltage/frequency AC 220-240V 50Hz ASL60DR2S:176mm×599mm×278mm Dimensions (H×W×D) ASL90DR2S:176mm×899mm×278mm Dimensions (H×W×D) Extended depth 278-472mm Height of front panel 40mm/80mm Weight ASL60DR2S:9.2kg...
-
Page 18: Your Receipt
Attach your receipt to this page... -
Page 19: Purchase Details
Purchase Details For future reference, please record the following information in the form below. The product details can be found on the rating plate (located within the rangehood, behind the grease filters), installation details and purchase details which can be found on your sales invoice. STORE DETAILS STORE NAME ADDRESS... -
Page 20: Warranty Information
Warranty Information AUSTRALIAN WARRANTY TERMS & CONDITIONS This warranty only applies to Appliances RANGEHOOD APPLIANCES purchased and used in Australia and is in addition to (and does not exclude, restrict, or This document sets out the terms and conditions modify in any way) any non-excludable statutory of the product warranties for Residentia Group warranties in Australia. - Page 21 (a) the Appliance is damaged by: failure. The benefits to you given by this warranty accident are in addition to your other rights and remedies (ii) misuse or abuse, including failure to properly under a law in relation to the Appliances or services to which the warranty relates.
- Page 22 THIS PAGE IS INTENTIONALLY LEF T BL ANK...
- Page 23 Simply visit the below website, or ask your retailer 24 months on the microwave magnetron; Waste for help: www.inalto.co.nz/register disposers have a 12 month warranty. The provision of service under this warranty is...
- Page 24 A H I G H E R L E V E L O F C O O K I N G — W W W . I N A L T O . H O U S E —...
Need help?
Do you have a question about the ASL60DR2S and is the answer not in the manual?
Questions and answers