Table of Contents
Advertisement
Advertisement
Table of Contents

Related Manuals for Juniper Mesa 3


Summary of Contents for Juniper Mesa 3
- Page 1 O W N E R ’ S M A N U A L...
- Page 2 The Bluetooth word mark is owned by the Bluetooth SIG, ® Inc. Any use of such marks by Juniper Systems, Inc. is under license. The names of other companies and products mentioned herein may be the trademarks of their respective owners.
-
Page 3: Table Of Contents
Contents Getting Started Overview The Anatomy of the Mesa 3 Perform Initial Tasks Standard Features Keypad Features LED Activity Indicators Light Sensor Connector Ports Audio Features Sensors Bluetooth Wireless Communication ® Wi-Fi Wireless Networking Power Management Ctrl-Alt-Delete Function Mesa 3 is Locked Up... - Page 4 Storage, Maintenance, and Recycling Storing the Mesa 3 and Battery Pack Protecting the Touchscreen Recycling the Mesa 3 and Batteries Warranty and Repair Information Limited Product Warranty Complete Care Service Plans Warnings, Regulatory Information, Licensing 55 Product Warnings Certifications and Standards...
-
Page 5: Getting Started
Getting Started... -
Page 6: Overview
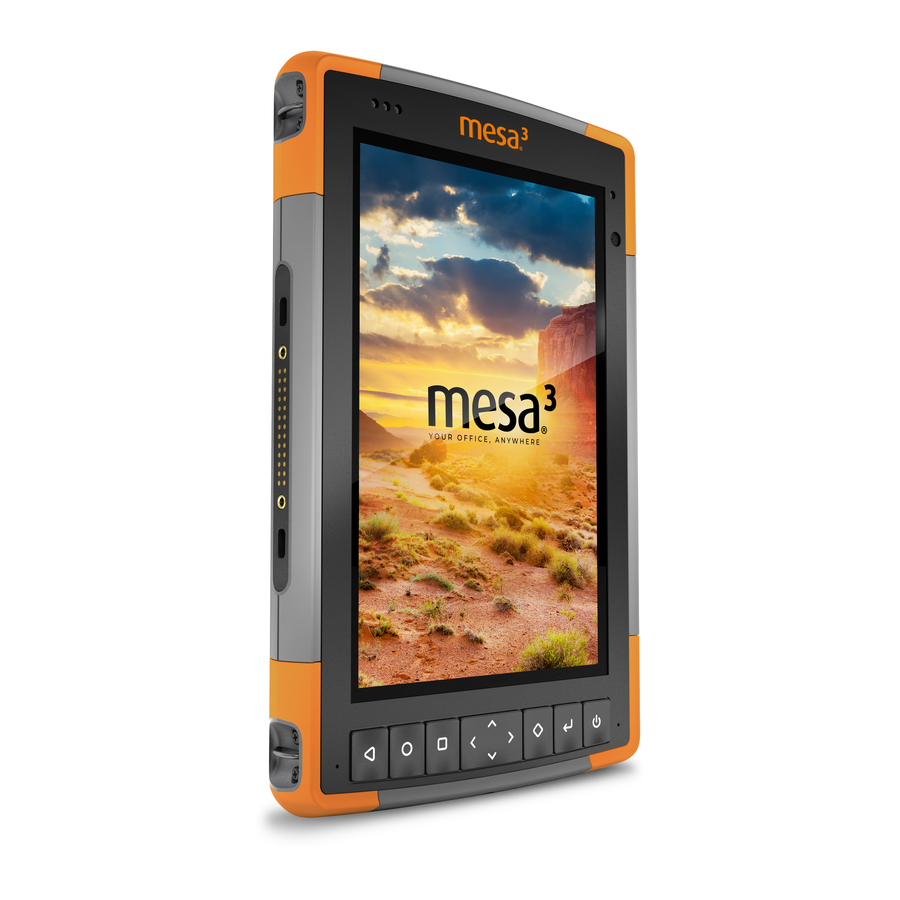
Getting Started Overview The Mesa 3 Rugged Tablet™ from Juniper Systems has the Windows 10 Pro operating system. Standard features include a 7” display, capacitive touchscreen, keypad, Bluetooth, and Wi-Fi. Standard accessories include a lithium-ion battery pack, AC wall charger, hand strap, connector port cover, fine tip capacitive stylus and tether, and foam tip stylus for use in wet conditions. - Page 7 Battery Compartment and Card Slots 4 Flexible Card Retainer 1 Battery Pack, Removable 5 Battery Compartment 2 Battery Door 6 Docking Connection 3 Micro SIM Card Slot and Micro SD/SDHC Card Slot 7 Hand Strap Attachment (underneath card retainer) Point (2 on each side) Connector Ports 8 Connector Port Protector 9 12 VDC Power Input Jack...
-
Page 8: Perform Initial Tasks
Perform Initial Tasks When you receive your Mesa 3, perform the tasks outlined in this section before first use. Review Documentation This owner’s manual and other documents like release notes are available on our website at: https://junipersys.com/ support/mesa-3/documentation. View, download, and print documents as desired, either on the Mesa 3 or another computer with an internet connection. - Page 9 5. Attach the appropriate plug for your country into the AC wall charger and plug it into a wall socket. Plug the other end into the DC power jack on the Mesa 3. Note: Use the AC wall charger that came with the Mesa 3 or another approved charger from Juniper Systems.
- Page 10 A hand strap, fine tip capacitive stylus, and tether are included with the Mesa 3. Hand Strap To attach the hand strap to the Mesa 3, follow the images below. You can attach it to the right or left side of the tablet: Stylus Tether 1.
-
Page 11: Standard Features
Standard Features... - Page 12 You can try different profiles to see which one works best. Using the Mesa 3 in Wet Conditions When using the Mesa 3 in wet conditions, you must use your finger or the soft-tipped stylus that is included on the capacitive touchscreen, even if the Wet touchscreen profile is selected.
-
Page 13: Keypad Features
If the Windows 10 screen calibration tool is used, it may degrade touchscreen performance. Keypad Features The Mesa 3 has programmable keys, a power/suspend key, windows key, enter key, and a navigation pad. The keys are sealed and have backlight illumination. -
Page 14: Led Activity Indicators
LED Activity Indicators LED activity indicators are located on the front of the Mesa 3 in the upper-left corner. Red LED, solid: 1) When the Mesa 3 is put to sleep or „ powered off by pressing the power key... -
Page 15: Light Sensor
SD Cards The Mesa 3 has a slot for a micro SD card located in the battery compartment. The card slot and flexible card holder are designed to hold the card securely in place so it will not come out or disconnect if the tablet is dropped. -
Page 16: Audio Features
To remove the SD card, pull it out. Use tape or an eraser if you have trouble. Audio Features The Mesa 3 has the following audio features: Speaker - The speaker provides audible indicators „ and program feedback. You can listen to mono audio files and watch video. -
Page 17: Sensors
Mesa 3 is being used in. 1. Open an app that uses the compass. 2. Move the Mesa 3 around in the air so that it is oriented in different directions and angles. An effective way to assure this is properly done is to move the Mesa 3 back and forth in a sideways figure 8 for approximately 30 seconds. -
Page 18: Wi-Fi Wireless Networking
3. Make Bluetooth discoverable on both devices. Bluetooth on the Mesa 3 is off by default. To activate it, open the Action Center and press and hold the Bluetooth icon. Select Go to settings. 4. In the Bluetooth settings screen, you should see a list of all Bluetooth devices within range. -
Page 19: Power Management
CAUTION: Only use the battery charger that came with your Mesa 3 tablet. The Mesa 3 requires a 30W or higher power supply with a 12V output to power the tablet and charge the batteries at the same time within the specified 4-6 hour time frame. - Page 20 3. Take out the removable battery and store it in a cool, dry location. 4. When you are ready to power on the Mesa 3, replace the battery pack. Plug in the AC wall charger and connect it to the Mesa 3 BEFORE you power it on.
-
Page 21: Ctrl-Alt-Delete Function
This can be useful for troubleshooting. Mesa 3 is Locked Up If the Mesa 3 is completely stuck and won’t respond or you cannot get to the Start menu, hold the power key down for five seconds to see if that solves it. If that doesn’t work, hold it down for 10 seconds. - Page 22 Mesa 3 Rugged Tablet Owner’s Manual...
-
Page 23: Optional Features And Accessories
Optional Features and Accessories... -
Page 24: Gps/Gnss
GNSS receiver with external antenna is not available in combination with the barcode imager or the RFID reader. GPS/GNSS Mesa 3 Geo models use an integrated GPS/GNSS receiver with an internal antenna to provide position information. Use Maps to see your location and ensure that the receiver is working. -
Page 25: Configuring The Gnss Receiver
Configuring the GNSS Receiver The u-blox u-center utility can configure the internal u-blox GPS/GNSS receiver. 1. With your Mesa 3, download and install the latest version of u-center from the u-blox website. 2. Find the COM port number for the Mesa 3. - Page 26 To change the SBAS and Rate Settings, 1. Select View > Configuration View. 2. In the left column scroll down and select your desired setting. SBAS (SBAS Settings) „ RATE (Rates) „ Mesa 3 Rugged Tablet Owner’s Manual...
- Page 27 Change the Navigation Mode Navigation mode helps to compensate for how fast the device is moving. 1. Select View > Configuration View. 2. In the column on the left, scroll down to tap on NAV5 (Navigation 5). 3. Under Navigation Modes, use the drop-down menu to change the Dynamic Model to your preferred mode.
- Page 28 Auto detect automatically determines the baud rate you need. To turn off auto detect, 1. Select Receiver > Action. 2. Uncheck Auto Detect. To manually change the baud rate, 1. Select Receiver > Baud rate. 2. Choose your preferred baud rate. Mesa 3 Rugged Tablet Owner’s Manual...
-
Page 29: Camera
1. Select View > Text Console. GPS/GNSS Accuracy The GPS/GNSS antenna in the Mesa 3 is at the top under the notification LEDs. It is intended to work in both portrait and landscape view. Do not put your hand or another object over this area. -
Page 30: 4G Lte Data Modem
4G LTE Data Modem The 4G LTE data modem is an option for the Mesa 3, adding Wireless Wide Area Network data modem capability. This modem supports all major service providers in North America, Europe, and many other regions of the world. -
Page 31: Barcode Imager
To remove the SIM card, gently pull it out with tweezers or a piece of tape. Note: If the modem was on before shutting the Mesa 3 down to insert the SIM card, you are prompted to configure the data connection when you reboot. - Page 32 This menu gives you access to several setting screens. User Settings From the menu, select User to open the User Settings screen. From this screen, set up options like Barcode Scan Time and which button to use to scan barcodes. Mesa 3 Rugged Tablet Owner’s Manual...
- Page 33 2. Open an application or document to receive the barcode data and put the cursor where you want the data to be placed. 3. The barcode imager is located on the top of the Mesa 3 when in portrait mode. Aim the barcode imager at the barcode.
- Page 34 Barcode Connector to restore the settings of the Barcode Connector program. 4. Close the Barcode Connector program. 5. Launch Barcode Connector and verify that correct functionality has been restored. Sample Barcodes 1D Barcodes Code 39 Code 128 UPC-A Mesa 3 Rugged Tablet Owner’s Manual...
- Page 35 2D Barcodes Aztec Maxicode MicroPDF417 QR Code Chapter 3 Optional Features and Accessories...
-
Page 36: Pistol Grip
The Pistol Grip is designed to reduce strain and maximize productivity in heavy barcode scanning applications. It meets MIL-STD-810G. Note: Pistol grip compatibility requires that the Mesa 3 is configured with the electrical contacts on the case back. How to Use the Pistol Grip 1. -
Page 37: Rfid Reader
From the home screen, you can do a Scan Test right away. Hold the Mesa 3 with the display facing you, and an RFID tag directly away from the back of the Mesa 3. Tap Scan on the screen. After a tag is successfully read, the Scan Data is shown on the screen. - Page 38 User Settings From the menu, select User to open the User Settings screen. From this screen, set up options like RFID Scan Time and which button to use to scan RFID tags. Mesa 3 Rugged Tablet Owner’s Manual...
- Page 39 The Mesa 3 regulatory threshold is the same as the maximum power of the RFID module so this number will always be zero.
-
Page 40: Rs-232 Port
Open a document to receive the tag data and put a cursor in the proper location. For best read performance, hold the Mesa 3 with the display facing you, and the tag directly away from the back of the Mesa 3. The RFID reader is internal and roughly 2”... - Page 41 Configure RS-232 Signals: Select Always enabled to „ have the RS-232 output signals driving and input signals enabled when the Mesa 3 is running or in sleep mode. Select Disabled during sleep to have the RS-232 output and input signals disabled automatically when the tablet is in sleep mode.
- Page 42 This can allow the RS-232 device to conserve battery power in sleep mode. If your app and/ or RS-232 device experiences communication failures when the Mesa 3 enters or exits sleep mode, then leave this option unchecked. Mesa 3 Rugged Tablet Owner’s Manual...
-
Page 43: Office Docking Station
9 Power Input Jack 7 8 9 Ports The USB ports are for attaching devices to the Mesa 3 „ such as a mouse, keyboard, or external storage device. The HDMI port is for connecting a video monitor to the „... - Page 44 5. The Mesa 3 charges more quickly if the power settings are set up to allow the Mesa 3 to enter a low power mode when it is not in use, but is plugged in. To adjust this setting, go to the Start menu, then Settings > System >...
-
Page 45: Vehicle Dock
„ Vehicle Dock The Vehicle Dock is part of a mounting system that provides the Mesa 3 with a method to be secured in a vehicle or other mobile mounting application. Note: There is a powered version and a non-powered version. - Page 46 4. Press the lock bar down until it engages the Mesa 3. 5. Push the lock button in. The Mesa 3 is now locked in the dock and cannot be accidentally removed. 6. To remove the Mesa 3, turn the key until the lock button pops out.
-
Page 47: Battery Charger
32°F (0°C) or above 122°F (50°C). Power the Battery Charger by using the AC wall charger provided with your Mesa 3. Slide the battery pack into the battery charger, orienting it so that the battery contacts meet the charging contacts in the battery charger. The red LED flashes slowly, indicating that the battery pack is charging. - Page 48 Mesa 3 Rugged Tablet Owner’s Manual...
-
Page 49: Storage, Maintenance, And Recycling
Storage, Maintenance, and Recycling... -
Page 50: Storing The Mesa 3 And Battery Pack
We recommend charging the tablet each night or weekend when it is in a sleep state. If the Mesa 3 is not charged while in a sleep state and the battery reaches a low charge, it automatically hibernates to prevent further drain on the battery. -
Page 51: Recycling The Mesa 3 And Batteries
Recycling the Mesa 3 and Batteries When the Mesa 3 and Li-Ion battery packs for your Mesa 3 reach the end of their service life, they must not be disposed of with municipal waste. - Page 52 Mesa 3 Rugged Tablet Owner’s Manual...
-
Page 53: Warranty And Repair Information
Warranty and Repair Information... -
Page 54: Limited Product Warranty
Warranty and Repair Information Limited Product Warranty Two Year Warranty Juniper Systems, Inc. (“JS”) warrants that the Mesa 3 Rugged Tablet and optional internal battery shall be free from defects in materials and workmanship, under normal intended use, for a period of 24 months from the date of... - Page 55 (vi) the defect or malfunction results from misuse or accident, (vii) the serial number on the product has been tampered with or removed, or (viii) the product has been opened or tampered with in any way (such as the tamper evident VOID label indicating certified IP [Ingress Protection] seal area has been tampered with or removed).
- Page 56 International Sale of Goods. The courts of Utah shall have exclusive personal jurisdiction in case of any disputes arising out of or in connection with this warranty. Warranty Repairs Warranty information for the Mesa 3 Rugged Tablet is located on our website at https://junipersys.com/support/ mesa-3/my-product then Warranty.
-
Page 57: Complete Care Service Plans
Services and Materials Provided Under Warranty Analysis of problem by service technician „ Labor and materials required to fix defective parts „ Functional analysis performed after repair „ Shipping costs to return device to customer „ JS strives to provide continued full repair services for our products for up to five years from the final production date of each product model. - Page 58 Repairs, Upgrades, and Evaluations CAUTION: Do not attempt to repair the Mesa 3 yourself. This action voids the warranty. Information about repairs, upgrades, and evaluations is located on our website at https://junipersys.com/support/ mesa-3/my-product then Repairs. You can locate a repair...
-
Page 59: C Warnings, Regulatory Information, Licensing
Warnings, Regulatory Information, Licensing... -
Page 60: Product Warnings
Warnings, Regulatory Information, Licensing Product Warnings Follow the warnings listed below to use the M3 (Mesa 3) and accessories safely. Battery Warnings WARNING! This device comes with a lithium-ion rechargeable battery pack. To reduce the risk of fire or burns, do not disassemble, crush, puncture, short external contacts, or expose the battery pack to fire. - Page 61 12 VDC and a minimum 1.67 A, and be certified or listed by a nationally recognized testing laboratory. The AC wall charger provided with the Mesa 3 meets these criteria. Using any other external power source can damage your product and void your warranty.
-
Page 62: Certifications And Standards
Certifications and Standards There are North American, European Union, and Australian versions of the Mesa 3, with different certifications and standards. United States In compliance with the FCC rules 47 CFR 15.19(a)(3), the statements that follow must appear on the device or in the user documentation. - Page 63 In compliance with the FCC rules, 47 CFR 15.21, the user must be notified that changes or modifications to the Rugged Tablet that are not expressly approved by the manufacturer could void the user’s authority to operate the equipment. Only approved accessories may be used with this equipment.
- Page 64 The ferrite core must be placed on the cable near the end that connects to the Mesa 3. Declaration of Conformity The Declaration of Conformity for CE Marking is available http://www.junipersys.com/doc Mesa 3 Rugged Tablet Owner’s Manual...
-
Page 65: Licensing Information
Restricted Materials Conformity The Mesa 3 conforms to the following restricted materials regulations: RoHS 2011/65/EU „ RoHS 2015/863 „ REACH 1907/2006 (33) „ REACH 1907/2006 (67) „ POP 2019/1021 „ Proposition 65 „ Canada Prohibition „ TSCA „ Licensing Information... - Page 66 MPEG LA, LLC, 6312 S. Fiddlers Green Circle, Suite 400E, Greenwood Village, Colorado 80111 U.S.A. Windows 10 is automatically updated, which is always enabled. ISP fees may apply. Additional requirements may apply over time for updates. Cortana experience may vary by device. Mesa 3 Rugged Tablet Owner’s Manual...
-
Page 67: Specifications
Specifications... - Page 68 #4-40 UNC with a maximum depth of 3/16th” (4.76 mm) Display Active viewing area: 7” (178 mm) „ WXGA 800 x 1280 pixel resolution „ Backlit LCD „ Outdoor viewable „ Portrait or landscape orientation „ Mesa 3 Rugged Tablet Owner’s Manual...
- Page 69 FEATURE SPECIFICATION Touchscreen Capacitive multi-touch interface for „ use with gloves, small tip stylus, and in wet conditions Chemically-strengthened „ Dragontrail™ High Ion-Exchange (HIE™) coverglass for impact and scratch resistance Touchscreen profile options „ Keyboard Programmable keys „ Backlit keys „...
- Page 70 CE Marking „ Industry Canada „ Australia (ACMA) „ Bluetooth SIG qualification „ IP68 waterproof and dustproof „ Designed to MIL-STD 810G „ RoHS 2 compliant „ Mesa 3 is certified on AT&T networks „ Mesa 3 Rugged Tablet Owner’s Manual...
- Page 71 FEATURE SPECIFICATION Warranties 24 months for Mesa 3 „ 90 days for accessories „ Extended service and maintenance „ plans Software Alarms & Clock „ Included Calculator „ Calendar „ Camera „ Cortana „ Device Info (config/control) „ File Explorer „...
- Page 72 FEATURE SPECIFICATION Configurations All models and features for the Mesa 3 are configured for United States/ Canada, European Union or Australia. Mesa 3 is offered in the following models: Base Model „ Geo Model - With u-blox NEO-M8N „ receiver and integrated antenna...
- Page 73 FEATURE SPECIFICATION 4G LTE Data Sierra Wireless AirPrime EM7455 or „ Modem EM7430 (region dependant) Supports micro-SIM card only. Micro- „ SIM card header inside battery compartment with card detect feature and card retainer. Does not support voice calls or SMS „...
- Page 74 - Input: 100-240 VAC, 50/60 Hz, 0.8 A - Output: 12 VDC, 2.5 A Capacitive fine tip stylus with tether „ Quick Start Guide „ Owner’s Manual (on our website) „ Two year warranty on Mesa 3 „ Mesa 3 Rugged Tablet Owner’s Manual...
- Page 75 Survey/GPS pole clamp and mount „ Pistol Grip for reading barcodes „ Holster for Pistol Grip and Mesa 3 „ Vehicle charger cable, 12 V vehicle „ power port, 6 ft. Vehicle Mounting Dock with 12 VDC „...
- Page 76 B1, B3, B5, B7, B8, B18, B19, B21, B28, B38, B39, B40, B41 UMTS/HSPA+ North America/EU/ROW B1, B2, B3, B4, B5, B8 “ Australia B1, B5, B6, B8, B9, B19 Note: ROW = Rest of World, or Non-North America Mesa 3 Rugged Tablet Owner’s Manual...
-
Page 77: Index
Index... - Page 78 Battery Pack, Removable 3–5 Battery Packs Battery Life 15 , 15 , 51 Charge 5 Install 4–5 , 15–16 Internal 2 Removable 3 Specifications 59 Status 15 Storage 40 Warnings 50 Bluetooth Wireless Communication 13–14 Mesa 3 Rugged Tablet Owner’s Manual...
- Page 79 Camera 22 Specifications 62 Care and Maintenance Cleaning 41 Storage 40 , 22 , 23 , 40 , 41 , 48 , 51 Cautions 11 Certifications and Standards 52 Canada 53 CE Marking, European Union 54 Licensing Information 54 Radio Frequency Safety 54 United States 52 Cleaning 41 Compass 13...
- Page 80 Limitation of Liability 46 Locked Up 17 Memory 58 , 59 Microphone 12 Office Docking Station 34 Operating System 58 Physical Features 58 Pistol Grip 28 Holster 28 Powering Off 16 Product Warnings 50 Mesa 3 Rugged Tablet Owner’s Manual...
- Page 81 Recycling the Mesa 2 and Batteries 41 Removable Battery Pack 3–5 Repair 48 System Information 48 Repairs, Upgrades, and Evaluations 48 RFID Reader 29 RS-232C Port 32 Screen Protector 65 SD Cards 11 Sensors Accelerometer 13 Compass Calibration 13 Gyroscope 13 Service Plans 47 Set up Tasks, Initial 4 , 23...
- Page 82 Vehicle Dock 37 , 15 , 51 Wall Charger 5 Warnings 50–51 Battery Warnings 50–51 Wall Charger Warnings 51 Warranty 44–47 Exclusions 44 Limitation of Liability 46 Remedy 45 Repairs 46 Services 47 Warranty Exclusions 44 Wi-Fi Wireless Communication 14 Connecting to a Wi-Fi Network 14 Mesa 2 Rugged Tablet Owner’s Manual...
Need help?
Do you have a question about the Mesa 3 and is the answer not in the manual?
Questions and answers