
Related Manuals for Teledyne FLIR ONE Series


Summary of Contents for Teledyne FLIR ONE Series
- Page 1 User’s manual FLIR ONE series Distributed by: Sie haben Fragen oder wünschen eine Beratung? Angebotsanfrage unter 07121 / 51 50 50 oder über info@datatec.de...
-
Page 2: Table Of Contents
Table of contents Disclaimers ..................1 Legal disclaimer ............... 1 Usage statistics ................ 1 U.S. Government Regulations............1 Copyright ................1 Quality assurance ..............1 Patents ................... 1 EULA Terms ................1 EULA Terms ................1 Notice to user ...................2 Safety information ..............2 Disposal of electronic waste ............ -
Page 3: Disclaimers
Disclaimers 1.1 Legal disclaimer 1.8 EULA Terms For warranty terms, refer to https://www.flir.com/warranty. • You have acquired a device (“INFRARED CAMERA”) that includes soft- ware licensed by FLIR Systems AB from Microsoft Licensing, GP or its affiliates (“MS”). Those installed software products of MS origin, as well 1.2 Usage statistics as associated media, printed materials, and “online”... -
Page 4: Notice To User
Notice to user 2.1 Safety information CAUTION The FLIR ONE camera is not waterproof. CAUTION Be careful if you use the camera to observe very hot objects such as fire and molten metal. 2.2 Disposal of electronic waste Electrical and electronic equipment (EEE) contains materials, components and substan- ces that may be hazardous and present a risk to human health and the environment when waste electrical and electronic equipment (WEEE) is not handled correctly. -
Page 5: Note About Authoritative Versions
Notice to user 2.5 Note about authoritative versions The authoritative version of this publication is English. In the event of divergences due to translation errors, the English text has precedence. Any late changes are first imple- mented in English. #T810375; r. AB/76566/76566; en-US... -
Page 6: Customer Help
Customer help 3.1 General Do not hesitate to contact our Customer Support Center if you experience problems or have any questions. For customer help, go to http://support.flir.com. 3.2 Submitting a question To submit a question to the customer help team, you must be a registered user. It only takes a few minutes to register online. -
Page 7: Quick Start Guide
Quick Start Guide 4.1 Procedure Follow this procedure: 1. Charge the FLIR ONE camera for approximately 1 hour. 2. Download the FLIR ONE app from your preferred app store, and then install it on your phone. 3. Push the On/off button on the bottom of the FLIR ONE camera to turn it on. It takes about 20 seconds for the camera to start. -
Page 8: Camera Parts
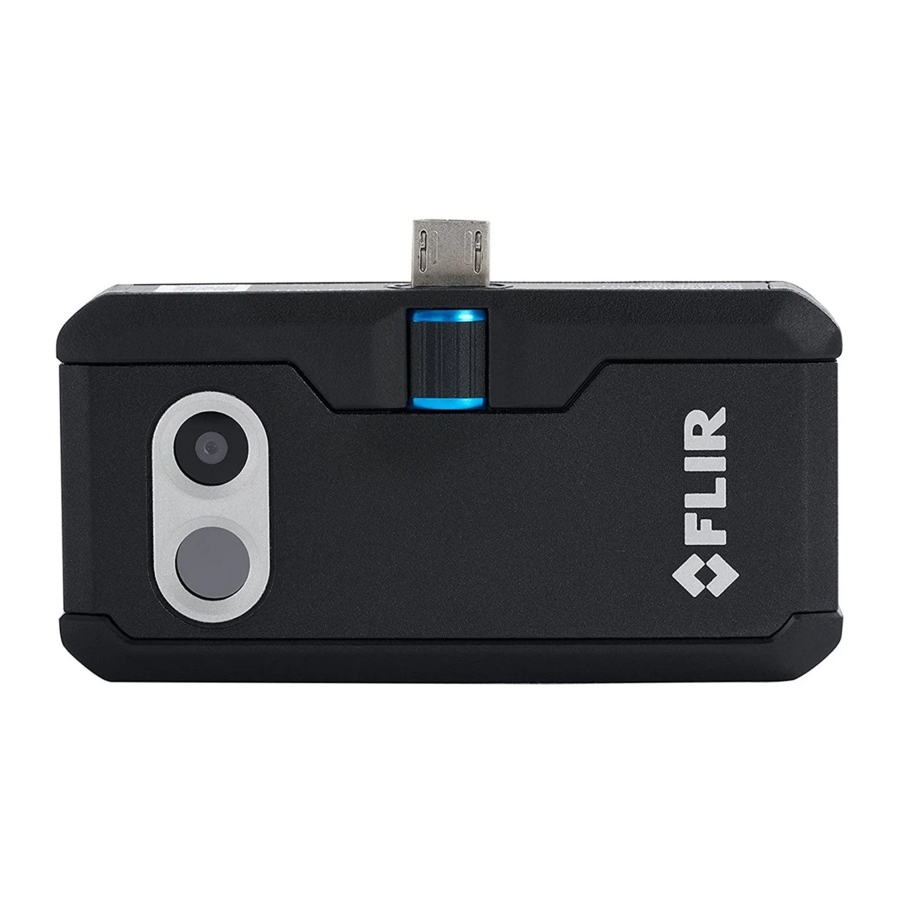
Camera parts 5.1 FLIR ONE PRO and FLIR ONE PRO LT 5.1.1 View from the front 1. Visual camera. 2. Thermal camera. 3. Phone connect. 4. Height control for the OneFit connector. 5.1.2 View from the bottom 1. On/off switch and Power indicator. 2. -
Page 9: Flir One
Camera parts 5.2 FLIR ONE 5.2.1 View from the front 1. Visual camera. 2. Thermal camera. 3. Phone connect. 4. Height control for the OneFit connector. 5.2.2 View from the bottom 1. On/off switch and Power indicator. 2. Charge indicator LED. 3. -
Page 10: Operation
Operation 6.1 Charging the battery WARNING Make sure that you install the socket-outlet near the equipment and that it is easy to get access to. Follow this procedure: • Connect a power supply to a wall outlet. • Connect the power supply to the USB-C connector power on the FLIR ONE camera. •... -
Page 11: Using The Flir One App
Operation 6.4 Using the FLIR ONE app 6.4.1 Installation The latest version of the FLIR ONE app is available on the Apple App Store for iOS devi- ces and the Google Play Store for Android devices. Download and install the app on your device. -
Page 12: Drawer Menu
Operation Images and videos can be shared to other apps, for example an e-mail app or a social media app on your mobile device. 6.4.6 Drawer menu In the drawer menu you find: • Relevant information related to the camera. •... -
Page 13: Cleaning The Camera
Cleaning the camera 7.1 Camera housing, cables, and other items Use one of these liquids: • Warm water • A weak detergent solution Equipment: • A soft cloth Follow this procedure: 1. Soak the cloth in the liquid. 2. Twist the cloth to remove excess liquid. 3. -
Page 14: Ce Declaration Of Conformity
CE Declaration of conformity [See next page] #T810375; r. AB/76566/76566; en-US... - Page 16 last page Website http://www.flir.com Customer support http://support.flir.com Copyright © 2021, FLIR Systems, Inc. All rights reserved worldwide. Disclaimer Specifications subject to change without further notice. Models and accessories subject to regional market considerations. License procedures may apply. Products described herein may be subject to US Export Regulations. Please refer to exportquestions@flir.com with any questions. Publ.
Need help?
Do you have a question about the FLIR ONE Series and is the answer not in the manual?
Questions and answers