HIKVISION DS-2TD6267-75C4L/W Quick Start Manual
Thermal bi-spectrum network positioning system
Hide thumbs
Also See for DS-2TD6267-75C4L/W:
- User manual (90 pages) ,
- User manual (124 pages) ,
- User manual (112 pages)

Subscribe to Our Youtube Channel
Related Manuals for HIKVISION DS-2TD6267-75C4L/W


Summary of Contents for HIKVISION DS-2TD6267-75C4L/W
- Page 1 DS-2TD6267-75C4L/W Thermal Bi-Spectrum Network Positioning System Quick Start Guide...
- Page 2 TO THE MAXIMUM EXTENT PERMITTED BY APPLICABLE LAW, THE PRODUCT DESCRIBED, WITH ITS HARDWARE, SOFTWARE AND FIRMWARE, IS PROVIDED “AS IS,” WITH ALL FAULTS AND ERRORS, AND HIKVISION MAKES NO WARRANTIES, EXPRESS OR IMPLIED, INCLUDING WITHOUT LIMITATION, MERCHANTABILITY, SATISFACTORY QUALITY, FITNESS FOR A PARTICULAR PURPOSE, AND NON-INFRINGEMENT OF THIRD PARTY.
- Page 3 DS-2TD6267-75C4L/W Thermal Bi-Spectrum Network Positioning System Quick Start Guide equipment generates, uses, and can radiate radio frequency energy and, if not installed and used in accordance with the instruction manual, may cause harmful interference to radio communications. Operation of this equipment in a residential area is likely to cause harmful interference in which case the user will be required to correct the interference at his own expense.
- Page 4 DS-2TD6267-75C4L/W Thermal Bi-Spectrum Network Positioning System Quick Start Guide Warnings The device should be used in compliance with local laws and electrical safety regulations. Refer to the appropriate documentation for detailed information. The input voltage should conform to IEC60950-1 standard: SELV (Safety Extra Low Voltage) and the Limited Power Source (24 VAC/12 VDC).
-
Page 5: Table Of Contents
DS-2TD6267-75C4L/W Thermal Bi-Spectrum Network Positioning System Quick Start Guide Table of Contents 1 Preparation ..............................6 2 Appearance Description ..........................7 Type I Positioning System Appearance ....................7 Type II Positioning System Appearance ....................8 Cable Descriptions ..........................9 Alarm In/Out Connections ........................10 3 Installing the Positioning System ...................... -
Page 6: Preparation
DS-2TD6267-75C4L/W Thermal Bi-Spectrum Network Positioning System Quick Start Guide 1 Preparation Basic Requirement All the electronic operation should be strictly compliance with the electrical safety regulations, fire prevention regulations, and other related regulations in your local region. Check the package contents, and make sure that the device in the package is in good condition and all the assembly parts are included. -
Page 7: Appearance Description
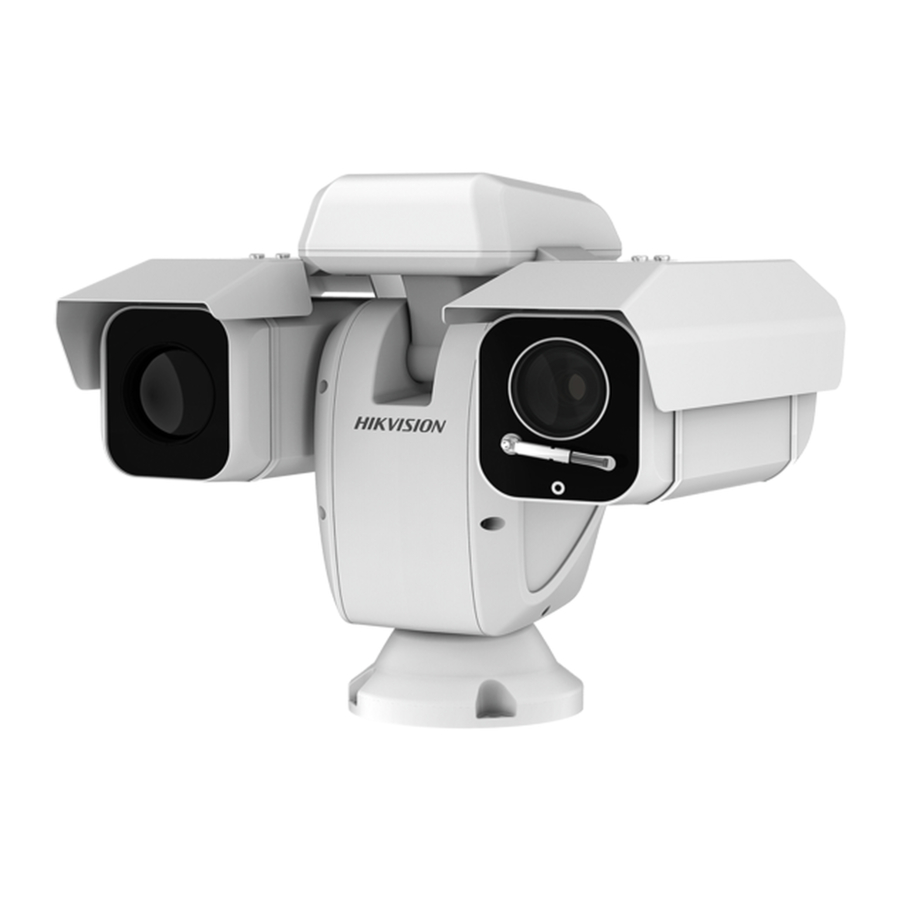
DS-2TD6267-75C4L/W Thermal Bi-Spectrum Network Positioning System Quick Start Guide 2 Appearance Description There are two kinds of thermal network positioning systems: Type I positioning system and Type II positioning system. The appearance description of two cameras are shown below. Type I Positioning System Appearance Figure 1, Type I Thermal Positioning System Overview Refer to the following figures for Type I thermal positioning system overview and dimensions. -
Page 8: Type Ii Positioning System Appearance
DS-2TD6267-75C4L/W Thermal Bi-Spectrum Network Positioning System Quick Start Guide Figure 3, Type I Thermal Positioning System Dimensions (2) Type II Positioning System Appearance Refer to the following figures for Type II thermal positioning system overview and dimensions. Figure 4, Type II Thermal Positioning System Overview... -
Page 9: Cable Descriptions
DS-2TD6267-75C4L/W Thermal Bi-Spectrum Network Positioning System Quick Start Guide Figure 5, Type II Thermal Positioning System Dimensions (1) Figure 6, Type II Thermal Positioning System Dimensions (2) Cable Descriptions The cable interfaces of positioning system are shown in the following figure. The cables of RS-485, power supply, alarm inputs, alarm outputs, etc. -
Page 10: Alarm In/Out Connections
DS-2TD6267-75C4L/W Thermal Bi-Spectrum Network Positioning System Quick Start Guide Figure 7, Cables of Other Positioning Systems Alarm In/Out Connections NOTE: This section is for positioning system with alarm in/out functions only. The positioning system can be connected to alarm inputs (0–5 VDC) and alarm outputs. See the following... -
Page 11: Installing The Positioning System
DS-2TD6267-75C4L/W Thermal Bi-Spectrum Network Positioning System Quick Start Guide 3 Installing the Positioning System Monitoring Distance Range Electric lens is adopted for the positioning system’s thermal channel. It supports auto-focus and remote focus. For different lens focal length, the monitoring range is shown in the table below:... -
Page 12: Wiring
DS-2TD6267-75C4L/W Thermal Bi-Spectrum Network Positioning System Quick Start Guide Wiring Take into consideration the installation environment and the positioning system position when you plan for the wiring. To ensure a stable power supply and signal transmission, closely follow the rules below: Become familiar with the installation environment before wiring, including wiring distance, wiring environment, keeping magnetic-field interference away, etc. - Page 13 DS-2TD6267-75C4L/W Thermal Bi-Spectrum Network Positioning System Quick Start Guide Purpose If the camera is installed outdoors, adapt the waterproof accessory for the network cable after the camera is secured on the installation surface. Figure 10, Waterproof Accessory Components Table 3-3 Components...
-
Page 14: Memory Card Installation
DS-2TD6267-75C4L/W Thermal Bi-Spectrum Network Positioning System Quick Start Guide Figure 11, Waterproof Accessory Installation Memory Card Installation Steps 1. Open the memory card cover on the right side of the positioning system with a cross screwdriver. 2. Insert the memory card into the card slot until it clicks, as shown below. - Page 15 DS-2TD6267-75C4L/W Thermal Bi-Spectrum Network Positioning System Quick Start Guide Steps 1. Drill four screw holes on the bracket according to the base dimensions of the figure below with four screws. Figure 13, Base Dimensions 2. Fix the positioning system onto the bracket base, as shown below.
-
Page 16: Finishing Installing
DS-2TD6267-75C4L/W Thermal Bi-Spectrum Network Positioning System Quick Start Guide Figure 14, Install the Positioning System 3. Connect the corresponding required cables and power on. Make sure the system functions, e.g., live view and control operations work normally. Finishing Installing NOTE: Connect the corresponding cables and turn the power on;... -
Page 17: Activation Via Web Browser
DS-2TD6267-75C4L/W Thermal Bi-Spectrum Network Positioning System Quick Start Guide 4.2.1 Activation via Web Browser Steps 1. Power on the system, and connect the system to the network. 2. Input the IP address into the Web browser address bar, and click Enter to enter the activation interface. - Page 18 DS-2TD6267-75C4L/W Thermal Bi-Spectrum Network Positioning System Quick Start Guide Steps 1. Run the SADP software to search the online devices. 2. Check the device status from the device list, and select an inactive device. Figure 17, SADP Interface 3. Create a password and input the password in the password field, and confirm the password.
-
Page 19: Modifying The Ip Address
DS-2TD6267-75C4L/W Thermal Bi-Spectrum Network Positioning System Quick Start Guide STRONG PASSWORD RECOMMENDED − We highly recommend that you create a strong password of your own choosing (using a minimum of eight characters, including at least three of the following categories: upper case letters, lower case letters, numbers, and special characters) in order to increase the security of your product. - Page 20 DS-2TD6267-75C4L/W Thermal Bi-Spectrum Network Positioning System Quick Start Guide Figure 18, Modify the IP Address 4. Input the password and click Save to activate your IP address modification. QSG DS-2TD6267-75C4L/W 041921NA...
-
Page 21: Operating Via Web Browser
DS-2TD6267-75C4L/W Thermal Bi-Spectrum Network Positioning System Quick Start Guide 5 Operating via Web browser Accessing the System System Requirement Operating System: Microsoft Windows XP SP1 and above version/Vista/Win7/Server 2003/Server 2008 • 32-bit CPU: Intel Pentium IV 3.0 GHz or higher RAM: 1 GB or higher •... -
Page 22: Live View Page
DS-2TD6267-75C4L/W Thermal Bi-Spectrum Network Positioning System Quick Start Guide Figure 20, Download Plug-in 6. Reopen the Web browser after installing the plug-in, and repeat the above steps 2–4 to log in. NOTE: For further detailed configuration instructions, refer to the network positioning system user manual. - Page 23 DS-2TD6267-75C4L/W Thermal Bi-Spectrum Network Positioning System Quick Start Guide Toolbar: Operations on the live view page, e.g., live view, capture, record, audio on/off, regional exposure, regional focus, etc. PTZ Control: Panning, tilting, focusing and zooming actions of the positioning system. The lighter, wiper, one-touch focus and lens initialization control.
-
Page 24: Appendix
DS-2TD6267-75C4L/W Thermal Bi-Spectrum Network Positioning System Quick Start Guide 6 Appendix Frequently Asked Questions (FAQ) 6.1.1 Device Running Error Question: The device fails to start up or reboots repeatedly. • The device constantly powers off unexpectedly when you pan/tilt the device or call preset. -
Page 25: Common Material Emissivity Reference
DS-2TD6267-75C4L/W Thermal Bi-Spectrum Network Positioning System Quick Start Guide Answer: Examine if the IE plug-in is well installed. Change the Website Blocker settings if necessary. • For cross-domain routing, enable the UPnP of device, or set manual mapping to port No. 80, 8000, or 554.
Need help?
Do you have a question about the DS-2TD6267-75C4L/W and is the answer not in the manual?
Questions and answers