Table of Contents
Advertisement
Advertisement
Table of Contents

Subscribe to Our Youtube Channel
Related Manuals for Ross Touch Drive


Summary of Contents for Ross Touch Drive
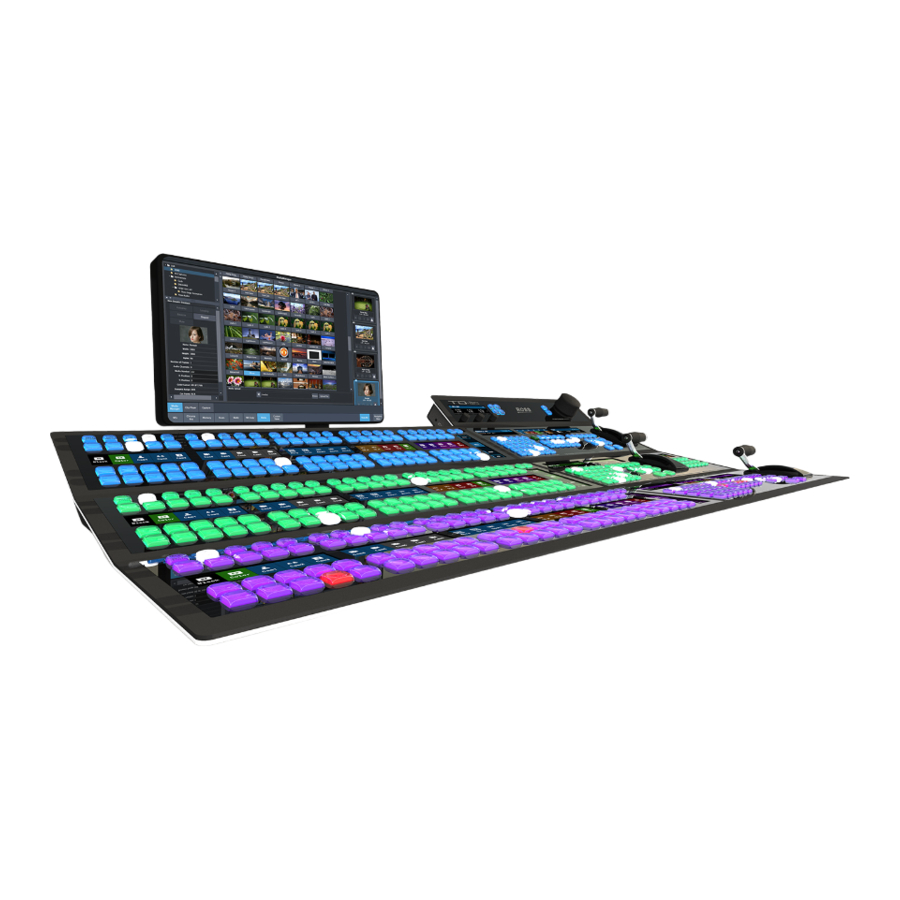
- Page 1 TouchDrive and Carbonite Black Control Panel Guide v1.0...
- Page 2 6. We will keep our promises. 7. We will treat the competition with respect. ii • Thank You For Choosing Ross — TouchDrive and Carbonite Black Control Panel Guide (v1.0)
- Page 3 The symbol with the word “ Warning ” otherwise, without the prior written permission within the equipment manual indicates a potentially of Ross Video. While every precaution has been hazardous situation which, if not avoided, could result in death or serious injury.
- Page 4 9. Do not defeat the safety purpose of the is connected to its own separate branch circuit polarized or grounding-type plug. A with an earth connection. polarized plug has two blades with one wider than the other. A grounding type plug CAUTION: These service instructions are for use has two blades and a third grounding prong.
- Page 5 If an item becomes defective within Cet appareil numérique de la classe “ A ” est the warranty period Ross will repair or replace conforme a la norme NMB-003 du Canada. the defective item, as determined solely by Ross.
- Page 6 Software upgrades for switchers may occur Use of Hazardous Substances in Electrical from time to time, and are determined by Ross and Electronic Products (China RoHS) Video. The upgrades are posted on the Ross Ross Video Limited has reviewed all components...
- Page 7 Website www.rossvideo.com Technical Support At Ross Video, we take pride in the quality of our products, but if a problem does occur, help is as close as the nearest telephone. Our 24-Hour Hot Line service ensures you have access to technical expertise around the clock.
-
Page 8: Table Of Contents
Contents Panel Setup.............30 Network Setup................30 To Connect to the TouchDrive......30 Control Panel Overview........9 To Connect to the Carbonite Black......30 TouchDrive Control Panels.............9 Date and Time (TouchDrive)..........30 1. User Buttons............9 To Set the Date and Time........30 2. Video Source Buses..........9 Touchscreen Configuration..........31 3. -
Page 9: Control Panel Overview
Control Panel Overview • MEM BNK X — assign the key bus to memory bank X. Press and hold the button to select a different memory bank. This chapter provides a basic introduction to • CC BNK X — assign the key bus to custom the control panel, including an overview of the control bank X. -
Page 10: Positioner
auto-follow functions attached to video source selections. 5. Positioner The positioner is used to position and size keys 8. Keyer Area in the DVE, control some wipe, border, and wash parameters, as well as control some external The keyer area is used to select and devices. -
Page 11: Cb9 Control Panel
MEs at the same time. On the CB1 and CB2 selects the video source that will be taken control panels there are only store and on-air with the next background transition. recall buttons for MEs 1 and 2. The Program bus is the middle row of source buttons and selects the video source that is 3. - Page 12 1. Pattern/Menu Selection Buttons — These type of transition will be performed. The buttons are used to select a pattern for a Cut and Auto Trans buttons are used to wipe transition, or to access switcher menus. perform transitions. 2. USB — The USB port on the control panel is 12.
-
Page 13: Menu Interfaces
Menu Interfaces Control Panel 3-Knob Menu System The 3-knob menu system on the control panel The interface to the control panel can be is accessed either by pressing MENU and the accessed through DashBoard, the 3-knob menu, Menu Selection button for the menu you want and the touchscreen displays. - Page 14 peripheral control menu for that specific device is shown. 14 • Menu Interfaces — TouchDrive and Carbonite Black Control Panel Guide (v1.0)
-
Page 15: Panel Operation
A row can only be assigned to an ME, MiniME ™ Canvas/MultiScreen, or chroma key. All Ross ® switcher control panels operate on the 3. Tap the mnemonic for where you want to same basic principles for assigning a row to an assign the row. -
Page 16: Video Sources
1. The color of the source buttons on the row To Select a Source on a Bus on TouchDrive indicate where the row is assigned. The buttons on each bus of the panel row are used to select the source that is mapped to that Tip: The colors are set by the color scheme that is applied button. -
Page 17: Transitions
Press the button again to continue the Tip: Double-press the SHIFT button to lock the button row transition. to the shifted bus. Press the SHIFT button again to return to the non-shifted bus. The Shift-Lock is reset when the ME •... -
Page 18: To Perform A Transition On Touchdrive (No Memory Area)
• MEDIA WIPE — perform a MediaWipe • Background — press ME RATE and use transition the keypad to enter a new rate, in frames, and press ENTER. The rate is shown on Note: The TRANS X buttons are configurable and can be the display on the Transition area. -
Page 19: To Perform A Transition On Carbonite Black
have the 3-knob display show the position setting of the pattern and use the positioner to move the pattern around. 5. Set the rate for the transition you want to perform. • Background a. On the Transition area tap Rate and use the 3-knob menu to enter the new 3. -
Page 20: To Override The Pre-Delay Setting
• Fader — move the fader from one limit Tip: You can perform a quick, or hot, cut on the to the other. The rate at which you push background bus by simply selecting a different source. the fader determines the speed of the 2. -
Page 21: To Set Up A Key On Touchdrive
in the background video, and a fill, that fills the 4. Tap the keyer button on the display to show hole with different video. more information about that keyer. Note: Refer to the documentation that came with your frame Note: The information will change depending on the type for specific information on configuring the different types of of key selected. -
Page 22: Storing Memories
Use DashBoard to set the attributes that you • ALL — press ALL to include all available want to include. resources in the memory. • ME — press and hold ME and use the Storing Memories keypad to select which ME resources are included with the memory. -
Page 23: Recalling Memories
™ 2. Select the ME, Canvas/MultiScreen, MiniME To store a memory, you must select which ME, or chroma key outputs that you want to MiniME ™ , or Canvas/MultiScreen to store the store the memory for. memory for, and then use the mnemonic buttons to select the bank and register to store 3. - Page 24 an entry for ME 1, the 3 button on the keypad glows when ME 1 is part of the inclusions. Tip: Press ATTRIB to have Live Assist jump to the Memory Recall page. 4. Select the recall mode that you want to use to recall the memory.
-
Page 25: Custom Controls
To recall a memory, you must select which ME To recall a memory, you must select which ME, to recall the memory for, and then use the MiniME ™ , Canvas/MultiScreen, or chroma key pattern buttons to select the bank and register outputs to recall the memory for, and then use to recall the memory from. -
Page 26: Editing A Custom Control
To Record a CC on TouchDrive Editing a Custom Control 1. Press CC/UP in the 3-knob menu area. After you have recorded a custom control, you can go back and edit that custom control to add or remove events. Tip: Custom controls can also be edited from the Custom Control node in DashBoard. -
Page 27: Running A Custom Control
If there isn't a dedicated user button you Tip: When editing a custom control, press RUN EVENT to can press and hold a CC BNK X button and run the currently selected event. This can help you diagnose problems in a custom control. press the button on the key bus for the cc bank. - Page 28 Function Description Function Description ME Copy Copy the content of an ME, MiniME ™ , or ME Reset TouchDrive — reset a single resource ™ Canvas/MultiScreen to another. The (ME, MiniME , Canvas/MultiScreen, entire contents of the destination are chroma key). replaced with the contents of the Press and hold the user button for source.
- Page 29 Function Description Trans Reset TouchDrive — reset the selected transition type. Press and hold the transition type button for the transition you want to reset (DISS, WIPE, DVE, MEDIA WIPE). Press Reset Trans on the row control menu. Carbonite Black — reset the selected transition type.
-
Page 30: Panel Setup
Panel Setup (Sat. 1 or Sat. 2). The panel id sets what permissions the control panel has to the resources on the frame. Network connections, date and time, and 6. Click Apply Changes. DashBoard alarms can be set up for your control panel. -
Page 31: Touchscreen Configuration
Touchscreen Configuration Bus Map The touchscreen interface on TouchDrive can The bus map assigns video sources to the source be set to show or hide the title bar at the top of buttons on the control panel. When you connect the screen. -
Page 32: Control Panel Button Inserts
Switch Assembly with a rolling or replace the default button names with those motion until they click together. of a different language. Button insert templates can be downloaded from Ross Video. 32 • Panel Setup — TouchDrive and Carbonite Black Control Panel Guide (v1.0) -
Page 33: Mnemonics
2. Click the Carbonite button for the source you want to customize the mnemonics for. Setting Description Font Size Click Small, Medium, or Large to select the size of the font used on the mnemonic display. The larger the font, the fewer characters that are visible on the mnemonic. -
Page 34: Personality
Personality You can configure the NEXT button to allow you to manually trigger GPI outputs. This allows you to use the GPI to manually roll a clip on a video Personality settings allow you to configure how server, or load the next page on a character you interact with the control panel and switcher, generator. -
Page 35: Diagnostics
User IP Settings Switcher logs can be used to identify and Force DHCP IP diagnose problems with the switcher. Use this Force Static IP (192.168.0.129) information when contacting Ross Video Technical Support. reserved reserved To Copy Logs To a USB... -
Page 36: To Factory Default The Panel
To Factory Default the Panel 1. From the tree view for the control panel, double-click Configuration > Factory Defaults 2. Click Load Factory Defaults. 36 • Diagnostics — TouchDrive and Carbonite Black Control Panel Guide (v1.0) -
Page 37: Calibration
Calibration Calibration allows you to reset the limits of the faders on the control panel and re-center the positioner. To Calibrate the Control Panel 1. Press MENU > System > NEXT > NEXT > Diagnostic Tests (Diag Tests on Carbonite Black) >... -
Page 38: Specifications
Specifications Table 2: Carbonite Black Control Panels CB1S CB2S CB3S CB3X Switcher resources, video specifications, power Power rating, and port pinouts. 2.1A 2.5A 2.9A 3.8A 5.4A 6.7A Hardware Weights Input 100 - 120V~, 220 - 240V~, 47-63Hz Voltage Hardware Weight CB1 Panel 13 lbs (5.90 kg) CB1S Panel... -
Page 39: Index
Index Numerics 3-Knob Menu 9, Auto-Follow NEXT Button Trigger Navigation Hide Title Bar Abort Transition Auto Transition 17–19 Aux Bus Source Selection Interface Bus Hold Keyboard, DashBoard Bus Map Keyer Area Buses Keying Button Inserts Key Priority Buttons TOUCH HOME TOUCH LOCK Source Selection ME Select, Personality... - Page 40 Transitions (continued) Pause ROLL CLIP 17–19 Pre-Delay Override Row Control Preview 17–19 Roll Clip Shortcuts Solo Control Panel Undo Source Button Names User Buttons 9, Storing Memories Video Inputs TOUCH HOME button Button Names TOUCH LOCK button Video Source Buses Touchscreen Configuration Video Sources Trans Preview...
Need help?
Do you have a question about the Touch Drive and is the answer not in the manual?
Questions and answers