
Related Manuals for Proline CBS23


Summary of Contents for Proline CBS23
- Page 1 CBS23 MICROWAVE MICRO-ONDES MAGNETRONOVEN MICROONDE MICROONDAS MIKROVLNNÁ TROUBA MIKROVLNNÁ RÚRA ...
-
Page 2: Table Of Contents
CONTENT WARNINGS..........................2 - 6 IMPORTANT SAFETY INSTRUCTIONS...................6 COOKING UTENSILS........................6 OTHER HELPFUL INSTRUCTIONS ..................7 OVEN OVERVIEW ........................Names of Oven Parts ......................8 Turntable ..........................8 Control Panel ........................9 MICROWAVE OVEN INSTALLATION ..................10 OPERATION ..........................11 Setting the Clock ......................11 Microwave Cooking......................11 Grilling ..........................12... -
Page 3: Warnings
WARNINGS IMPORTANT SAFETY INSTRUCTIONS READ CAREFULLY AND KEEP FOR FUTURE REFERENCE This appliance is intended for domestic household use only and should not be used for any other purpose or in any other application, such as for non domestic use or in a commercial environment. - Page 4 Only use utensils that are suitable for use in microwave ovens. When heating food in plastic or paper containers, keep an eye on the oven due to the possibility of ignition. The microwave oven is intended for heating food and beverages. Drying of food or clothing and heating of warming pads, slippers, sponges, damp cloth and similar may lead to risk of injury, ignition or fire.
- Page 5 For the Details for cleaning door seals, cavities and adjacent parts, please see section “Cleaning and Maintenance” in page 17 . The oven should be cleaned regularly and any food deposits removed. Failure to maintain the oven in a clean condition could lead to deterioration of the surface that could adversely affect the life of the appliance and possibly result in a...
- Page 6 This appliance can be used by children aged from 8 years and above and persons with reduced physical, sensory or mental capabilities or lack of experience and knowledge if they have been given supervision or instruction concerning use of the appliance in a safe way and understand the hazards involved.
- Page 7 Caution: If the device operates in combination mode, it is recommended that children use the oven only under the supervision of adults because the temperature may be high. IMPORTANT SAFETY INSTRUCTIONS When the microwave oven is switched off, please disconnect it from the supply mains, to do this you must remove the plug from the supply outlet. The plug shall be the main disconnection device and shall remain accessible at all times. The microwave oven cannot be operated with the door open due to the safety interlocks built into the door mechanism which switch off the cooking functions when the door is opened. Operating the microwave oven with the door open could result in harmful exposure to microwave energy. It is important not to tamper with the door mechanism. Do not let water or any other liquid enter the oven through the ventilation slots. Do not place any object between the oven front face and the door or allow soil or cleaner residue to accumulate on sealing surfaces. ...
-
Page 8: Cooking Utensils
COOKING UTENSILS Utensils should be checked to ensure that they are suitable for use in the microwave oven. Materials you can use in microwave oven Utensils Remarks Aluminium foil Shielding only. Small smooth pieces can be used to cover thin parts of meat or poultry to prevent overcooking. Arcing can occur if foil is too close to oven walls. The foil should be at least 2.5cm away from oven walls. Browning dish Follow manufacturer’s instructions. The bottom of browning dish must be at least 5mm above the turntable. Incorrect usage may cause the turntable to break. Dinnerware Microwave‐safe only. Follow manufacturer’s instructions. Do not use cracked or chipped dishes. Glass jars Always remove lid. Use only to heat food until it’s warm. Most glass jars are not heat resistant and may break. Glassware Heat‐resistant oven glassware only. Make sure there is no metallic trim. Do not use cracked or chipped dishes. Oven cooking Follow manufacturer’s instructions. Do not close with metal tie. bags Make slits to allow steam to escape. Paper plates Use for short‐term cooking/warming only. Do not leave oven and cups unattended while cooking. ... -
Page 9: Other Helpful Instructions
Materials to be avoided in microwave oven Utensils Remarks Aluminium tray May cause arcing. Transfer food into microwave‐safe dish. Food carton with May cause arcing. Transfer food into microwave‐safe dish. metal handle Metal or metal‐ Metal shields the food from microwave energy. Metal trim trimmed utensils may cause arcing. Metal twist ties May cause arcing and could cause a fire in the oven. Paper bags May cause a fire in the oven. Plastic foam Plastic foam may melt or contaminate the liquid inside when exposed to high temperature. Wood Wood will dry out when used in the microwave oven and may split or crack. NOTES: Care should be taken when removing utensils or the glass turntable, as they may become hot during cooking. Only use a thermometer that is designed for use in the microwave oven. Ensure the turntable is in place when you operate the oven. OTHER HELPFUL INSTRUCTIONS For best results and more enjoyable cooking, please read these comments thoroughly. For Best Results: 1. When determining the time for a particular food, begin by using minimum time and checking condition occasionally. It is easy to overcook food because microwaves cook very quickly. 2. Small quantities of food or foods with low water content may dry out and become hard if cooked too long. ... -
Page 10: Oven Overview
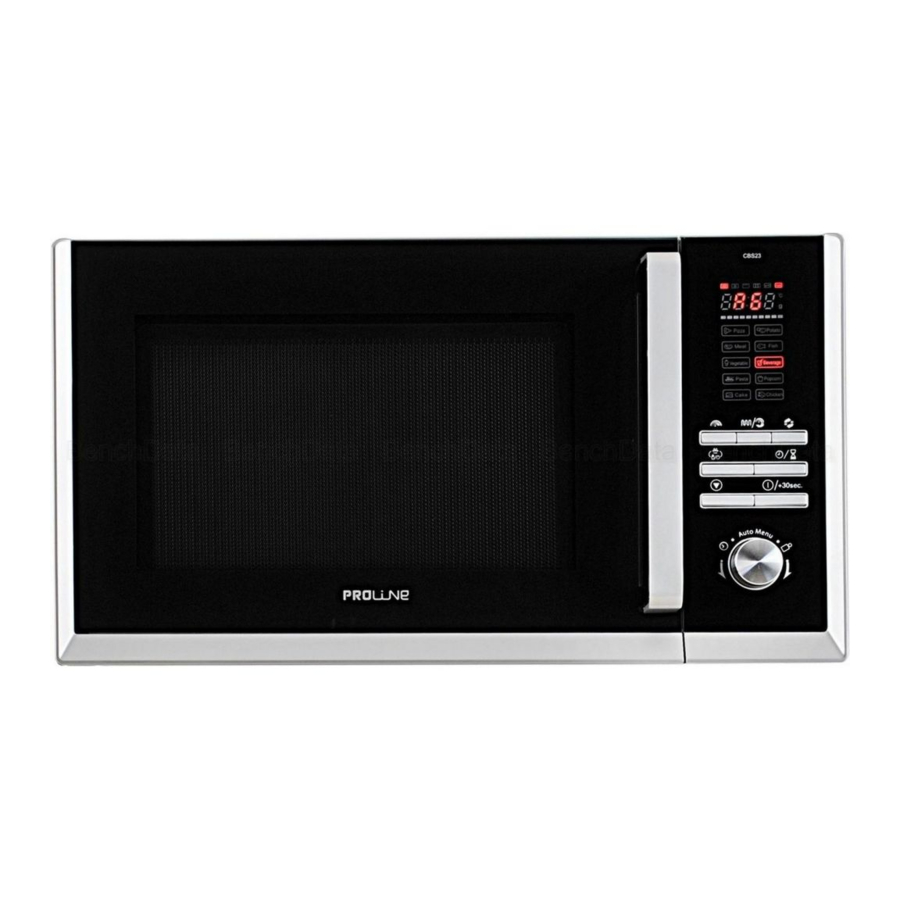
Browning: There are a few foods which are not cooked long enough in the microwave oven to brown and may need additional cooking. Coatings such as paprika and browning agents such as Worcestershire sauce may be used on chops, meat patties or chicken pieces. Roasts, poultry or ham, cooked for 10‐15 minutes or longer, will brown without extra additives. OVEN OVERVIEW Names of Oven Parts A. Control panel B. Shaft C. Turntable ring D. Glass tray E. Oven window F. Door assembly G. Door safety lock system H. Grill rack Turntable ... -
Page 11: Control Panel
Control Panel Microwave cooking Press to set microwave power level. Grill/Combi. Repeatedly press to select a grill cooking or one combination cooking program. Convection cooking Press to set convection cooking. Weight/ Time defrost Press to defrost food by weight or time. Clock/Kitchen timer Press to set clock time or kitchen timer. Stop/Clear • Press once to temporarily stop cooking, or twice to cancel cooking. • It is also used for setting child lock. ... -
Page 12: Microwave Oven Installation
MICROWAVE OVEN INSTALLATION Remove all packing material and Cabinet: Remove any protective film accessories. Examine the oven for any found on the microwave oven cabinet damage such as dents or broken door. surface. Do not install if the oven is damaged. Do not remove the light brown Mica cover that is attached to the inside of the oven cavity to protect the magnetron. 1. Select a level surface that provides (6) Place the oven as far away from enough open space for the intake radios and TV as possible. and/or outlet vents. Operation of microwave oven may cause interference to your 30cm radio or TV reception. -
Page 13: Operation
OPERATION When the oven is plugged in, the display will show “0:00” and a beep sound will be heard. Setting the Clock 1. In standby state, press to set the clock in 24‐hour cycle. The hour digits will flash. 2. Turn until the correct hour is displayed. 3. Press to confirm. minute digits will flash. ... -
Page 14: Grilling
Grilling The longest cooking time is 95 minutes (95:00). Grill cooking is particularly useful for thin slices of meat, steaks, chops, kebabs, sausages and pieces of chicken. It is also suitable for hot sandwiches and au gratin dishes. 1. Press once and “G‐1” will be shown on the display. 2. Press to confirm. 3. Turn to adjust the grill time. 4. Press to start cooking. NOTE: If half the grill time passes, the oven beeps twice, and this is normal. In order to have a better effect of grilling food, you should turn the food over, close the oven door then press to continue cooking. If no operation is performed, it will continue working. Combination Cooking The longest cooking time is 95 minutes (95:00). This feature allows you to combine grill, microwave and convection cooking on four different settings. 1. Press ... -
Page 15: Convection Cooking
Convection Cooking The convection cooking can let you cook the food as a traditional oven. Microwave is not used. It is recommended that you should preheat the oven to the appropriate temperature before placing the food in the oven. During convection cooking, hot air is circulated throughout the oven cavity to brown and make crisp foods quickly and evenly. This oven can be programmed for ten different cooking temperatures (100℃~190℃). 1. Press once, “100” will flash on the display. 2. Press repeatedly or turn to select the desired temperature. 3. Press to confirm. 4. Press to start preheating. When the oven temperature is reached the buzzer will sound twice to remind you to put food into the oven. 5. -
Page 16: Auto Menu
Auto Menu For the food in the following table, it is not necessary to program the cooking power and time. Take the following steps: 1. In standby state, turn clockwise to select the desired menu code from the table below. 2. Press to confirm. 3. Turn to select the food weight. 4. Press to start cooking. Menu Weight(g) Power A1 300 100% Microwave/ Pizza 400 100% Grill 230 A2 460 100% Microwave ... -
Page 17: Speed Cooking
NOTE: When you choose A9 cake, do not put the cake into the oven before the oven is preheated to 160℃. The buzzer will sound to remind you of putting the cake into the oven. Press to start cooking. Speed Cooking In standby state, press to cook with 100% power level for 30 seconds. Each press of the button will increase the cooking time by 30 seconds. The longest cooking time is 95 minutes. During microwave, grill, convection and combination cooking, each press of will increase the cooking time by 30 seconds. NOTE: In auto menu and weight defrost mode, cooking time cannot be increased by pressing the button. Child Lock The child lock prevents unsupervised operation by children. To set the child lock, press for 3 seconds, then a long beep will sound and “ ” will be shown on the display. In the lock state, all buttons are disabled. To cancel the child lock, press ... -
Page 18: Cleaning And Maintenance
CLEANING AND MAINTENANCE Disconnect the electrical supply to the oven before cleaning. General Advice Frequent cleaning prevents smoke and bad odours during cooking and also sparking in the oven cavity and around the door seal. Do not let food deposits or grease accumulate inside the oven cavity or on the door seal. If your microwave oven is fitted with a waveguide cover (usually located inside the oven cavity on the right side wall) it must be kept clean at all times, should food deposits or grease be allowed to accumulate on the cover, sparking will occur and may damage your oven invalidating the warranty. Before any maintenance or cleaning, disconnect the oven from the mains supply and wait for it to cool to room temperature. Oven Door Remove any food deposits and grease between the door seal and oven cavity using a damp cloth, it is important to keep this area clean at all times. Do not use harsh abrasive cleaners or sharp metal scrapers to clean the oven door glass since they can scratch the surface, which may result in shattering of the glass. Interior Walls Remove any grease splashes from the oven cavity walls with soap and water, then rinse and dry. The door seal and oven cavity have to be particularly well cleaned to ensure the door will close properly and to avoid sparking between the oven cavity and door assembly. Do not use abrasive products such as scouring pads which will damage the surfaces of the oven cavity and door. Only warm soapy water must be used to clean stainless steels surfaces. Outer Surfaces ... -
Page 19: Specifications
Cleaning surfaces that come into contact with food For hygiene safety the glass tray should be cleaned regularly as the item may come into contact with food. The item should be cleaned with warm soapy water and dried thoroughly. If the inside of the oven cavity and door seal are not kept perfectly clean there is a danger of damage due to sparking inside the oven cavity invalidating the warranty. Never scrape the oven cavity walls with sharp objects. SPECIFICATIONS Rated voltage and frequency: 230V~ 50Hz Rated input (microwave): 1300W Rated input (grill/convection): 1200W Microwave frequency: 2450MHz ... -
Page 20: Troubleshooting
TROUBLESHOOTING Normal Phenomena Microwave oven interfering TV Radio and TV reception may be affected when reception the microwave oven is operating. It is similar to the interference of small electrical appliances, like mixer, vacuum cleaner and electric fan. It is normal. Dim oven light During low power microwave cooking, the oven light may become dim. It is normal. Steam accumulating on door, During cooking, steam may come out of food. hot air out of vents Most of steam will escape from the vents. But some of them may accumulate on positions like the oven door. It is normal. Oven operation accidentally It is forbidden to operate the appliance with no food in. without any food inside. It is very DANGEROUS. Problem Possible Cause Solution Power cord not plugged in Unplug the appliance tightly. then plug it in again after Oven cannot be 10 seconds. operated. There is something wrong Test the mains socket by with the mains socket. plugging another ... - Page 21 TABLE DES MATIÈRES AVERTISSEMENTS........................2-6 CONSIGNES DE SÉCURITÉ IMPORTANTES .................7 UTENSILES DE CUISSON ......................8 INSTRUCTIONS UTILES COMPLÉMENTAIRES ..............9 DESCRIPTION DU FOUR......................10 Dénomination des pièces du four .................10 Plateau tournant ......................10 Panneau de contrôle .......................11 INSTALLATION DU FOUR À MICRO-ONDES ...............12 UTILISATION ...........................13 Régler l’horloge .......................13 Cuisson aux micro-ondes ....................13...
-
Page 22: Avertissements
AVERTISSEMENTS INSTRUCTIONS DE SÉCURITÉ IMPORTANTES LIRE AVEC ATTENTION ET GARDER POUR DE FUTURES UTILISATIONS Cet appareil est destiné à un usage domestique uniquement. Toute utilisation autre que celle prévue pour cet appareil, ou pour une autre application que celle prévue, par exemple une application commerciale, est interdite. - Page 23 MISE EN GARDE: Les liquides et autres aliments ne doivent pas être chauffés dans des contenants fermés hermétiquement car ils risquent d’exploser. N’utiliser que des ustensiles appropriés à l’usage dans les fours micro ondes. Pendant le chauffage de denrées alimentaires dans des contenants en plastique ou en papier, garder un oeil sur le four en raison de la possibilité...
- Page 24 Le contenu des biberons et des pots d’aliments pour bébé doit être remué ou agité et la température doit en être vérifiée avant consommation, de façon à éviter les brûlures. Il n’est pas recommandé de chauffer les oeufs dans leur coquille et les oeufs durs entiers dans un four micro ondes car ils risquent d’exploser, même après la fin de cuisson.
- Page 25 Appareil de groupe 2 Classe B Cet appareil est un appareil de Groupe 2 car il produit intentionnellement de l' énergie à fréquence radioélectrique pour le traitement de la matière et il est destiné à être utilise dans un local domestique ou un établissement raccordé...
- Page 26 Cet appareil n’est pas destiné à être mis en fonctionnement au moyen d'une minuterie extérieure ou par un système de commande à distance séparé. Les surfaces sont susceptibles de devenir chaudes au cours de l'utilisation. La température des surfaces accessibles peut être élevée lorsque l'appareil est en fonctionnement.
-
Page 27: Consignes De Sécurité Importantes
CONSIGNES DE SÉCURITÉ IMPORTANTES Quand le four à micro‐ondes est éteint, débranchez‐le de l’alimentation électrique en sortant sa fiche de la prise électrique. La fiche de l'appareil fait office de coupe‐circuit principal de l'appareil et doit donc rester accessible en permanence. Le mécanisme de la porte du four à micro‐ondes comporte des verrous de sécurité qui stoppent la cuisson lorsque la porte n’est pas correctement fermée. Le four à micro‐ondes ne peut donc pas cuire si sa porte est ouverte. Le fonctionnement du four à micro‐ondes porte ouverte pourrait en effet provoquer l’exposition dangereuse à l’énergie des micro‐ondes. Il est important de ne pas modifier le mécanisme de verrouillage de la porte. Veillez à ce qu’aucun liquide, eau ou autre, ne pénètre à l’intérieur du four par ses ouïes de ventilation. Ne placez pas d’objet entre la face avant du four et sa porte. Veillez à ce que les salissures et les résidus de produit de nettoyage ne s’accumulent pas sur les surfaces d’étanchéité. Évitez d’utiliser des récipients dont les bords sont verticaux et comportent un goulot étroit. Mélangez les liquides au milieu de leur durée de cuisson, puis remettez‐les dans le four à micro‐ondes pour effectuer la deuxième moitié de la cuisson. Une fois la cuisson terminée, vous devez impérativement les laisser reposer, les mélanger ou les secouez, et vérifiez prudemment leur température avant de les consommer. N’utilisez pas de nettoyant abrasif agressif, ni de tampon à récurer métallique agressif pour nettoyer le verre de la porte du four, car ceux‐ci risquent de rayer sa surface et le verre risque de se briser. N’utilisez pas de nettoyeur vapeur. ... -
Page 28: Utensiles De Cuisson
USTENSILES DE CUISSON Il est nécessaire de s’assurer que les ustensiles conviennent à une utilisation dans un four à micro‐ondes. Matériaux que vous pouvez utiliser dans un four à micro ‐ ondes Ustensiles Remarques Feuille Uniquement pour protéger. De petits morceaux peuvent être d’aluminium utilisés pour recouvrir de petites pièces de viandes ou de volaille afin d’éviter qu’elles ne cuisent trop. Des étincelles peuvent se produire si l’aluminium est trop proche des parois. L’aluminium doit être éloigné de 2,5 cm au minimum des parois internes du four. Plat à gratin Respectez les instructions du fabricant. Le fond du plat doit se trouver à 5 mm au minimum au‐dessus du plateau rotatif. Une utilisation incorrecte peut provoquer la casse du plateau rotatif. ... -
Page 29: Instructions Utiles Complémentaires
Matériaux que vous ne devez pas utiliser dans un four à micro‐ondes Ustensiles Remarques Plateau en Risque de provoquer des étincelles. Mettez les aliments dans aluminium un récipient utilisable dans un four à micro‐ondes. Carton alimentaire Risque de provoquer des étincelles. Mettez les aliments dans avec poignée un récipient utilisable dans un four à micro‐ondes. métallique Récipients Le métal bloque l’énergie des micro‐ondes en sorte que les comportant des aliments ne peuvent pas cuire. Le métal risque de provoquer décorations des étincelles. métalliques Attaches avec fil Peuvent provoquer des étincelles et un feu dans le four. métallique Sachets en papier Peuvent provoquer un feu dans le four. Mousse en Les mousses en plastique peuvent fondre ou contaminer les plastique liquides présents dans le four si elles sont exposées à des températures élevées. Bois Le bois sèche quand il est utilisé dans un four à micro‐ondes et peut se fissurer ou se fendre. REMARQUES : Faites attention lorsque vous sortez un plat ou le plateau rotatif en verre du four, car ils peuvent être devenus brûlants pendant la cuisson. ... -
Page 30: Description Du Four
REMARQUE : L’air sortant des ouïes de ventilation peut devenir chaud pendant la cuisson. Brunissement : Certains aliments ne brunissent pas suffisamment quand ils sont cuits dans un four à micro‐ondes et peuvent nécessiter des opérations supplémentaires. Des enrobages, par exemple de paprika, et des agents de brunissement, par exemple de la sauce Worcestershire, peuvent être utilisés sur les côtelettes, les steaks de ... - Page 31 Panneau de Contrôle Cuisson aux micro-ondes Régler la puissance des micro‐ondes. Grill/Combi. Appuyer plusieurs fois pour sélectionner la cuisson au grill ou l’une des cuissons combinées. Cuisson à convection Programmer la cuisson à convection. Décongélation au poids/à la durée Décongeler des aliments en fonction de leur poids ou d’une durée. Horloge/Minuteur Régler l’horloge ou le minuteur. Stop/Annuler • Appuyez une fois pour arrêter momentanément la cuisson. Appuyez deux fois pour annuler la cuisson. •...
- Page 32 NSTALLATION DU FOUR Retirez tous les accessoires et éléments d’emballage. Inspectez le four pour Compartiment intérieur : Retirez tous vérifier qu'il n'est pas endommagé, par les films de protection présents sur les exemple que sa porte n'est pas cassée surfaces du compartiment intérieur du et qu'il n’est pas cabossé. N’installez pas four à micro‐ondes. l’appareil s’il est endommagé. Ne retirez pas la plaque Mica marron claire fixée à l’intérieur du four, car elle sert à protéger le magnétron. 1. Sélectionnez une surface (6) Veillez à ce que le four à micro- horizontale offrant un espace ouvert ...
-
Page 33: Utilisation
UTILISATION Branchez le four, un bip retentit et son écran affiche « 0:00 ». Régler l'horloge 1. Quand l’appareil est en veille, appuyez sur pour régler l’horloge (affichage sur 24 h).Les chiffres des heures se mettent à clignoter. 2. Tournez pour régler les chiffres des heures. 3. Appuyez sur pour confirmer. Les chiffres des minutes se mettent à clignoter. 4. Tournez pour régler les chiffres des minutes. 5. Appuyez sur pour confirmer le réglage. Les deux points « : » se mettent à clignoter. REMARQUE : Si l'horloge n’est pas réglée, le four ne fonctionne pas quand il est mis en marche. Vous pouvez vérifier l’heure pendant la cuisson en appuyant sur . ... -
Page 34: Cuisson Au Grill
Cuisson au grill La durée de cuisson maximale est de 95 minutes (95:00). La cuisson au grill est très utile pour cuire des tranches de viande, des steaks, de la viande hachée, des kebabs, des saucisses ou des morceaux de poulet. Elle convient également pour préparer des sandwichs chauds ou des gratins. 1. Appuyez une fois sur , « G‐1 » s’affiche. 2. Appuyez sur pour confirmer. 3. Tournez pour régler la durée de cuisson au grill. 4. Appuyer sur pour démarrer la cuisson. REMARQUE : Quand la moitié de la durée de cuisson au grill s'est écoulée, le four sonne deux fois. Ceci est normal. Afin d’obtenir une cuisson optimale avec la fonction grill, retournez les aliments à ce moment‐là, puis refermez la porte et appuyez sur pour continuer la cuisson. Si vous n’effectuez pas cette opération, la cuisson continue. Cuisson combinée La durée de cuisson maximale est de 95 minutes (95:00). Ce mode vous permet de combiner les cuissons aux micro‐ondes, au grill et à convection selon quatre programmes prédéfinis. 1. Appuyez une fois sur , « G‐1 » s’affiche. ... -
Page 35: Cuisson À Convection
Cuisson à convection La cuisson à convection vous permet de cuire des aliments comme dans un four traditionnel, sans utilisation des micro‐ondes. Il est recommandé de préchauffer le four à une température appropriée avant de mettre les aliments à l’intérieur du four. Pendant la cuisson avec convection, de l’air chaud circule à l’intérieur de la cavité du four pour dorer les aliments et les rendre croustillants rapidement et uniformément. Ce four peut être programmé sur 10 températures de cuisson différentes (110°C ~ ... -
Page 36: Menu Auto
Menu auto Pour les aliments énumérés dans le tableau ci‐dessous, il n’est pas nécessaire de programmer la durée et la puissance de la cuisson. Procédez comme suit : 1. Dans le mode veille, sélectionnez le code d’un menu (voir le tableau ci‐dessous) en tournant le bouton dans le sens des aiguilles d’une montre. 2. Appuyez sur pour confirmer. 3. Tournez pour sélectionner un poids d’aliments. 4. Appuyer sur pour démarrer la cuisson. Menu Poids (g) Puissance A1 300 100% Micro‐ondes/ Pizza 100% Grill 400 230 A2 Pommes 460 100% Micro‐ondes de terre 690 200 ... -
Page 37: Cuisson Express
REMARQUE : Quand vous sélectionnez « A9 ‐ Gâteau », ne mettez pas le gâteau dans le four tant que celui‐ci n'a pas atteint la température de 160 (préchauffage). La sonnerie retentit pour vous indiquer de mettre le gâteau dans le four. Appuyer sur pour démarrer la cuisson. Cuisson Express Dans le mode veille, appuyez sur pour démarrer une cuisson de 30 secondes à une puissance de 100%. Chaque pression sur cette touche prolongera le temps de cuisson de 30 secondes. La durée de cuisson maximale est de 95 minutes. Pendant la cuisson au grill, aux micro‐ondes, à convection ou combinée, chaque pression sur la touche allonger la durée de cuisson de 30 secondes. REMARQUE : Dans les modes menu auto et décongélation au poids, cette touche ne permet pas d’allonger la durée de fonctionnement. Verrou enfant Le verrou enfant permet d’éviter qu’un enfant non surveillé ne mette le four en marche. ... - Page 38 ENTRETIEN ET NETTOYAGE Débranchez le four de l’alimentation électrique avant de le nettoyer. Conseils généraux Nettoyer fréquemment le four permet d’éviter la formation de fumées et de mauvaises odeurs pendant la cuisson et d’étincelles dans la cavité du four et sur le pourtour du joint de la porte. Veillez à ce qu’il n’y ait pas d’accumulation de dépôts alimentaires ou de graisses dans la cavité du four et sur le joint de porte. Si votre four à micro‐ondes est pourvu d’un capot de guide d’ondes (généralement situé dans la cavité du four sur la paroi latérale droite), veillez à ce qu’il soit toujours propre. Si des dépôts alimentaires et gras s’accumulent sur le capot, cela provoquera des étincelles risquant d’endommager votre four et d’annuler la garantie. Avant toute opération d’entretien ou de nettoyage sur le four, débranchez‐le de la prise secteur et attendez qu’il refroidisse jusqu’à la température ambiante. Porte du four Éliminez tous les dépôts alimentaires et les graisses présents entre le joint de porte et la cavité du four avec un chiffon humide. Il est très important de veiller à ce que cette zone soit toujours propre. N’utilisez pas de nettoyant abrasif agressif, ni de tampon à récurer métallique agressif pour nettoyer le verre de la porte du four, car ceux‐ci risquent de rayer sa surface et le verre risque de se briser. Parois intérieures Éliminez toutes les projections de graisses des parois intérieures du four avec de l'eau et du savon, puis rincez‐les et séchez‐les. Veillez particulièrement à maintenir propres le joint de porte et la cavité du four pour garantir que la porte se ferme complètement et évitez qu'il n’y ait des projections hors de la cavité du four par la porte. N’utilisez pas de matériau abrasif, par exemple un tampon à récurer, car il risque d’endommager les surfaces internes du four et de la porte. ...
-
Page 39: Spécifications Techniques
ATTENTION : Certains capots de guide d’ondes peuvent être facilement endommagés, faites particulièrement attention à ne pas les détériorer. Ne lavez aucun accessoire dans un lave‐vaisselle. Nettoyage des surfaces en contact avec les aliments Pour des raisons d’hygiène, le plateau en verre doit être nettoyé régulièrement, car il peut entrer en contact avec les aliments. Nettoyez‐le à l’eau chaude savonneuse, puis séchez‐le soigneusement. Si l’intérieur de la cavité interne du four et le joint de porte ne sont pas maintenus parfaitement propres, le four risque d’être endommagé par des étincelles se produisant dans sa cavité interne. Ce type de détériorations annule la garantie. Ne grattez jamais les parois internes du four avec un objet coupant. SPÉCIFICATIONS TECHNIQUES Tension et fréquence nominales : 230V~ 50 Hz Puissance d’entrée nominale (micro‐ondes) : 1300 W Puissance d’entrée nominale (grill/micro‐ondes) : 1200 W Fréquence des micro‐ondes : 2450 MHz ... -
Page 40: Dépannage
DÉPANNAGE Phénomènes normaux Le four à micro‐ondes créé des Quand le four à micro‐ondes est en interférences qui perturbent la fonctionnement, cela peut perturber la réception de votre téléviseur. réception de vos radios et téléviseurs. C'est un phénomène que l'on retrouve avec d'autres petits appareils électroménagers, par exemple les mixeurs, les aspirateurs et les ventilateurs. C’est normal. L’intensité de l’éclairage Pendant la cuisson aux micro‐ondes à faible intérieur du four est faible. puissance, la lumière interne peut devenir faible. C’est normal. De la buée s’accumule sur la Pendant la cuisson, les aliments peuvent paroi interne de la porte et de produire de la vapeur. La plus grande partie de l’air chaud sort par les ouïes de la vapeur s’échappe par les ouïes de ventilation. ventilation du four. Néanmoins de la vapeur peut s’accumuler dans certains endroits, par exemple la porte du four. C’est normal. Le four est mis en marche Il est interdit de faire fonctionner l'appareil accidentellement alors qu'il ne quand il ne contient pas d'aliment. C’est très contient pas d'aliment. DANGEREUX. Problème Cause possible Solution Son cordon d’alimentation Débranchez l’appareil, n’est pas correctement puis rebranchez‐le après ... - Page 41 INHOUD WAARSCHUWINGEN ......................2- 6 BELANGRIJKE VEILIGHEIDSVOORSCHRIFTEN..............6 KEUKENGEREI .......................... ANDERE NUTTIGE AANWIJZINGEN..................8 OVERZICHT VAN DE OVEN ......................9 Beschrijving van de ovenonderdelen ................9 Draaiplateau........................9 Bedieningspaneel......................10 INSTALLATIE VAN DE MAGNETRONOVEN................11 WERKING ..........................12 De klok instellen .......................12 Met de magnetronoven koken ..................12 Grillen ..........................13 Combinatiekoken ......................13 Convectiekoken........................14...
-
Page 42: Waarschuwingen
WAARSCHUWINGEN BELANGRIJKE VEILIGHEIDSVOORSCHRIFTEN LEES ZORGVULDIG EN BEWAAR VOOR LATERE RAADPLEGING Dit apparaat is uitsluitend bestemd voor huishoudelijk gebruik en mag niet worden gebruikt voor andere doeleinden, zoals voor niet huishoudelijk gebruik of in een commerciële omgeving. Vermijd risico's als het snoer beschadigd is, laat het vervangen door de fabrikant, een erkende reparatiedienst of een gelijkaardig... - Page 43 Gebruik alleen keukengerei dat geschikt is voor gebruik in de magnetron. Als u voedingsmiddelen in plastic of papieren dozen verhit, houd de oven in het oog vanwege brandgevaar. De magnetronoven is bedoeld voor het opwarmen van voedsel en drank. Het drogen van voedsel of het opwarmen van een warmtekussen, pantoffels, spons, vochtige doek en gelijksoortige voorwerpen kan risico op letsel,...
- Page 44 Het niet goed onderhouden van de oven kan een beschadiging van het oppervlak veroorzaken wat de levensduur van het apparaat aantast en mogelijk tot een gevaarlijke situatie kan leiden. De magnetronoven mag alleen in een vrijstaande positie worden gebruikt. Plaats het apparaat niet in een kast. Verwijs naar het hoofdstuk “Reinigen en onderhoud”...
- Page 45 Dit apparaat mag worden gebruikt door kinderen vanaf 8 jaar en personen met een verzwakt lichamelijk, zintuiglijk of verstandelijk vermogen of een gebrek aan ervaring en kennis, op voorwaarde dat zij onder toezicht staan, instructies hebben ontvangen betreffende het veilige gebruik van dit apparaat en de mogelijke gevaren van het gebruik ervan begrijpen.
- Page 46 Voorzichtig: als de oven in de combinatiemodus wordt gebruikt is het aanbevolen om kinderen de oven alleen onder toezicht van een volwassene te laten gebruiken want de temperatuur kan hoog oplopen. BELANGRIJKE VEILIGHEIDSVOORSCHRIFTEN De magnetron uitschakelen betekent niet dat het apparaat van de voeding is losgekoppeld. Om het apparaat van de voeding los te koppelen, haalt u de stekker uit het stopcontact. De stekker wordt gebruikt om het apparaat van de stroom los te koppelen en deze moet steeds makkelijk bereikbaar zijn. De magnetron kan niet worden gebruikt met een open deur doordat de veiligheidsvergendeling in het deurmechanisme de kookfuncties uitschakelt wanneer de deur open is. De magnetron met een open deur gebruiken kan leiden tot blootstelling aan schadelijke magnetronenergie. Pas het deurmechanisme nooit ...
-
Page 47: Keukengerei
KEUKENGEREI Controleer het keukengerei om u ervan te verzekeren dat deze geschikt zijn voor gebruik in de magnetronoven. Materialen die u in de magnetron kunt gebruiken Keukengerei Opmerkingen Aluminiumfolie Alleen als afscherming. Kleine, gladde stukjes kunnen worden gebruikt voor het afdekken van dunne delen vlees of gevolgelte om te lang koken te vermijden. Vonkvorming kan plaatsvinden als folie zich te dicht tegen de ovenwanden bevindt. De folie moet zich minstens 2,5cm van de ovenwanden bevinden. Bruiningsschaal Volg de aanwijzingen van de fabrikant. De onderkant van de bruiningschaal dient minstens 5 mm boven het draaiplateau te zijn. Verkeerd gebruik kan leiden tot breuk van het draaiplateau. Vaatwerk Alleen indien magnetronbestendig. Volg de aanwijzingen van de fabrikant. Gebruik geen gebarsten of gebroken borden. Glazen potten Verwijder altijd het deksel. Gebruik alleen om voedingsmiddelen op te warmen. De meeste glazen potten zijn niet hittebestendig en kunnen breken. Glaswaar Alleen hittebestendig glaswaar voor oven. Zorg dat er geen metalen boord is. Gebruik geen gebarsten of gebroken borden. Ovenzakken Volg de aanwijzingen van de fabrikant. Niet met metalen strip sluiten. Maak gaten zodat de stoom kan ontsnappen. Papieren borden Alleen te gebruiken voor kortstondig koken/verhitten. Laat de en bekers oven niet onbeheerd achter wanneer in gebruik. Papieren doeken Gebruik om voedsel af te dekken bij het opwarmen zodat de vetten worden geabsorbeerd. Gebruik onder toezicht en slechts ... -
Page 48: Andere Nuttige Aanwijzingen
Materialen die in een magnetron vermeden dienen te worden Keukengerei Opmerkingen Aluminium schaal Kan vonken veroorzaken. Breng het voedsel over in een microgolfbestendige schaal. Kartonnen houder Kan vonken veroorzaken. Breng het voedsel over in een met microgolfbestendige schaal. metalen handgreep Keukengerei met Metaal schermt het voedsel af van microgolfenergie. Metaal metaal of metalen kan vonken veroorzaken. randen Metalen strips Kunnen vonken veroorzaken wat kan leiden tot een brand in de oven. Papieren zakken Kan leiden tot brand in de oven. Kunststofschuim Kunststofschuim kan smelten of de vloeistof in het voorwerp aantasten wanneer blootgesteld aan hoge temperaturen. Hout Hout droogt uit wanneer gebruikt in de microgolfoven en kan splijten of scheuren. OPMERKINGEN: Wees voorzichtig wanneer u keukengerei of het glazen draaiplateau uithaalt, deze kunnen tijdens het koken heet worden. Gebruik alleen een thermometer die specifiek voor gebruik in de magnetronoven ontworpen is. Zorg dat het draaiplateau op zijn plaats is wanneer u de oven gebruikt. ANDERE NUTTIGE AANWIJZINGEN Voor het beste resultaat en een aangenamer kookproces, lees onderstaande opmerkingen aandachtig door. ... -
Page 49: Overzicht Van De Oven
OPMERKING: De lucht die uit de ventilatie‐openingen komt kan tijdens het koken heet zijn. Bruinen: Er zijn enkele voedingsmiddelen die niet lang genoeg in de magnetronoven worden gekookt om te bruinen en hebben daarom extra kleur nodig. Karbonades, hamburgers of kip met paprika of bruiningsmiddelen zoals Worcestershiresaus bedekken kan voor extra kleur zorgen. Gebraad, gevogelte of ham dat gedurende 10‐15 minuten of langer wordt gekook zal bruinen zonder extra additieven. OVERZICHT VAN DE OVEN Beschrijving van de ovenonderdelen A. Bedieningspaneel B. Draaias C. Draairing D. Glazen draaiplateau E. Ovendeur F. Deurassemblage G. Deurvergrendelingssysteem H. Grillrek Draaiplateau a. -
Page 50: Bedieningspaneel
Bedieningspaneel Met de magnetronoven koken Druk om het vermogensniveau van de magnetron stellen. Grill/Combi Druk herhaaldelijk om de grillfunctie of een combinatiekookprogramma te selecteren. Convectiekoken Druk om het convectieprogramma in te stellen. Op gewicht/tijd ontdooien Druk om het voedsel op gewicht of tijd te ontdooien. Klok/Keukentimer Druk om de klok of keukentimer in te stellen. Stop/Wissen ... -
Page 51: Installatie Van De Magnetronoven
INSTALLATIE VAN DE MAGNETRONOVEN Verwijder alle verpakkingsmateriaal en Kast: Verwijder de beschermfolie van de accessoires. Controleer de oven op buitenzijde van de magnetronoven. eventuele schade zoals deuken of een Verwijder de lichtbruine Mica‐bekleding gebroken deur. Installeer de oven niet die zich in de ovenruimte bevindt niet, als deze beschadigd is. deze beschermt namelijk de magnetron. -
Page 52: Werking
WERKING Het display geeft “0:00” weer en u hoort een pieptoon zodra de stekker van de oven in het stopcontact steekt. De klok instellen 1. Druk op in stand‐bymodus om de klok in het 24‐uur formaat in te stellen. De uurweergave knippert. 2. Draai aan tot het juiste uur wordt weergegeven. 3. Druk op om te bevestigen. De minutenweergave knippert. 4. Draai aan tot de juiste minuten worden weergegeven. 5. Druk op om de instelling te bevestigen. ":" knippert op het display. OPMERKING: De oven zal bij inschakeling niet werken als de klok niet is ingesteld. Druk op ... -
Page 53: Grillen
Grillen De maximale kooktijd is 95 minuten (95:00). Het koken met de grill is vooral nuttig voor het bereiden van plakjes vlees, steak, karbonades, kebabs, worsten en stukken kip. Het apparaat is ook geschikt voor het bereiden van warme sandwiches en gegratineerde bereidingen. 1. Druk eenmaal op , “G‐1” wordt weergegeven op het display. 2. Druk op om te bevestigen. 3. Draai aan om de grilltijd in te stellen. 4. Druk op om het koken te starten. OPMERKING: In het midden van de grillduur hoort u twee pieptonen, dit is normaal. Om een beter grilleffect van uw voedsel te krijgen is het aanbevolen om uw voedsel om te draaien, de deur te sluiten en vervolgens op te drukken om het kookproces verder te zetten. Indien u geen handeling uitvoert, zal het grillproces gewoon doorgaan. Combinatiekoken De maximale kooktijd is 95 minuten (95:00). Deze functie laat u toe om zowel met de magnetron, de grill als convectie te koken en dit in vier verschillende instellingen. 1. -
Page 54: Convectiekoken
Convectiekoken Convectiekoken is het voedsel bereiden zoals in een traditionele oven. Microgolven worden niet gebruikt. Het is aanbevolen om de oven op de gepaste temperatuur voor te verwarmen voordat u het voedsel in de oven plaatst. Tijdens het convectiekoken circuleert er hete lucht in de ovenruimte om het voedsel snel en gelijkmatig te bruinen en knapperig te maken. Deze oven kan op tien verschillende kooktemperaturen (100 ~190 ) worden geprogrammeerd. 1. Druk eenmaal op en “100” gaat knipperen op het display. 2. Druk meermaals op of draai aan om de gewenste temperatuur te selecteren. 3. Druk op om te bevestigen. 4. Druk op om de oven voor te verwarmen. De zoemer gaat 2 keer af zodra de oventemperatuur wordt bereikt en het eten in de oven kan worden geplaatst. 5. Draai aan ... -
Page 55: Automatisch Menu
Automatisch menu Voor het voedsel in de volgende tabel is het niet nodig om het kookvermogen en de tijd te programmeren. Voer de volgende stappen uit: 1. Draai in wijzerzin aan in stand‐bymodus om de gewenste menucode te selecteren uit de onderstaande tabel. 2. Druk op om te bevestigen. 3. Draai aan om het gewicht van het voedsel te selecteren. 4. Druk op om het kookproces te starten. Menu Gewicht(g) Vermogen A1 300 100% magnetron/ Pizza 100% grill 400 230 A2 460 100% magnetron Aardappelen 690 200 300 ... -
Page 56: Snelkoken
OPMERKING: Als u A9 cake selecteert, moet u wachten om de cake in de oven te plaatsen tot die is voorverwarmd op 160 . De zoemer zal afgaan om u er aan te herinneren dat de cake in de oven mag. Druk op om het koken te starten. Snelkoken Druk op in stand‐bymodus om 30 seconden met een vermogen van 100% te koken. Elke druk op de knop verhoogt de kooktijd met 30 seconden. De maximale kooktijd is 95 minuten. Tijdens het koken met magnetron, grill, convectie of een combinatieprogramma, zal elke druk op de kooktijd 30 seconden verlengen. OPMERKING: In de modi auto‐menu en ontdooien op gewicht, kan de kooktijd niet worden verlengd door een druk op de knop. Kindervergrendeling De kindervergrendeling voorkomt gebruik door kinderen zonder enig toezicht. Houd 3 seconden lang ingedrukt om de kindervergrendeling in te stellen. U hoort een lange pieptoon en " " wordt weergegeven op het display. In de vergrendelingsmodus zijn alle knoppen gedeactiveerd. Houd 3 seconden lang ingedrukt om de kindervergrendeling te annuleren. U hoort een lange pieptoon en het display zal opnieuw de huidige tijd weergeven ... -
Page 57: Reiniging En Onderhoud
REINIGING EN ONDERHOUD Haal de stekker uit het stopcontact alvorens de oven schoon te maken. Algemeen advies Een regelmatige reiniging voorkomt rook en slechte geuren tijdens het koken en voorkomt vonken in de ovenruimte en rond de deurafdichting. Zorg dat de voedselresten of vetten niet in de ovenruimte of op de deurafdichting ophopen. Als uw magnetronoven met een microgolfgeleiderdeksel is uitgerust (bevindt zich over het algemeen in de ovenruimte aan de rechterzijde), houd deze altijd schoon. Als er voedselresten of vetten op het deksel ophopen kan dit vonken veroorzaken die uw oven kunnen beschadigen, wat niet door uw garantie wordt gedekt. Alvorens uw apparaat te onderhouden of te reinigen, haal de stekker uit het stopcontact en wacht totdat deze tot kamertemperatuur is afgekoeld. Ovendeur Verwijder eventuele voedselresten en vetten tussen de deurafdichting en ovenruimte met gebruik van een vochtig doek. Het is belangrijk om deze zone altijd schoon te houden. Maak de glazen ovendeur niet schoon met agressieve schoonmaakmiddelen of scherpe, metalen krabbers, deze kunnen het oppervlak krassen, wat tot glasbreuk kan leiden. Binnenwanden Verwijder eventuele vetspatten van de binnenwanden van de oven met behulp van zeep en water, veeg deze af en droog vervolgens. De deurafdichting en ovenruimte moeten zeer goed worden schoongemaakt zodat de deur op een correcte manier sluit en vonken tussen de ovenruimte en de deur worden vermeden. Gebruik geen schurende producten zoals schuursponsjes want deze beschadigen de ... -
Page 58: Technische Gegevens
OPGELET: Sommige microgolfgeleiderdeksels kunnen tijdens het schoonmaken eenvoudig worden beschadigd. Was de accessoires niet in een afwasmachine. Het schoonmaken van oppervlakken die met voedsel in aanraking komen Voor een goede hygiëne, maak het glazen draaiplateau regematig schoon, want dit item komt met voedsel in aanraking. Maak dit item met warm zeepwater schoon en droog grondig. Als de ovenruimte en deurafdichting niet kraaknet worden gehouden, is er risico op schade door vonken in de ovenruimte die niet door de garantie wordt gedekt. Schrob de binnenwanden van de oven nooit met scherpe voorwerpen. TECHNISCHE GEGEVENS Nominale spanning en frequentie: 230V~ 50Hz Nominaal ingangsvermogen (magnetron): 1300 W Nominaal ingangsvermogen (grill/convectie): 1200W Magnetronfrequentie: 2450MHz ... -
Page 59: Probleemoplossing
PROBLEEMOPLOSSING Normale gebeurtenissen Magnetronoven verstoort de Tijdens de werking van de magnetronoven kan TV‐ontvangst. de radio‐ en TV‐ontvangst verstoord zijn. Deze is gelijk aan de storing die andere kleine elektrische apparatuur, zoals mixers, stofzuigers of ventilatoren, veroorzaken. Dit is normaal. Gedempt ovenlicht Tijdens het koken op laag vermogen is het mogelijk dat het ovenlicht gedempt is. Dit is normaal. Stoomophoping op deur, hete Tijdens het kookproces kan er stoom uit het lucht uit ventilatieopeningen voedsel komen. De meeste stoom ontsnapt via de ventilatieopeningen. Een deel van de stoom kan zich echter ophopen op bijvoorbeeld de ovendeur. Dit is normaal. Oven wordt per ongeluk gestart Het is niet toegelaten om de oven zonder zonder dat er voedsel in de aanwezig voedsel te gebruiken. Dit is ZEER oven aanwezig is. gevaarlijk. Probleem Mogelijke oorzaak Oplossing Snoer is niet juist Haal de stekker uit het aangesloten. stopcontact en plaats hem terug na 10 ... - Page 60 INDICE AVVERTENZE...........................2 - 6 IMPORTANTI ISTRUZIONI DI SICUREZZA.................6 UTENSILI DI COTTURA .......................7 ALTRE ISTRUZIONI UTILI ......................8 PANORAMICA ..........................9 Nomi dei componenti del forno ..................9 Piatto rotante ........................9 Panello di controllo ......................10 INSTALLAZIONE DEL FORNO A MICROONDE ..............11 FUNZIONAMENTO ........................12 Impostare l’orologio......................12 Cottura microonde ......................12 Grill ............................13...
-
Page 61: Avvertenze
AVVERTENZE IMPORTANTI ISTRUZIONI DI SICUREZZA LEGGERE CON ATTENZIONE E CONSERVARE PER CONSULTAZIONI FUTURE Questo apparecchio è inteso solo per uso domestico e non va usato per altri scopi o in altre applicazioni come per usi non domestici o in ambienti commerciali. - Page 62 Durante il riscaldamento in contenitori di plastica o carta, controllare sempre gli alimenti in cottura per evitare i rischi di incendio. Il forno a microonde è progettato per riscaldare alimenti e bevande. L'uso dell'apparecchio per asciugare alimenti o vestiti e per riscaldare termofori, pantofole, spugne, panni umidi e altri materiali simili può...
- Page 63 Il forno deve essere pulito regolarmente e ogni residuo alimentare deve essere rimosso. Il mantenimento del forno in condizioni non ottimali può causare deterioramenti e danni all'apparecchio, che possono diminuire la durata di vita del forno e causare rischi all'utente.
- Page 64 Questo apparecchio può essere usato dai bambini a partire dagli 8 anni e da persone con ridotte capacità fisiche, mentali o sensoriali o senza esperienza e conoscenza, se supervisionate e istruite sulle modalità d'uso dell'apparecchio in modo sicuro e comprendono i pericoli coinvolti.
- Page 65 I bambini devono essere supervisionati per accertare che non giochino con l'apparecchio. Attenzione: Se l'apparecchio funziona in modalità combinata permettere di utilizzare il forno ai bambini solo se adeguatamente sorvegliati, in ragione delle alte temperature. IMPORTANTI ISTRUZIONI DI SICUREZZA Quando il forno a microonde è spento, scollegarlo dalla rete elettrica rimuovendo la spina dalla presa a muro. La spina è il principale dispositivo di scollegamento dalla rete elettrica e deve essere raggiungibile in qualsiasi momento. ...
-
Page 66: Utensili Di Cottura
UTENSILI DI COTTURA Controllare gli utensili per assicurarsi che siano adatti per l'uso a microonde. Materiali utilizzabili in forno a microonde Utensili Note Pellicola di Solo per riparare. E' possibile utilizzare pezzi piccoli per coprire alluminio parti sottili di carne o pollame. Pericolo di archi elettrici nel caso la pellicola sia troppo vicina alle superfici interne. La pellicola deve essere tenuta ad almeno 2.5 cm dalle pareti. Piatto crisp Seguire le istruzioni del produttore. Il fondo del piatto crisp deve essere collocato ad almeno 5 mm dal piatto rotante. L'uso scorretto del piatto può causare la rottura del piatto rotante. Stoviglie Solo se adatti all'utilizzo in forno a microonde. Seguire le istruzioni del produttore. Non usare piatti rotti o scheggiati. Barattoli in vetro Rimuovere sempre il coperchio. Utilizzare solo per riscaldare gli alimenti. La maggior parte dei barattoli di vetro non sono termoresistenti e potrebbero rompersi. Utensili in vetro Solo stoviglie in vetro termoresistenti. Assicurarsi che non vi siano parti metalliche. Non usare piatti rotti o scheggiati. Sacchetti per Seguire le istruzioni del produttore. Non chiudere con legacci di forno metallo. Praticare dei fori per consentire la fuoriuscita del vapore. Piatti e bicchieri Utilizzare esclusivamente per cotture brevi/riscaldamento. Non di carta lasciare il forno incustodito quando è collegata alla corrente. Tovaglioli di Utilizzare per coprire il cibo da riscaldare in modo che i grassi si plastica assorbano. Utilizzare solo per cotture brevi e sotto costante supervisione. Carta Utilizzare per coprire gli alimenti per evitare schizzi e per cotture a ... -
Page 67: Altre Istruzioni Utili
Materiali da evitare in forno a microonde Utensili Note Vassoio in alluminio Può causare archi elettrici. Trasferire gli alimenti in piatti adatti all'uso in forno a microonde. Contenitori in Può causare archi elettrici. Trasferire gli alimenti in piatti adatti cartone con all'uso in forno a microonde. maniglia in metallo Metallo o Il metallo ripara gli alimenti dall'energia a microonde. Ciò può utensili con parti in causare archi elettrici. metallo Legacci in metallo Possono causare archi elettrici o fiamme. Sacchetti di carta Possono incendiarsi nel forno. Schiuma di plastica I materiali in schiuma plastica possono sciogliersi e contaminare gli alimenti. Legno Il legno secca con il calore, e può spezzarsi o creparsi. NOTE: Rimuovere con cura gli oggetti dal forno, poiché potrebbero scaldarsi molto durante la cottura. Utilizzare esclusivamente termometri concepiti per l'uso in forno a microonde. Assicurarsi che il piatto rotante sia posizionato correttamente prima dell'uso. ALTRE ISTRUZIONI UTILI Leggere attentamente le seguenti indicazioni. Per risultati ottimali: 1. Per stabilire il tempo di cottura ottimale per un determinato alimento, impostare un tempo basso controllando la cottura. Il forno a microonde cuoce molto rapidamente, perciò il cibo potrebbe scuocere facilmente. 2. Le quantità ridotte di alimenti o gli alimenti a basso contenuto di acqua possono seccare rapidamente. ... -
Page 68: Panoramica
Doratura: Per ottenere la doratura dei cibi è spesso necessario cuocerli più tempo. E' possibile utilizzare coperture e altri agenti che aiutano la doratura delle carni, come paprika o salsa Worchester. Per ottenere la doratura di pollame e arrosti è sufficiente cuocerli per 10‐15 minuti in più, senza aggiungere nulla. PANORAMICA Nomi dei componenti del forno A. Pannello di controllo B. Alberino C. Anello del piatto rotante D. Vassoio di vetro E. Finestra F. Sportello ... -
Page 69: Panello Di Controllo
Panello di controllo Cottura microonde Premere per impostare il livello di potenza del microonde. Grill/Combi. Premere più volte per selezionare la cottura alla griglia o un programma di cottura combinata. Cottura a convezione Premere per programmare la cottura a convezione. Peso/Tempo scongelamento Premere per scongelare gli alimenti per peso o per tempo. Orario/Timer cottura Premere per impostare l'orologio o il timer per la cottura. Stop/Clear • Premere una volta per interrompere temporaneamente la cottura o due per annullare la cottura. • Il tasto è utilizzato anche per impostare il blocco bambini. Start/Confirm/+30 sec ... -
Page 70: Installazione Del Forno A Microonde
INSTALLAZIONE DEL FORNO A MICROONDE Rimuovere tutto il materiale di imballaggio e gli accessori. Verificare che il forno non Console: Rimuovere qualsiasi pellicola presenti danni o difetti. Non installare il protettiva dalla superficie del forno. forno se quest’ultimo è danneggiato. Non rimuovere la placca in Mica marrone posta all'interno della cavità del forno a protezione del magnetron. 1. Scegliere una superficie che garantisca ) Collocare il forno il più distante spazio sufficiente per la ventilazione in possibile da apparecchi radio e entrata e/o in uscita. TV. Il funzionamento del forno a microonde può causare 30cm interferenze nella ricezione del 20cm... -
Page 71: Funzionamento
FUNZIONAMENTO Quando il forno viene collegato alla rete elettrica, sul display appare "0:00" e l’apparecchio emette un segnale acustico di avviso. Impostare l’orologio 1. In modalità standby, premere per impostare l'orologio in formato 24 ore. 2. Le cifre dell’ora lampeggeranno. 3. Ruotare fino a visualizzare l'ora corretta. 4. Premere per confermare. 5. Le cifre dei minuti lampeggiano. 6. Ruotare fino a visualizzare l'ora corretta. 7. Premere per confermare l’impostazione. “:” lampeggerà sul display. NOTA: Se l’orologio non viene impostato, il forno non potrà funzionare. ... -
Page 72: Grill
Grill Il tempo di cottura più lungo è di 95 minuti (95:00). La cottura grill è particolarmente utile per fettine sottili di carne, bistecche, kebab, salsicce e pollo. E' inoltre adatta per panini caldi e piatti al gratin. 1. Premere e "G‐1" lampeggia sul display. 2. Premere per confermare. 3. Ruotare per impostare il tempo di cottura grill. 4. Premere per avviare la cottura. NOTA: Quando metà del tempo impostato per la cottura grill è trascorso, il forno emetterà un segnale acustico ripetuto due volte. Ciò è normale. Per una doratura migliore si consiglia di girare il cibo, richiudere lo sportello e premere per proseguire la cottura. Altrimenti, lasciare che il forno termini la cottura. Cottura combinata Il tempo di cottura più lungo è di 95 minuti (95:00). Questa funzione permette di combinare microonde, grill o convezione con quattro modalità diverse. 1. Premere e "G‐1" lampeggia sul display. 2. Premere ripetutamente o ruotare per selezionare la potenza: ... -
Page 73: Cottura A Convezione
Cottura a convezione La cottura a convezione permette di cuocere il cibo come in un forno tradizionale. Non vengono utilizzate microonde. Si raccomanda di pre‐riscaldare il forno alla temperatura desiderata prima di collocarvi il cibo all’interno. Durante la cottura a convezione, l’aria calda circola per tutta la cavità del forno per dorare il cibo rapidamente e uniformemente. È possibile impostare fino a 10 temperature diverse di cottura (100 ~190 . 1. Premere e "100" lampeggia sul display. 2. Premere ripetutamente o ruotare per selezionare la potenza. 3. Premere per confermare. 4. Premere per avviare la cottura. Quando il tempo di cottura viene raggiunto il segnale acustico suonerà per due volte. È possibile inserire gli alimenti in forno. 5. Ruotare per impostare il tempo di cottura. 6. Premere per avviare la cottura. NOTA: Se non si desidera pre‐riscaldare il forno prima della cottura, saltare il passo n.4. Timer cottura 1. Premere due volte. Sul display appare "00:00". 2. Ruotare per inserire il tempo corretto (il tempo massimo di cottura è 95 minuti). 3. Premere ... -
Page 74: Auto Menu
Auto menu Per gli alimenti indicati nella tabella seguente non è necessario programmare il tempo e la potenza di cottura. Seguire i passi seguenti: 1. In modalità standby, ruotare in senso orario per selezionare il menu desiderato dalla tabella sottostante. 2. Premere per confermare. 3. Ruotare per selezionare il peso del cibo. 4. Premere per avviare la cottura. Menu Peso (g) Alimentazione A1 300 100% microonde/ Pizza 100% grill 400 230 A2 460 100% microonde Patate 690 200 300 ... -
Page 75: Cottura Rapida
NOTA: Selezionando la modalità "A9 Torte”, non inserire la torta nel forno finché quest’ultimo non ha raggiunto la temperatura di 160°C. Un segnale acustico avviserà quando il forno è pronto per la cottura della torta. Premere per avviare la cottura. Cottura rapida In modalità stand‐by, premere per cuocere al 100% della potenza per 30 secondi. Ogni pressione del tasto aumenta il tempo di cottura di 30 secondi. Il tempo di cottura più lungo è di 95 minuti. Durante le cotture microonde, grill, convezione e combinate, ogni pressione del tasto aumenterà il tempo di cottura di 30 secondi. NOTA: In modalità auto menu e scongelamento per peso, il tempo non può essere premendo il tasto. aumentato Blocco bambini Il blocco bambini evita l’utilizzo del forno da parte di bambini non sorvegliati. Per impostare il blocco bambini, tenere premuto fino a che l'apparecchio non emette un segnale acustico prolungato e " " non appare sul display. In modalità blocco, tutti i tasti sono disabilitati. Per impostare il blocco bambini, tenere premuto fino a che l'apparecchio non emette un segnale acustico prolungato e il display torna a visualizzare l'ora. ... -
Page 76: Pulizia E Manutenzione
PULIZIA E MANUTENZIONE Scollegare il forno dalla rete elettrica prima di qualsiasi operazione di pulizia. Consiglio generale Una pulizia frequente e regolare previene l'emissione di fumo o di cattivi odori durante la cottura e la presenza di scintille nella cavità del forno o nei pressi della chiusura dello sportello. Non lasciare accumuli di cibo o grasso nella cavità del forno o sulla chiusura dello sportello. Se il forno è equipaggiato con una placca a copertura della guida d’onda (di solito collocata sul lato interno destro del forno), quest’ultima deve essere tenuta costantemente pulita per evitare accumuli di cibo o grasso e per prevenire il rischio di scintille, che danneggerebbero il forno e annullerebbero la garanzia. Prima di ogni intervento di manutenzione o pulizia, scollegare il forno dalla rete elettrica e attendere che si raffreddi a temperatura ambiente. Sportello del forno Rimuovere ogni deposito di cibo e grasso tra la guarnizione dello sportello e la cavità del forno con un panno umido; è importante tenere questa zona sempre pulita. Non usare detergenti abrasivi o utensili di metallo appuntiti per pulire il vetro del forno poiché potrebbero graffiarne e danneggiarne la superficie. Pareti interne Rimuovere schizzi di grasso dalle pareti della cavità del forno con sapone e acqua, quindi sciacquare e asciugare. Prestare particolare attenzione nella pulizia dello sportello e dell'interno del forno e assicurarsi che lo sportello si chiuda correttamente per evitare scintille tra l’interno del forno e i meccanismi dello sportello. Non usare prodotti abrasivi (ad esempio, pagliette) poiché rischierebbero di danneggiare le superfici interne e lo sportello del forno. Usare solo acqua calda con sapone per la pulizia delle superfici in acciaio inox. Superfici esterne Per la pulizia delle superfici esterne usare un panno umido. Non usare prodotti abrasivi (ad esempio, pagliette) poiché rischierebbero di danneggiare le superfici esterne. Accertarsi che l'acqua non penetri nelle fessure di ventilazione. Lavare gli accessori a mano in acqua calda e sapone. ... -
Page 77: Specifiche
ATTENZIONE : Alcune placche a copertura della guida d’onda sono particolarmente delicate e possono essere facilmente danneggiate. Prestare attenzione durante la pulizia. Non lavare gli accessori in una lavastoviglie. Pulire le superfici sporche di cibo Per motivi di igiene, pulire regolarmente il piatto rotante. Pulire con acqua insaponata e asciugare con cura. Se l'interno del forno non viene mantenuto in condizioni ottimali, ciò può causare danni e rischi di scosse elettriche, invalidando la garanzia. Non graffiare le pareti della cavità del forno con oggetti appuntiti. SPECIFICHE Voltaggio e frequenza nominali: 230V~ 50Hz Ingresso nominale (microonde): 1300W Ingresso nominale (grill/convezione): 1200W Frequenza microonde: 2450MHz ... -
Page 78: Risoluzione Dei Problemi
RISOLUZIONE DEI PROBLEMI Fenomeni normali Il forno a microonde Il funzionamento del forno può interferire con interferisce con la ricezione TV la ricezione radio e TV. E' simile all'interferenza di piccoli elettrodomestici, quali frullatori, aspirapolvere e ventilatori elettrici. E' normale. Luce del forno debole Durante le cotture a bassa potenza, la luce del forno può indebolirsi. E' normale. Accumulo di vapore sullo Durante la cottura può prodursi del vapore. sportello, aria calda dalle Buona parte fuoriuscirà dalle fessure. Ma una fessure di ventilazione parte potrebbe accumularsi sullo sportello. E' normale. Il forno si è avviato Si raccomanda di non avviare mai il forno accidentalmente senza cibo al senza alimenti all'interno. Può essere MOLTO suo interno. PERICOLOSO. Problema Possibile causa Soluzione ... - Page 79 CONTENIDO ADVERTENCIAS ........................2 - 6 INSTRUCCIONES DE SEGURIDAD IMPORTANTES..............6 UTENSILIOS DE COCINA......................7 OTRAS INSTRUCCIONES DE UTILIDAD ................8 DESCRIPCIÓN GENERAL DEL HORNO .................9 Denominación de los elementos del horno..............9 Plato giratorio ........................9 Panel de control ......................10 INSTALACIÓN DEL HORNO MICROONDAS ................11 FUNCIONAMIENTO.........................12 Configuración del reloj ....................12...
-
Page 80: Advertencias
ADVERTENCIAS PRECAUCIONES IMPORTANTES DE SEGURIDAD LEA ATENTAMENTE Y CONSERVE COMO FUTURA REFERENCIA Este aparato ha sido concebido para uso exclusivamente doméstico y no se debe utilizar con ningún otro objetivo ni aplicación, como el uso en un entorno no doméstico o con fines comerciales. - Page 81 Utilice sólo utensilios de cocina que sean apropiados para usar en hornos microondas. Cuando caliente los alimentos en recipientes de plástico o de papel, manténgase pendiente del microondas, dado la posibilidad de que se produzca un fuego. El horno microondas está hecho para calentar alimentos y bebidas.
- Page 82 Los huevos en su cáscara y los huevos duros no deben calentarse en el microondas ya que podrían explotar, incluso después de que se haya terminado de utilizar el microondas para calentarlos. El horno y los restos de alimentos en su interior se deben limpiar regularmente.
- Page 83 electricidad de baja tensión que alimenta las edificaciones residenciales (Classe B). La superficie posterior del aparato deberá colocarse contra la pared. Este aparato puede ser utilizado por menores a partir de los 8 años o personas con deficiencias físicas, sensoriales o mentales, o que no tengan suficiente experiencia o conocimientos en el uso de este producto, si son supervisados o han sido instruidos acerca del uso seguro del...
-
Page 84: Instrucciones De Seguridad Importantes
La puerta y la superficie externa del aparato pueden alcanzar temperaturas elevadas cuando está en funcionamiento. Mantenga un espacio libre de 30 cm como mínimo encima del horno. Es conveniente que los niños sean supervisados para asegurarse de que no juegan con el aparato. -
Page 85: Utensilios De Cocina
UTENSILIOS DE COCINA Deberán comprobarse los utensilios para cerciorarse de que son adecuados para su uso en hornos microondas. Materiales que pueden utilizarse en un horno microondas Utensilios Observaciones Papel Únicamente para cubrir alimentos. Se pueden utilizar pequeñas piezas aluminio lisas para cubrir las partes delgadas de carne o de aves de corral y evitar así que se cocinen en exceso. Puede producirse un arco eléctrico si el papel aluminio está demasiado cerca de las paredes del horno. Deberá existir una separación mínima de 1 pulgada (2.5 cm) entre el papel aluminio y las paredes del horno. Recipiente Siga las instrucciones proporcionadas por el fabricante. La base de la para dorar bandeja para dorar deberá estar situada al menos 5 mm por encima del plato giratorio. Un uso incorrecto podría hacer que estallase el plato giratorio. Vajilla Únicamente del tipo apto para microondas. Siga las instrucciones proporcionadas por el fabricante. No utilice vajilla o cristalería que esté desconchada o agrietada. Tarros de Acuérdese siempre de quitar la tapa. Utilícelos únicamente para cristal calentar alimentos hasta que estén a una temperatura moderada. La mayoría de los botes y tarros de cristal no son resistentes al calor y podrían estallar. Cristalería Utilice únicamente cristalería resistente al calor, apta para su uso en hornos microondas. Asegúrese de que no tenga adornos metálicos. No utilice vajilla o cristalería que esté desconchada o agrietada. Bolsas Siga las instrucciones proporcionadas por el fabricante. No las cierre ... -
Page 86: Otras Instrucciones De Utilidad
Materiales que no deben utilizarse en un horno microondas Utensilios Observaciones Bandejas de Pueden producir arcos eléctricos. Transfiera los alimentos a aluminio un recipiente apto para microondas. Cartones con Pueden producir arcos eléctricos. Transfiera los alimentos a asas metálicas un recipiente apto para microondas. Utensilios de metal El metal actúa como una barrera que impide que los o alimentos se beneficien de la energía del microondas. Las decoraciones partes metálicas pueden producir arcos eléctricos. metálicas Ataduras metálicas Pueden producir arcos eléctricos y dar lugar a un incendio en el horno. Bolsas de papel Pueden causar un incendio en el horno. Espuma plástica La espuma plástica puede fundirse o contaminar el líquido contenido cuando se expone a temperaturas elevadas. Madera La madera se secará cuando se utilice en el microondas y podría astillarse o rajarse. NOTAS: Deberá tenerse cuidado al retirar utensilios o el plato giratorio del horno que pueden haber alcanzado una temperatura elevada durante la cocción. Utilice únicamente un termómetro que haya sido aprobado para su uso en hornos microondas. Asegúrese de que el plato giratorio esté en su lugar cuando ponga el horno en funcionamiento. OTRAS INSTRUCCIONES DE UTILIDAD ... -
Page 87: Descripción General Del Horno
Dorado de los alimentos: Hay algunos alimentos que no se cocinan lo suficiente en el horno de microondas para llegar a dorarse y puede que necesiten una cocción adicional. En dicho caso, será conveniente cubrir alimentos tales como chuletas, empanadas de carne o porciones de pollo con pimentón u otros ingredientes que favorecen el dorado tales como salsa Worcestershire. Si se cocinan entre 10 y 15 minutos o más, el jamón, ave y carne asada adquirirán un aspecto dorado sin necesidad de aditivos adicionales. DESCRIPCIÓN GENERAL DEL HORNO Denominación de los elementos del horno A. Panel de control B. Eje C. Eje del plato giratorio D. Plato giratorio de cristal ... -
Page 88: Panel De Control
Panel de control Cocción en modo microondas Pulse este botón para ajustar el nivel de potencia del microondas. Parrilla/Modo combinado Pulse reiteradamente este botón para configurar programa de cocción utilizando la parrilla, seleccionar un modo combinado o bien de cocción. Cocción en modo de convección Pulse este botón para configurar un programa de cocción por convección. Peso/Tiempo de descongelación Pues este botón para descongelar alimentos en función de su peso o intervalo deseado. Reloj/Temporizador de cocción Pulse este botón para configurar el reloj o el temporizador cocción. Parar/Cancelar ... -
Page 89: Instalación Del Horno Microondas
INSTALACIÓN DEL HORNO MICROONDAS Retire todo el material de embalaje y los accesorios. Examine el horno para Carcasa: Retire cualquier película determinar la posible existencia de protectora que exista en la superficie daños tales como abolladuras o puerta del armario donde se vaya a empotrar rota. No instale el horno si observa el microondas. algún tipo de daño. No retire la tapa de mica de color marrón claro sujeta al receptáculo del horno y que protege el magnetrón. 1. Elija una superficie plana donde (6) Coloque el horno lo más lejos exista suficiente espacio para las posible de radios y televisores. El salidas y/o entradas de ventilación. funcionamiento del microondas puede producir interferencias en la 30cm recepción de radio o de televisión. -
Page 90: Funcionamiento
FUNCIONAMIENTO Al enchufar el horno a la red eléctrica, la pantalla mostrará la indicación “0:00” y sonará un tono de aviso. Configuración del reloj 1. En estado de espera, presione para ajustar el reloj en el formato de 24 horas.La indicación de las horas comenzará a parpadear en la pantalla. 2. Gire hasta que se muestren los minutos correctos. 3. Pulse a modo de confirmación. Los dígitos de los minutos parpadearán 4. Gire hasta que se muestren los minutos correctos. 5. Púlselo para confirmar cualquier selección o configuración de parámetro efectuada. La indicación “:” aparecerá parpadeando en la pantalla. NOTA: De no configurarse el reloj, el horno no funcionará tras haberlo encendido. Compruebe la hora durante la cocción pulsando . ... -
Page 91: Cocción En Modo Grill
Cocción en modo grill El tiempo máximo de cocción es de 95 minutos (95:00). Cocinar con la función de grill es particularmente útil para rebanadas finas de carne, filetes, chuletas, brochetas, salchichas y trozos de pollo. También es apropiado para bocadillos calientes y platos gratinados. 1. Pulse una vez y observe que “G‐1” aparecerá mostrado en la pantalla. 2. Pulse a modo de confirmación. 3. Gire para ajustar el tiempo del grill. 4. Pulse para iniciar la cocción. NOTA: una vez transcurrida la mitad del tiempo programado para el funcionamiento de la parrilla, el tono de aviso del horno sonará dos veces; se trata de una función normal del horno. Con el fin de conseguir un mejor resultado al asar los alimentos, dele la vuelta al alimento, cierre la puerta del horno y pulse para continuar la cocción. Si no realiza ninguna operación, el horno seguirá funcionando. Cocción de modo combinado El tiempo máximo de cocción es de 95 minutos (95:00). Esta función le permite combinar el grill y la cocción con microondas y de convección en dos configuraciones diferentes. ... -
Page 92: Cocción En Modo De Convección
Cocción en modo de convección El modo de cocción por convección le permite cocinar los alimentos como en un horno convencional. El modo de microondas no se utiliza. Se recomienda precalentar el horno a la temperatura adecuada antes de colocar los alimentos en su interior. Durante el proceso de cocción por convección, se hace circular aire caliente por la cavidad del horno para dorar y cocinar los alimentos de manera rápida y uniforme de modo que queden crujientes. Este horno puede ser programado usando diez temperaturas de cocción diferentes (100°C ~ 190°C). 1. Pulse una vez; “100” parpadeará en la pantalla. 2. Pulse reiteradamente o gire para seleccionar la combinación de potencia: 3. Pulse a modo de confirmación. 4. Pulse para iniciar el precalentamiento. Una vez alcanzada la temperatura del horno el timbre sonará dos veces para recordarle que debe poner la comida en el horno. 5. Gire para ajustar el intervalo de cocción. 6. Pulse para iniciar la cocción. ... -
Page 93: Menú Automático
Menú automático Para los alimentos incluidos en el cuadro que se muestra a continuación, no será necesario programar la potencia ni el intervalo de cocción. Proceda conforme a los pasos indicados: 1. En el modo de espera, gire hacia la derecha para seleccionar el código de menú de la tabla más abajo. 2. Pulse a modo de confirmación. 3. Gire seleccionar el peso del alimento. 4. Pulse para iniciar la cocción. Menú Peso (g) Potencia A1 300 100% microondas/ Pizza 100% grill 400 230 A2 ... -
Page 94: Función De Cocción Rápida
NOTA: Cuando seleccione el menú A9 pasteles, no introduzca el pastel en el horno ℃ antes de haberlo precalentado a 160 . El tono de aviso sonará para recordarle que ponga el pastel en el horno. Pulse para iniciar la cocción. Función de cocción rápida En estado de espera, pulse para cocinar a un nivel de potencia del 100% durante 30 segundos. Cada pulsación del botón hará que aumente el intervalo de cocción en 30 segundos. El intervalo máximo de cocción que puede configurarse es de 95 minutos. Durante la cocción con microondas, grill, convección o combinada, cada que pulse el intervalo de cocción incrementará en 30 segundos. NOTA: En el menú automático y en el modo de descongelación por peso, el tiempo de cocción no se puede aumentar pulsando el botón. Bloqueo de seguridad para niños El cierre de seguridad para niños evita que los niños manipulen el aparato sin estar supervisados. ... -
Page 95: Limpieza Y Mantenimiento
LIMPIEZA Y MANTENIMIENTO Antes de limpiar el horno, desenchúfelo de la red eléctrica. Advertencia general La limpieza frecuente del aparato evitará que se produzcan humos y malos olores durante la cocción o que se generen chispas en la cavidad del horno y alrededor del burlete de la puerta. No deje que se acumulen restos de comida o grasa en el interior de la cavidad del horno o en el burlete de la puerta. Si su horno microondas incorpora una tapa difusora de ondas (normalmente ubicada en la pared lateral derecha de la cavidad del horno), esta deberá mantenerse limpia en todo momento, ya que, en caso de que se acumulen restos de alimentos o grasa en dicha tapa, podrían producirse chispas y causar daños que no están cubiertos por la garantía. Antes del efectuar cualquier tarea de limpieza o mantenimiento en el horno, desenchúfelo de la red eléctrica y espere a que se haya enfriado a la temperatura ambiente. Puerta del horno Utilice un paño húmedo para eliminar cualquier resto de alimentos o grasa que pudiera haberse acumulado entre el burlete de la puerta y la cavidad interior, ya que es importante mantener limpia esta zona en todo momento. No utilice limpiadores abrasivos o agresivos ni rascadores metálicos para limpiar el cristal de la puerta del horno, ya que podrían arañar o hacer estallar el cristal. Paredes interiores Elimine cualquier salpicadura de grasa de las paredes de la cavidad interior del horno utilizando agua y jabón. Seguidamente, aclare y seque con un paño. Deberá esmerarse la limpieza del burlete de la puerta y la cavidad del horno para así asegurarse de que la puerta cierre correctamente y no se produzcan chispas entre la cavidad del horno y el conjunto de la puerta. No utilice productos abrasivos tales como estropajos que pudieran dañar las ... -
Page 96: Especificaciones
PRECAUCIÓN: Algunas tapas difusoras de ondas son muy delicadas y pueden dañarse fácilmente. Por lo tanto, preste especial atención durante su limpieza. No lave los accesorios en el lavavajillas. Limpieza de las superficies que entran en contacto con los alimentos Por razones de higiene, limpie el plato giratorio con frecuencia porque podría haber entrado en contacto con los alimentos. Limpie el plato con agua tibia jabonosa y séquelo después. De no mantenerse la calidad del horno y los burletes de la puerta en perfecto estado de limpieza, existirá peligro de que se produzcan daños debido a la generación de chispa en el interior de la cavidad del horno y la garantía que acompaña al aparato quedará anulada. Nunca raspe las paredes de la cavidad del horno utilizando objetos afilados o puntiagudos. ESPECIFICACIONES Tensión y frecuencia nominales: 230 V ~ 50 Hz Potencia nominal de entrada (microondas): 1300W Potencia nominal de entrada (parrilla / convección): 1200W Frecuencia de microondas: 2450MHz ... -
Page 97: Resolución De Problemas
RESOLUCIÓN DE PROBLEMAS Fenómenos normales El microondas interfiere con la Es posible que, durante su funcionamiento, el señal de recepción del televisor microondas produzca interferencias en los aparatos de radio o televisión. Lo mismo sucede con aquellas interferencias producidas por pequeños electrodomésticos tales como batidoras, aspiradores o ventiladores eléctricos. Se trata de un fenómeno normal. La luz del horno es demasiado Durante la cocción de microondas a baja potencia, la tenue luz del horno se puede atenuar. Se trata de un fenómeno normal. Se acumula vapor en la puerta El vapor puede desprenderse de los alimentos del horno y sale aire caliente durante la cocción. La mayor parte del vapor se por los orificios de ventilación escapa por ranuras de ventilación. Aunque también se puede acumular en otros lugares, tales como la puerta del horno. Se trata de un fenómeno normal. Se ha iniciado el horno sin que Se prohíbe hacer funcionar el aparato sin alimentos haya alimentos en su interior. en su interior. Proceder de esta manera es bastante PELIGROSO. Problema Causa probable Solución El cable de alimentación Desenchufe el aparato y eléctrica no está vuelva a enchufarlo de nuevo No es posible entender ... - Page 98 OBSAH VAROVÁNÍ..........................2 - 6 DŮLEŽITÉ BEZPEČNOSTNÍ POKYNY ..................6 NÁDOBÍ DO MIKROVLNNÉ TROUBY..................7 DALŠÍ UŽITEČNÉ POKYNY......................8 PŘEHLED TROUBY ........................9 Názvy součástí trouby......................9 Točna............................9 Ovládací panel ........................10 INSTALACE MIKROVLNNÉ TROUBY..................11 OBSLUHA ..........................12 Nastavení času ........................12 Mikrovlnné vaření .......................12 Grilování...
-
Page 99: Varování
UPOZORNĚNÍ D LEŽITÉ BEZPE NOSTNÍ POKYNY P E T TE SI TYTO POKYNY A USCHOVEJTE JE PRO BUDOUCÍ POUŽITÍ Tento p ístroj je navržen pouze pro domácí použití, nesmí být použit na žádné jiné ú ely a nesmí se tedy používat nap . mimo domácnosti nebo pro komer ní... - Page 100 Vp ípad oh ívání potravin v plastových nebo papírových obalech obsah mikrovlnné trouby vizuáln kontrolujte, nebo hrozí riziko vznícení. Mikrovlnná trouba je ur ená pro oh ev potravin a nápoj . Sušení potravin nebo oble ení, oh ívání oteplovacích vložek, pantofl , mycích hub, vlhkých had ík a podobn m že vést ke vzniku rizika úrazu, vznícení...
- Page 101 Troubu pravideln ist te a odstra ujte veškeré zbytky jídla. V p ípad zne išt ní trouby hrozí poškození povrchu, které m že nep ízniv ovlivnit životnost spot ebi e a p ípadn být i zdrojem rizika. Mikrovlnná trouba je ur ena pouze na voln stojící...
- Page 102 Tento spot ebi mohou používat d ti od 8 let a osoby s omezenými fyzickými, smyslovými nebo duševními schopnostmi nebo nedostatkem zkušeností a znalostí, pokud jsou tyto osoby pod dohledem nebo byly ádn pou eny ohledn použití spot ebi e bezpe ným zp sobem a chápou možná...
- Page 103 D ti musejí být pod dozorem, aby si se spot ebi em nehrály. Upozorn ní: Pokud za ízení pracuje v kombinovaném režimu, je doporu eno, aby d ti kv li vysoké teplot užívaly troubu jen pod dohledem dosp lých. ...
-
Page 104: Nádobí Do Mikrovlnné Trouby
Á Í É Á Í É Použité nádobí musí být vhodné pro použití v mikrovlnné troubě. Materiály, které můžete v mikrovlnné troubě použít Nádobí Poznámky k daným předmětům Hliníková fólie Pouze pro zakrytí. Lze použít tenkou a hladkou fólii jako ochranu tenkých kousků masa nebo drůbeže a k zabránění ... -
Page 105: Další Užitečné Pokyny
Materiály, kterých se v mikrovlnné troubě vyvarovat Nádobí Poznámky k daným předmětům Hliníkový podnos Může způsobit jiskření. Vložte jídlo do nádoby vhodné pro mikrovlnné trouby. Karton na Může způsobit jiskření. Vložte jídlo do nádoby vhodné pro potraviny s mikrovlnné trouby. kovovou rukojetí Kovové nádobí Kov působí jako štít proti mikrovlnné energii. Kovové okraje nebo nádobí mohou způsobit jiskření. s kovovými prvky Kovové spony Může způsobit jiskření a obsah může vzplanout. Papírové tašky Obsah může vzplanout. Molitan Molitan se může vlivem vysokých teplot rozpustit nebo kontaminovat tekutinu uvnitř. Dřevo Dřevo při použití v mikrovlnné troubě vysychá a může se rozpadnout. POZNÁMKY: Při odstraňování nádobí anebo otočného skleněného talíře buďte opatrní, protože může být po ohřevu horké. Používejte pouze teploměr, který je určen pro použití v mikrovlnné troubě. Během používání trouby musí být otočný talíř na svém místě. Š Í Ž... -
Page 106: Přehled Trouby
POZNÁMKA: Vzduch, který vychází z otvorů během vaření, může být teplý. Hnědnutí: Některá jídla se vaří jen krátkou dobu, takže nestačí zhnědnout a bude zde potřeba je ještě povařit. Na kotlety, masové placičky anebo kousky kuřete můžete použít přípravky, které napomáhají zhnědnutí pokrmu jako je paprika nebo worcestrová omáčka. Pečeně, drůbež anebo šunka ohřívané po delší dobu než 10 ‐ 15 minut zhnědnou bez použití dalších přípravků. Ř Ř Názvy součástí trouby A. Ovládací panel B. Hřídel C. Otočný prstenec D. Skleněný podnos E. Okénko ve dvířkách F. Sestava dvířek ... -
Page 107: Ovládací Panel
Ovládací panel Mikrovlnné vaření Stiskněte pro nastavení výkonu mikrovlnné trouby. Gril/Kombi. Stiskněte opakovaně pro výběr programu grilování nebo jednoho kombinovaného programu ohřevu. Konvekční vaření Stisknutím nastavíte konvekční vaření. Hmotnost/Doba rozmrazování Stiskněte pro rozmrazování potraviny podle hmotnosti nebo času. Hodiny/Kuchyňský časovač Stiskněte pro nastavení hodin nebo časovače. Stop/Vymazat • Stiskněte jednou pro přerušení vaření nebo dvakrát pro jeho zrušení. •... -
Page 108: Instalace Mikrovlnné Trouby
É É Odstraňte všechny balící materiály a Vestavěný spotřebič: Odstraňte veškeré příslušenství. Zkontrolujte, zda není ochranné fólie na povrchu skříně trouba poškozená, prohnutá nebo zda trouby. nejsou poškozená dvířka. Nepoužívejte ... -
Page 109: Obsluha
zapojení trouby zásuvky displeji zobrazí „0:00“ ozve zvukový signál. Nastavení času 1. V klidovém stavu stiskněte pro nastavení času ve 24 hodinovém cyklu. Číslice hodin začnou blikat. 2. Otáčejte ovladačem , dokud se nezobrazí správná hodina. ... -
Page 110: Grilování
Grilování Maximální doba ohřevu je 95 minut (95:00). Grilování je vhodné zejména pro tenké plátky masa, steaky, kotlety, kebab, klobásy a kousky kuřecího masa. Je rovněž vhodné pro horké sendviče a zapečené pokrmy. 1. Stiskněte jednou . Na displeji se zobrazí „G‐1“. 2. Stiskněte pro potvrzení. 3. Otáčením nastavte dobu grilování. 4. Stiskněte pro spuštění vaření. POZNÁMKA: Po uplynutí poloviny doby grilování se ozve dvojí pípnutí. Pro dosažení lepšího efektu grilování byste měli připravované jídlo otočit, zavřít dvířka a stisknout pro pokračování ve vaření. Pokud neprovedete žádnou akci, grilování bude pokračovat. Kombinovaná příprava jídla Maximální doba ohřevu je 95 minut (95:00). Tato funkce umožňuje kombinovat grilování, mikrovlnné vaření, nebo konvekci ve čtyřech různých nastaveních. 1. Stiskněte jednou . Na displeji se zobrazí „G‐1“. 2. Několikrát stiskněte ... -
Page 111: Konvekční Vaření
Konvekční vaření Konvekční vaření umožňuje připravovat jídlo jako v tradiční troubě. Mikrovlny se nepoužívají. Před vložením pokrmu se doporučuje troubu předehřát na vhodnou teplotu. Při konvekčním vaření cirkuluje horký vzduch v prostoru trouby, aby rychle a rovnoměrně opekl potraviny tak, aby byly křupavé. Tuto troubu lze naprogramovat na deset různých teplot vaření (100°C~190°C). 1. Stiskněte jednou a na displeji bude blikat „100“. 2. Několikrát stiskněte nebo otáčejte pro nastavení požadované teploty. 3. Stiskněte pro potvrzení. 4. Stiskněte pro spuštění předehřevu. dosažení... -
Page 112: Auto Menu
Auto Menu Pro potraviny uvedené v následující tabulce nemusíte nastavovat výkon ani dobu přípravy. Postupujte takto: 1. V klidovém režimu otáčejte ve směru hodinových ručiček a vyberte požadované menu z níže uvedené tabulky. 2. Stiskněte pro potvrzení. 3. Otáčejte a zvolte hmotnost jídla. 4. Stiskněte pro spuštění vaření. Menu Hmotnost (g) Výkon A1 300 100% Mikrovlnka/ Pizza 100% Gril 400 230 A2 460 ... -
Page 113: Rychlá Příprava Jídla
POZNÁMKA: Pokud vyberete A9 Koláč, koláč nevkládejte do trouby, dokud není předehřátá na 160°C. Zvukový signál Vás upozorní, že můžete koláč vložit do trouby. Stiskněte pro spuštění vaření. Rychlá příprava jídla V klidovém stavu stiskněte a ohřívejte jídlo na 100 % výkonu po dobu 30 sekund. Každé stisknutí tlačítka zvýší dobu ohřevu o 30 sekund. Maximální doba vaření je 95 minut. Během mikrovlnného ohřevu, grilování, konvekčního a kombinovaného vaření každé stisknutí zvýší dobu vaření o 30 sekund. POZNÁMKA: Čas přípravy nelze prodloužit v režimech auto menu a rozmrazování s uvedením hmotnosti stisknutím tlačítka. Dětský zámek Dětský zámek zabraňuje malým dětem v ovládání mikrovlnné trouby bez dozoru dospělých. Dětský zámek se nastavuje stiskem na 3 vteřiny, dokud se neozve dlouhý zvukový signál a na displeji se nezobrazí „ “. Troubu s nastaveným dětským zámkem nelze používat. Chcete‐li zrušit dětskou pojistku, stiskněte ... - Page 114 Č Š Ě Í Ú Ž Č Š Ě Í Ú Ž Před čištěním odpojte troubu od elektrického napájení. Běžné rady Pravidelným čištěním předejdete vzniku kouře a zápachu během ohřívání a rovněž jiskření vevnitř trouby a okolo těsnění dvířek. Uvnitř trouby nebo v těsnění dvířek se nesmějí hromadit zbytky jídla nebo tuk. Pokud je Vaše mikrovlnná trouba vybavena krytem vlnovodu (obvykle je umístěn uvnitř trouby na pravé boční straně), měl by být udržován v čistotě. Zbytky jídla anebo tuk by se mohly na krytu hromadit, způsobit jiskření a troubu zničit, což by mělo za následek neplatnost záruky. Před každou údržbou nebo čištěním odpojte troubu od elektrické sítě a počkejte, až vychladne na pokojovou teplotu. Dvířka trouby Je důležité udržovat vnitřek trouby a oblast těsnění v čistotě, proto vlhkým hadříkem odstraňte všechny zbytky jídla anebo tuku. ...
-
Page 115: Specifikace
UPOZORNĚNÍ: Některé kryty vlnovodu lze snadno poškodit. Dávejte při čištění pozor. Nemyjte příslušenství v myčce. Čištění povrchů, které přicházejí do styku s potravinami Z hygienických důvodů je nutné skleněný talíř pravidelně čistit, protože přichází do styku s potravinami. Měl by se čistit teplou mýdlovou vodou a důkladně osušit. Pokud vnitřek trouby a těsnění dvířek nebudou udržovány v dokonalé čistotě, hrozí nebezpečí poškození v důsledku jiskření ve vnitřním prostoru trouby, což povede k neplatnosti záruky. Nikdy neškrábejte stěny trouby ostrými předměty. Jmenovité napětí a frekvence: 230 V ~ 50 Hz Jmenovitý příkon (mikrovlnná trouba): 1300W Jmenovitý příkon (gril/konvekce): 1200W Mikrovlnná frekvence: 2450 MHz ... -
Page 116: Odstraňování Problémů
Ň Á Í É Ů Ň Á Í É Ů Normální jevy Mikrovlnná trouba ruší televizní Zapnutá mikrovlnná trouba může ovlivnit příjem. příjem rozhlasového a televizního vysílání. Je to podobné jako v případě malých elektrických spotřebičů, jako jsou mixér, vysavač či elektrický ventilátor. Jedná se o běžné chování. Slabé světlo trouby Při použití programu s nízkým výkonem se může intenzita světla zeslabit. Jedná se o běžné chování. Na dvířkách kondenzuje pára, z Při vaření může z jídla vycházet pára. Většina z větracích otvorů vychází horký ní unikne otvory. Někdy však může dojít k vzduch jejímu kondenzování například na dvířkách. Jedná se o běžné chování. Provoz trouby bez vloženého Je zakázáno provozovat tento spotřebič bez pokrmu. vloženého jídla určeného k ohřevu. Je to velmi NEBEZPEČNÉ. ... - Page 117 OBSAH VAROVANIE .......................... 2 - 5 DÔLEŽITÉ BEZPEČNOSTNÉ POKYNY...................6 RIAD DO MIKROVLNNEJ RÚRY ....................7 ĎALŠIE UŽITOČNÉ POKYNY....................8 PREHĽAD RÚRY ........................9 Názvy súčastí rúry .........................9 Točňa..........................10 Ovládací panel ........................11 INŠTALÁCIA MIKROVLNNEJ RÚRY ..................12 OBSLUHA ..........................12 Nastavenie času ........................12 Mikrovlnné varenie ......................12 Grilovanie ...........................13...
-
Page 118: Varovanie
UPOZORNENIA DÔLEŽITÉ BEZPE NOSTNÉ POKYNY PRE ÍTAJTE SI TIETO POKYNY A USCHOVAJTE ICH NA BUDÚCE POUŽITIE Toto zariadenie bolo navrhnuté iba na používanie v domácnosti a nesmie by používané na žiadny iný ú el ani aplikáciu, ako napríklad na iné než domáce používanie alebo používanie v obchodnom prostredí. - Page 119 V prípade ohrievania potravín v plastových alebo papierových obaloch obsah mikrovlnnej rúry vizuálne kontrolujte, lebo hrozí riziko vznietenia. Mikrovlnná rúra je ur ená na ohrev potravín a nápojov. Sušenie potravín alebo odevu, ohrev tepelných vložiek, papú , špongií, vlhkých handri iek a podobne môže vies k vzniku rizika úrazu, vznietenia alebo požiaru.
- Page 120 V prípade zne istenia rúry hrozí poškodenie povrchu, ktoré môže nepriaznivo ovplyvni životnos spotrebi a a prípadne by aj zdrojom rizika. Mikrovlnná rúra je ur ená len na vo ne stojacu inštaláciu. Zariadenie nesmie by nainštalované ako zabudovaný spotrebi . Pre podrobnosti týkajúce sa istenia tesnení...
- Page 121 ne bude dozerané alebo budú inštruované oh adne použitia zariadenia bezpe ným spôsobom a rozumejú možným rizikám. Deti sa nesmú hra so zariadením. istenie a užívate skú údržbu nesmú vykonáva deti. Deti staršie ako 8 rokov tak môžu kona len s dozorom. Uchovávajte prístroj aj kábel mimo dosahu detí...
-
Page 122: Dôležité Bezpečnostné Pokyny
Ô Ž É Č É Ô Ž É Č É Ak sa mikrovlnná rúra vypne, nie je odpojená od sieťového napájania. Na to je potrebné vytiahnuť zástrčku zo zásuvky napájania. Hlavným vypínačom prístroja je sieťová zástrčka, ktorá musí byť neustále dostupná. Vďaka zabudovaným bezpečnostným prvkom nie je možné mikrovlnnú rúru spustiť s otvorenými dvierkami. Pri používaní mikrovlnnej rúry s otvorenými dvierkami sa môžete vystaviť škodlivému pôsobeniu mikrovlnného žiarenia. Je zakázané akokoľvek manipulovať s mechanizmom dvierok. Nedopustite, aby sa do rúry vetracími otvormi dostala voda alebo iné kvapaliny. Medzi čelnú stranu a dvierka nevkladajte žiadne predmety a vyvarujte sa zanášania tesniacich plôch nečistotami či zvyškami čistiacich prostriedkov. Nepoužívajte nádoby s rovnými stenami a úzkym hrdlom. Premiešajte tekutinu pred vložením nádoby do rúry a potom znovu v polovici času ohrevu. Po ohriatí chvíľu počkajte, obsah premiešajte, pretrepte a starostlivo skontrolujte ... -
Page 123: Riad Do Mikrovlnnej Rúry
Ú Ú Použitý riad musí byť vhodný na použitie v mikrovlnnej rúre. Materiály, ktoré môžete v mikrovlnnej rúre použiť Riad Poznámky k daným predmetom Hliníková fólia Iba na zakrytie. Je možné použiť tenkú a hladkú fóliu ako ochranu tenkých kúskov mäsa alebo hydiny a na zabránenie ich spáleniu. Ak sa fólia dostane príliš blízko k stenám rúry, môže sa objaviť iskrenie. Fólia by sa nemala dostať bližšie než 2,5 cm od stien rúry. Zapekacia misa Postupujte v súlade s pokynmi výrobcu. Dno zapekacej misy musí byť najmenej 5 mm nad otáčacím tanierom. V prípade nesprávneho použitia hrozí rozbitie taniera. Riad Vhodné na použitie v mikrovlnnej rúre. Postupujte v súlade s pokynmi výrobcu. Nepoužívajte prasknuté či inak poškodené nádoby. Sklenené nádoby Vždy odoberte veko. Používajte iba na ohrev jedla, kým nie je teplé. Väčšina pohárov nie je tepelne odolná a môže prasknúť. Sklenený riad Používajte iba nádoby z varného skla. Na nádobách nesmie byť žiadna kovová lišta. Nepoužívajte prasknuté či inak poškodené nádoby. Vrecúška na Postupujte v súlade s pokynmi výrobcu. Neuzatvárajte kovovou ... -
Page 124: Ďalšie Užitočné Pokyny
Materiály, ktoré v mikrovlnnej rúre nepoužívať Riad Poznámky k daným predmetom Hliníkový podnos Môže spôsobiť iskrenie. Vložte jedlo do nádoby vhodnej pre mikrovlnné rúry. Kartón na Môže spôsobiť iskrenie. Vložte jedlo do nádoby vhodnej pre potraviny s mikrovlnné rúry. kovovou rukoväťou Kovový riad alebo Kov pôsobí ako štít proti mikrovlnnej energii. Kovové okraje riad môžu spôsobiť iskrenie. s kovovými prvkami Kovové spony Môžu spôsobiť iskrenie a obsah sa môže vznietiť. Papierové tašky Obsah sa môže vznietiť. Molitan Molitan sa môže vplyvom vysokých teplôt rozpustiť alebo kontaminovať tekutinu vnútri. Drevo Drevo pri použití v mikrovlnnej rúre vysychá a môže sa rozpadnúť. POZNÁMKY: Pri odstraňovaní riadu alebo otočného skleneného taniera buďte opatrní, pretože môžu byť po ohreve horúce. Používajte iba teplomer, ktorý je určený na použitie v mikrovlnnej rúre. Počas používania rúry musí byť otočný tanier na svojom mieste. Ď Š ... -
Page 125: Prehľad Rúry
POZNÁMKA: Vzduch, ktorý vychádza z otvorov počas varenia, môže byť teplý. Hnednutie: Niektoré jedlá sa nevaria dostatočne dlho, takže nestačia zhnednúť a bude potrebné ich ešte dovariť. Na kotlety, mäsové placky alebo kúsky kurčaťa môžete použiť prípravky, ktoré napomáhajú zhnednutiu pokrmu, ako je paprika alebo worcesterská omáčka. Pečené mäso, hydina alebo šunka ohrievané dlhšie ako 10 – 15 minút zhnednú bez použitia ďalších prípravkov. Ľ Ú Ľ Ú Názvy súčastí rúry A. Ovládací panel B. Hriadeľ C. Otáčací prstenec D. Sklenený podnos E. Priezor F. Zostava dvierok G. Bezpečnostný uzatvárací mechanizmus ... -
Page 126: Ovládací Panel
Ovládací panel Mikrovlnné varenie Stlačte na nastavenie výkonu mikrovlnnej rúry. Gril/Kombi. Stlačte opakovane na výber programu grilovania alebo jedného kombinovaného programu ohrevu. Konvekčné varenie Stlačením nastavíte konvekčné varenie. Hmotnosť/Čas rozmrazovania Stlačte na rozmrazovanie potraviny podľa hmotnosti alebo času. Hodiny/Kuchynský časovač Stlačte na nastavenie hodín alebo časovača. Stop/Vymazať • Stlačte raz na dočasné prerušenie varenia alebo dvakrát na jeho zrušenie. • Používa sa tiež na nastavenie detskej zámky. ... -
Page 127: Inštalácia Mikrovlnnej Rúry
Š Á Ú Š Á Ú Odstráňte všetky baliace materiály a Skrinka rúry: Odstráňte všetky ochranné ... -
Page 128: Obsluha
Po zapojení rúry do zásuvky sa na displeji zobrazí „0:00“ a ozve sa zvukový signál. Nastavenie času 1. V pohotovostnom stave stlačte pre nastavenie hodín do 24‐hodinového cyklu.Číslice hodín začnú blikať. 2. Otáčajte ovládačom , pokiaľ sa nezobrazí správna hodina. 3. Stlačte na potvrdenie. Číslice minút začnú blikať. 4. Otáčajte , pokiaľ sa nezobrazí správna minúta. 5. Stlačte na potvrdenie nastavenia. Na displeji bude blikať „:“. POZNÁMKA: Ak nenastavíte čas, rúra po zapnutí nebude fungovať. Počas varenia môžete skontrolovať nastavený čas stlačením . Mikrovlnné varenie 1. -
Page 129: Grilovanie
Grilovanie Maximálny čas ohrevu je 95 minút (95:00). Grilovanie je vhodné najmä na tenké plátky mäsa, steaky, kotlety, kebab, klobásy a kúsky kuracieho mäsa. Je tiež vhodné pre horúce sendviče a zapečené pokrmy. 1. Stlačte raz a na displeji sa zobrazí „G‐1“. 2. Stlačte na potvrdenie. 3. Otáčajte pre nastavenie doby grilovania. 4. Stlačte na spustenie varenia. POZNÁMKA: Po uplynutí polovice času grilovania sa ozve dvojité pípnutie. Na dosiahnutie lepšieho efektu grilovania by ste mali pripravované jedlo otočiť, zavrieť dvierka a stlačiť na pokračovanie vo varení. Ak nevykonáte žiadnu akciu, grilovanie bude pokračovať. Kombinovaná príprava jedla Maximálny čas ohrevu je 95 minút (95:00). Táto funkcia umožňuje kombinovať grilovanie, mikrovlnné varenie a konvekciu v štyroch rôznych nastaveniach. 1. Stlačte raz a na displeji sa zobrazí „G‐1“. 2. Opakovane stláčajte alebo otočte ... -
Page 130: Konvekčné Varenie
Konvekčné varenie Konvekčné varenie umožňuje pripravovať jedlo ako v tradičnej rúre. Mikrovlny sa nepoužívajú. Pred vložením pokrmu sa odporúča rúru predhriať na vhodnú teplotu. Pri konvekčnom varení cirkuluje horúci vzduch v priestore rúry, aby rýchlo a rovnomerne opiekol potraviny tak, aby boli chrumkavé. Túto rúru je možné naprogramovať na desať rôznych teplôt varenia (100°C ~ 190°C). 1. Raz stlačte a na displeji bude blikať „100“. 2. Opakovane stláčajte alebo otáčajte pre nastavenie požadovanej teploty. 3. Stlačte na potvrdenie. 4. Stlačte na zapnutie predhrievania. Po dosiahnutí nastavenej teploty sa dvakrát ozve zvukový signál na pripomenutie vloženia jedla do rúry. 5. -
Page 131: Auto Menu
Auto Menu Pre potraviny uvedené v nasledujúcej tabuľke nemusíte nastavovať výkon ani čas prípravy. Postupujte takto: 1. V pohotovostnom stave otáčajte v smere hodinových ručičiek a vyberte požadovaný kód ponuky z nižšie uvedenej tabuľky. 2. Stlačte na potvrdenie. 3. Otáčaním nastavte hmotnosť jedla. 4. Stlačte na spustenie varenia. Menu Hmotnosť (g) Vvýkon A1 300 100% Mikrovlnka/ Pizza 400 100% Gril 230 A2 460 100% Mikrovlnka Zemiaky 690 200 300 ... -
Page 132: Rýchla Príprava Jedla
POZNÁMKA: Ak vyberiete A9 Koláč, koláč nevkladajte do rúry, kým nie je predhriata na 160°C. Zvukový signál vás upozorní, že môžete koláč vložiť do rúry. Stlačte na spustenie varenia. Rýchla príprava jedla V pokojovom stave stlačte na ohrievanie jedla pri 100 % výkone počas 30 sekúnd. Každé stlačenie tlačidla zvýši čas ohrevu o 30 sekúnd. Maximálny čas varenia je 95 minút. Počas mikrovlnného varenia, grilovania, konvekčného ohrevu a kombinovaného varenia každé stlačenie zvýši dobu varenia o 30 sekúnd. POZNÁMKA: V automatickej ponuke a pri rozmrazovaní s uvedením hmotnosti nie je možné zvýšiť dobu varenia stlačením tlačidla. Detská zámka Detská zámka zabraňuje malým deťom v ovládaní mikrovlnnej rúry bez dozoru dospelých. Detská zámka sa nastavuje stlačením na 3 sekundy, potom sa ozve dlhý zvukový signál a na displeji sa zobrazí “ ”. Rúru s nastavenou detskou zámkou nie je možné používať. ... -
Page 133: Čistenie A Údržba
Č Ú Ž Č Ú Ž Pred čistením odpojte rúru od elektrického napájania. Bežné rady Pravidelným čistením predídete vzniku dymu a zápachu počas ohrievania a tiež iskreniu vnútri rúry a okolo tesnenia dvierok. Vnútri rúry alebo v tesnení dvierok sa nesmú hromadiť zvyšky jedla alebo tuk. Ak je vaša mikrovlnná rúra vybavená krytom vlnovodu (zvyčajne je umiestnený vnútri rúry na pravej bočnej strane), mal by byť udržiavaný v čistote. Zvyšky jedla alebo tuku by sa mohli na kryte hromadiť, spôsobiť iskrenie a rúru zničiť, čo by malo za následok neplatnosť záruky. Pred každou údržbou alebo čistením odpojte rúru od elektrickej siete a počkajte, až vychladne na izbovú teplotu. Dvierka rúry Je dôležité udržiavať vnútro rúry a oblasť tesnenia v čistote, preto vlhkou handričkou odstráňte všetky zvyšky jedla alebo tuku. Na čistenie skla dvierok rúry nepoužívajte agresívne abrazívne čistiace prostriedky ani ostré kovové škrabky, pretože by mohli povrch poškrabať a tým spôsobiť rozbitie skla. Vnútorné steny ... -
Page 134: Technické Údaje
Tanier očistite teplou mydlovou vodou a dôkladne osušte. Ak vnútro rúry a tesnenie dvierok nebudú udržiavané v dokonalej čistote, hrozí nebezpečenstvo poškodenia v dôsledku iskrenia vo vnútornom priestore rúry, čo bude mať za následok zrušenie platnosti záruky. Nikdy neškrabte steny rúry ostrými predmetmi. É Ú É Ú Menovité napätie a frekvencia: 230 V ~ 50 Hz Menovitý príkon (mikrovlnka): 1300W Menovitý príkon (gril/konvekcia): 1200W Mikrovlnná frekvencia: 2450MHz ... -
Page 135: Odstraňovanie Problémov
Ň É Ň É Normálne javy Mikrovlnná rúra ruší televízny Zapnutá mikrovlnná rúra môže ovplyvniť príjem. príjem rozhlasového a televízneho vysielania. Je to podobné ako v prípade malých elektrických spotrebičov, ako sú mixér, vysávač či elektrický ventilátor. Ide o bežné správanie. Slabé svetlo rúry Pri použití programu s nízkym výkonom sa môže intenzita svetla zoslabiť. Ide o bežné správanie. Na dvierkach kondenzuje para, Pri varení môže z jedla vychádzať para. Väčšina z vetracích otvorov vychádza z nej unikne otvormi. Niekedy však môže dôjsť horúci vzduch k jej kondenzovaniu napríklad na dvierkach. Ide o bežné správanie. Náhodné zapnutie rúry bez Je zakázané používať tento spotrebič bez vloženého pokrmu. vloženého jedla určeného na ohrev. Je to veľmi NEBEZPEČNÉ. Problém Možná príčina Riešenie Napájací kábel nie je Odpojte spotrebič a ...
Need help?
Do you have a question about the CBS23 and is the answer not in the manual?
Questions and answers