
Subscribe to Our Youtube Channel
Related Manuals for Viavi FVAm Series


Summary of Contents for Viavi FVAm Series
- Page 1 FVAm™ Series Benchtop MPO Autofocus Microscope User Guide 22132675 Rev. 101, Standard July 2019...
- Page 2 VIAVI standard terms and conditions, available at www.viavisolutions.com/terms. Warranty VIAVI warrants this equipment to be free of defects in material and workmanship for one (1) calendar year from the date of purchase. Any mishandling or unauthorized repairs will void this warranty. For additional warranty terms and conditions, see www.viavisolutions.com/terms.
- Page 3 VIAVI has established a take-back processes in compliance with the EU Waste Electrical and Electronic Equipment (WEEE) Directive, 2012/19/EU, and the EU Battery Directive, 2006/66/EC. Instructions for returning waste equipment and batteries to VIAVI can be found in the WEEE section of the VIAVI Policies &...
- Page 4 China RoHS materials declaration “ RoHS” (Additional Information required for the Chinese Market only) RoHS : FVAm™ Series Benchtop MPO Autofocus Microscope (Product Family) (Pb) (Hg) (Cd) (PBB) (PBDE) (Component) (Main Product) (PCB Assemblies) (Internal wiring) (Display) (Keyboard) (Batteries) (Power Supply) (Electro-mechanical parts) (Hard Drive) (Optical modules) / (Auxiliary modules)
-
Page 5: Table Of Contents
Contents Overview .............................1-1 FiberChekPRO Fiber Inspection and Analysis software ..............1-2 Ordering information.......................... 1-3 Technical Assistance Center and Knowledge Base ................1-3 Getting started ..........................2-1 FVAm microscope features......................... 2-2 Auto Focus/Inspection Trigger and microscope LEDs ..............2-3 Powering the FVAm microscope......................2-4 Using FMAG adapters ......................... - Page 6 Starting a Pass/Fail test from the FVAm microscope ................. 3-5 Editing the active optical setting ......................3-6 Editing the active optical setting using FiberChekPRO..............3-6 Editing the active optical setting using the touchscreen and onboard controls......3-7 Managing custom connector definitions.................... 3-9 Creating a custom connector definition..................
- Page 7 About this guide This guide provides information about the FVAm™ Series Benchtop MPO Autofocus Microscope. Revision history Revision Date Details July 2019 Revised reference to IEC-61300-3-35-Ed. 2.0 in “Setting up Pass/Fail tests.” April 2019 This document is released. To access the latest version of this user guide, go to: http://fcpro.updatemyunit.net/archives/FCPRO/User_Guide_FVAm.pdf FVAm™...
-
Page 8: Overview
Inspection of fiber optic interconnects is essential for the optimal performance and longevity of fiber optic networks. Every time they are handled, fiber connectors must be inspected to ensure no debris or damage is present. VIAVI has made this critical task easier than ever with the FVAm™ Series Benchtop MPO Autofocus Microscope. -
Page 9: Fiberchekpro Fiber Inspection And Analysis Software
Figure 1-3: FiberChekPRO - Pass/Fail test results, MPO fiber connector Note: This user guide provides information about using FiberChekPRO with FVAm Series Benchtop MPO Autofo- cus Microscopes. For detailed information about the features and navigation tools of the software, refer to the FiberChekPRO Automated Fiber Inspection and Analysis Software User Manual, which you can access from the FiberChekPRO Help menu. -
Page 10: Ordering Information
Technical Assistance Center and Knowledge Base To find the Technical Assistance Center phone number and email in your region for the FVAm microscope product or to search the VIAVI Solutions Knowledge Base, visit the VIAVI Solutions Technical & Product Support site at support.viavisolutions.com. -
Page 11: Getting Started
2 Getting started This section covers the following information: • “FVAm microscope features” on page 2-2 • “Powering the FVAm microscope” on page 2-4 • “Using FMAG adapters” on page 2-5 • “Connecting fiber connectors and transceiver modules” on page 2-9 •... -
Page 12: Fvam Microscope Features
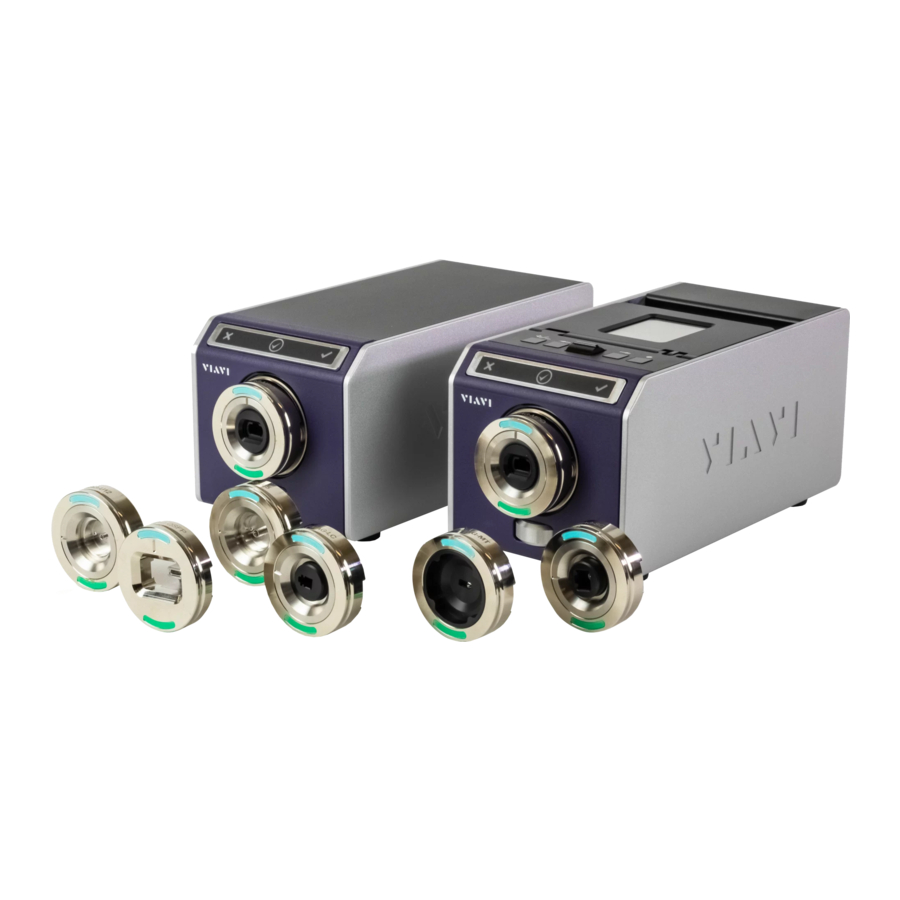
2-17). Figure 2-1: FVAm Series Benchtop MPO Autofocus Microscope - FVAM-1000-S Figure 2-2: FVAm Series Benchtop MPO Autofocus Microscope - rear panel CAUTION Power off the device, and disconnect all cables connected to it before moving the device or performing maintenance procedures. -
Page 13: Auto Focus/Inspection Trigger And Microscope Leds
Getting started FVAm microscope features Auto Focus/Inspection Trigger and microscope LEDs The Auto Focus/Inspection Trigger button lets you automatically focus a live view of fiber end faces (see “Panning and auto-focusing in live view” on page 2-16). You can also use this button to start a Pass/Fail test (see “Starting a Pass/Fail test from the FVAm microscope”... -
Page 14: Powering The Fvam Microscope
Getting started Powering the FVAm microscope Powering the FVAm microscope Step 1 Place the microscope on a flat, stable surface in a location close to an appropriate power source. Step 2 Connect the power adapter to the receptacle on the rear panel of the microscope and then to the power source. -
Page 15: Using Fmag Adapters
(PC) connectors and angled (APC) connectors, facilitating the process of setting up the microscope to inspect different types of fiber and fiber end faces. For more information about FMAG adapters, refer to the VIAVI Solutions Fiber Tips and Adapters Selection Guide. Table 2-2: FMAG adapters... -
Page 16: Adapter Features
Getting started Using FMAG adapters Adapter features An FMAG adapter adheres to the magnetic adapter plate at the front of the FVAm microscope by magnetic force only. A part number is etched on each FMAG adapter at the top of the side ring. Aqua and green markings at the front of the adapter identify the correct orientation for mounting it, as well as the correct adapter position for connector inspection. -
Page 17: Mounting And Positioning An Adapter
Getting started Using FMAG adapters Mounting and positioning an adapter Step 1 If present, remove the lens cap from the adapter plate: ▪ Firmly grasp the lens cap on each side and pull it straight back. ▪ Store the lens cap in a dust-proof container. Step 2 Holding the adapter with the part number and aqua marking at the top, place it on the magnetic adapter plate so that rounded posts of the plate are aligned with the corresponding recesses on the back of the... -
Page 18: Removing An Adapter
Getting started Using FMAG adapters Removing an adapter Important: Always replace an FMAG adapter with either the lens cap or another adapter. Replace with the lens cap whenever the FVAm microscope will not be used for an extended period of time (several days or weeks). -
Page 19: Connecting Fiber Connectors And Transceiver Modules
Getting started Connecting fiber connectors and transceiver modules Connecting fiber connectors and transceiver modules The FVAm microscope is designed to perform Pass/Fail tests on MPO fiber connectors and transceiver modules (QSFPs and CFPs) with MT ferrules. Connecting a fiber connector Step 1 Mount and position the correct FMAG adapter for the fiber connector onto the microscope. -
Page 20: Connecting A Qsfp Or Cfp Transceiver Module With Mt Ferrule
Getting started Connecting fiber connectors and transceiver modules Connecting a QSFP or CFP transceiver module with MT ferrule ELECTROSTATIC DISCHARGE (ESD) Risk of damage to pluggable module Wear a properly fitted electrostatic discharge (ESD) strap and work in an ESD-controlled area when handling pluggable transceivers. -
Page 21: Connecting To Fiberchekpro
Getting started Connecting to FiberChekPRO Connecting to FiberChekPRO To operate an FVAm microscope that does not feature a touchscreen display module, you must use the FiberChekPRO Automated Fiber Inspection and Analysis software. For an FVAm microscope with a touchscreen, most operations can be performed using either the touchscreen plus onboard controls or FiberChekPRO. However, some operations, such as firmware updates, can be performed only via FiberChekPRO. -
Page 22: Touchscreen Display Module And Onboard Controls
Getting started Touchscreen display module and onboard controls Touchscreen display module and onboard controls The FVAm microscope model FVAM-1000-S features a touchscreen display module and onboard controls. You can perform a broad range of operations—including setting up and starting Pass/Fail tests—using the touchscreen (see “Settings menu”... -
Page 23: Settings Menu
Getting started Touchscreen display module and onboard controls Settings menu The touchscreen features a Settings menu with selectable options for operating the FVAm microscope. You can access the menu, scroll through it, and select and enable options either by tapping the touchscreen using your finger or a tablet stylus or by using the onboard controls (see Table 2-3). -
Page 24: Focus-Quality Meter
Getting started Touchscreen display module and onboard controls Focus-quality meter By default, a color meter appears in a live view to indicate focus quality as you manually adjust the focus on the FVAm microscope or use the Auto Focus/Trigger Inspection button to auto-focus the live view. Green indicates that the focus quality is suitable for inspection;... -
Page 25: Calibrating The Touchscreen
Getting started Touchscreen display module and onboard controls Calibrating the touchscreen If touchscreen controls (such as menu options, keyboard keys, and icons) of the FVAm microscope do not respond as expected, you can calibrate the active areas of the touchscreen. Notes: •... -
Page 26: Panning And Auto-Focusing In Live View
Getting started Panning and auto-focusing in live view Panning and auto-focusing in live view After you connect a fiber cable to the FVAm microscope, you can view live images of the fiber connector on the FiberChekPRO Inspection page and, if available, the touchscreen. Notes: •... -
Page 27: Digital Panning
Getting started Panning and auto-focusing in live view Digital panning When a high-magnification live view of a fiber connector is displayed, you can use the left and right arrow icons in the image pane of the FiberChekPRO Inspection page to digitally pan the immediate area around a fiber end. On an FVAm microscope with a touchscreen, you can digitally pan using either the Pan Left and Pan Right onboard controls or the left and right arrow icons on the touchscreen. -
Page 28: Auto-Focusing A Live View
Getting started Panning and auto-focusing in live view Auto-focusing a live view You can automatically focus a live view of the fiber end faces displayed on either the FiberChekPRO Inspection page or the touchscreen. To start the auto-focus process in FiberChekPRO, click the Auto Focus image control. To start the auto focus process from the FVAm microscope, press the Auto Focus/Inspection Trigger button. -
Page 29: Setting Up Pass/Fail Tests
Getting started Setting up Pass/Fail tests Setting up Pass/Fail tests The FVAm microscope provides factory-set options you can use to set up Pass/Fail tests. Factory-set options cover the following parameters: • Analysis profiles, which define Pass/Fail thresholds for fiber types •... -
Page 30: Setting Up Pass/Fail Tests Using Fiberchekpro
Getting started Setting up Pass/Fail tests Setting up Pass/Fail tests using FiberChekPRO Step 1 Connect the FVAm microscope to FiberChekPRO. Click the Inspection tab to access options for the FVAm microscope. Step 2 Step 3 Select options from the following drop-down lists (see “Setting up Pass/Fail tests”... -
Page 31: Adding User Information
Getting started Adding user information Adding user information User information (for example, customer name, location, job ID, connector ID) appears on reports generated when the results of Pass/Fail tests are saved or transferred to a computer. You can add user information using either FiberChekPRO or, if available, the touchscreen. -
Page 32: Adding User Information Using The Touchscreen
Getting started Adding user information Adding user information using the touchscreen On the Settings menu, select USER INFO. Step 1 Select an option in the USER INFO sub-menu, and then type the corresponding information using the Step 2 touchscreen keyboard. Select OK to return to the USER INFO sub menu. -
Page 33: Setting Up Groups For Pass/Fail Test Results
Getting started Setting up groups for Pass/Fail test results Setting up groups for Pass/Fail test results On an FVAm microscope with a touchscreen display module, you can create groups for results saved to the microscope after Pass/Fail tests. Organizing results in groups is helpful when you need to review fiber-analysis images saved to the microscope. -
Page 34: Performing Pass/Fail Tests And Working With Saved Test Results
3 Performing Pass/Fail tests and working with saved test results This section covers the following topics: • “Requirements for Pass/Fail tests” on page 3-2 • “Starting a Pass/Fail test from FiberChekPRO” on page 3-3 • “Starting a Pass/Fail test from the FVAm microscope” on page 3-5 •... -
Page 35: Requirements For Pass/Fail Tests
Performing Pass/Fail tests and working with saved test results Requirements for Pass/Fail tests Requirements for Pass/Fail tests Pass/Fail tests inspect fiber connectors against preconfigured pass criteria for the active analysis profile. You can start a Pass/Fail test from either FiberChekPRO or, if available, the onboard controls on the FVAm microscope. Notes: •... -
Page 36: Starting A Pass/Fail Test From Fiberchekpro
FiberChekPRO is installed, or navigate to another location on the computer. The default folder is located at C:\Users\userName\Documents\Viavi\FiberChekPRO\Archives\FVAm-deviceID\YYYYMMDD. FVAm™ Series Benchtop MPO Autofocus Microscope User Guide 22132675 Rev. 101, Standard, 3-3... - Page 37 Performing Pass/Fail tests and working with saved test results Starting a Pass/Fail test from FiberChekPRO The report is generated and appears in a separate window. Step 6 Close the report window when you have finished viewing the information. You can access the saved report later for viewing or sharing by navigating to the location where the report is stored.
-
Page 38: Starting A Pass/Fail Test From The Fvam Microscope
Performing Pass/Fail tests and working with saved test results Starting a Pass/Fail test from the FVAm microscope Starting a Pass/Fail test from the FVAm microscope Note: The images used in this procedure show a Pass/Fail test performed on an MPO fiber connector. Step 1 Review “Requirements for Pass/Fail tests”... -
Page 39: Editing The Active Optical Setting
Performing Pass/Fail tests and working with saved test results Editing the active optical setting Editing the active optical setting Different manufacturers use different ferrule materials and polishing processes; consequently, connectors can appear very different from one another. When necessary, you can use either FiberChekPRO or, if available, the touchscreen and onboard controls to modify the active optical setting to better suit the fiber connectors you are testing. -
Page 40: Editing The Active Optical Setting Using The Touchscreen And Onboard Controls
Performing Pass/Fail tests and working with saved test results Editing the active optical setting When the lighting adjustment is completed, use the Crosshair Position tool to align the red crosshairs to Step 8 the edges of the fiber. Click OK. Step 9 —... - Page 41 Performing Pass/Fail tests and working with saved test results Editing the active optical setting Step 4 To adjust the sizing, position the blue circle until it is just inside the fiber edge. Press the Manual Focus/Navigation button up or down, or move the touchscreen slider to the left or right.
-
Page 42: Managing Custom Connector Definitions
Performing Pass/Fail tests and working with saved test results Managing custom connector definitions Managing custom connector definitions FiberChekPRO provides tools that let you create customized connector definitions and make them available to the FVAm microscope for Pass/Fail tests. You can create custom connector definitions based on new definition settings or on copies of existing connector definitions. -
Page 43: Recalling Fiber Analysis Images
Performing Pass/Fail tests and working with saved test results Recalling fiber analysis images Recalling fiber analysis images On an FVAm microscope with a touchscreen display module, you can view fiber analysis images for any set of results saved to the microscope after a Pass/Fail test. On the Settings menu, select RECALL IMAGE, and then select the either the group name where the set of Step 1 results were added or the connector ID assigned to the set of results. -
Page 44: Managing Data Stored On The Fvam Microscope
16x1 16x2 To ensure that Pass/Fail test results saved to the FVAm microscope are retained for your records, VIAVI strongly recommends regularly importing them to a computer using FiberChekPRO. A test report for each set of results is automatically generated when results are imported. Also, you can delete data from the microscope as part of the import operation or separately. -
Page 45: Deleting Stored Test Data
Performing Pass/Fail tests and working with saved test results Managing data stored on the FVAm microscope Step 2 Select the import options you require: ▪ Import only new data: To import only the test data acquired after the last import operation. ▪... - Page 46 Performing Pass/Fail tests and working with saved test results Managing data stored on the FVAm microscope Click Yes to confirm the operation. Step 3 The delete operation starts, and a progress dialog indicates when the operation is completed. Click OK. Step 4 —...
-
Page 47: Appendix A Touchscreen Settings Menu
Appendix A Touchscreen Settings menu This section covers the following information: • “Connector Setup” on page A-2 • “Create New Group” on page A-2 • “User Info” on page A-2 • “Recall Image” on page A-2 • “Edit Optical Settings” on page A-2 •... -
Page 48: Connector Setup
Appendix A Touchscreen Settings menu Connector Setup “Setting up Pass/Fail tests” on page 2-19. Create New Group “Setting up groups for Pass/Fail test results” on page 2-23. User Info “Adding user information” on page 2-21. Recall Image “Recalling fiber analysis images” on page 3-10. -
Page 49: System Settings
0 to 59 AF Calibration Recalibrate lens auto-focus. This feature should only be used at the direction of VIAVI support. Panmotor Calibration Recalibrate the motor used to pan the FVAm microscope lens between fibers. This feature should only be used at the direction of VIAVI support. - Page 50 Appendix A Touchscreen Settings menu Screen Brightness Set the brightness of the built-in screen to 100% (default), 80%, 60%, 40%, or 20%. USB Connect Mode Full Speed Set the USB connection to operate at USB 2.0 speed. High Speed Set the USB connection to operate at USB 1.1 speed. Auto (default) Set the USB connection to operate at the highest speed available.
-
Page 51: Appendix B Firmware Update
Appendix B Firmware update FiberChekPRO facilitates firmware management by identifying available firmware update versions for each device it supports, including FVAm Series Benchtop MPO Autofocus Microscopes. Updating the firmware Step 1 Connect the FVAm microscope to FiberChekPRO. If the FVAm microscope is running an earlier firmware version and FiberChekPRO is set up to automatically check for updates at startup, the New Firmware dialog appears on the Import page of the FiberChekPRO application window, prompting you to download the updated firmware to your computer. - Page 52 Appendix B Firmware update ▪ In the FiberChekPRO Setup dialog, click Download for the Sidewinder/FVAm model. ▪ When the download is completed, click OK in the FiberChekPRO Setup navigation pane to return to the Import page. On the Setup menu, select the microscope. Step 2 Step 3.
- Page 53 Appendix B Firmware update In the Firmware Update dialog, click Next to view available language packs. Select the check box for each Step 4 pack you want to enable, and then click Update. Note: Enabling multiple language packs increases the amount of time the firmware update requires. Click Update to start the update.
-
Page 54: Appendix C System Reset
Important: VIAVI strongly recommends that you refer to the document Standardizing Device Firmware information about the system reset process, including limitations, before you perform this procedure. - Page 55 Appendix C System reset Step 3. On the Setup page for the microscope, select the Firmware option in the navigation pane, and then click System Reset. Note: The System Reset button is available only while the firmware version installed on the FVAm microscope is either the same version defined by the system-reset threshold or a later version.
- Page 56 Appendix C System reset When the system reset is successfully completed, click OK to reboot the FVAm microscope. Step 6 After the microscope reboots, it automatically reconnects to FiberChekPRO. — End — FVAm™ Series Benchtop MPO Autofocus Microscope User Guide 22132675 Rev.
- Page 57 FVAm™ Series Benchtop MPO Autofocus Microscope User Guide 22132675 Rev. 101, Standard July 2019 English VIAVI Solutions Inc. 6001 America Center Drive, 6th Floor San Jose, CA 95002 North America: (Toll Free) 1-844-GO-VIAVI / 1-844-468-4284 All Other Regions: www.viavisolutions.com/contacts...
Need help?
Do you have a question about the FVAm Series and is the answer not in the manual?
Questions and answers